Custom Tools
Create tools that let agents query your Supabase database directly for message history and user preferences.
Integrate Letta with Supabase to build a production-ready full-stack AI chat application with persistent storage.
Letta manages agent state and conversations, but production applications need persistent storage for chat history, agent metadata, and user data. This guide shows you how to integrate Letta with Supabase to build a complete full-stack application.
You’ll build a chat application where users create AI agents, configure their personalities, and have conversations that persist to a database. By the end, you’ll have a working application that uses Letta for agent runtime and Supabase for data storage.
Here’s what we’ll build:
We’ll cover:
The complete code is available on GitHub.
To follow this guide, you need:
We’ll use JavaScript and Express for the backend, and vanilla JavaScript for the frontend.
Create a new directory for your project:
mkdir letta-supabase-appcd letta-supabase-appCreate the following folder structure:
mkdir -p server/{config,routes,services}mkdir -p client/{components,services}Your project structure should look like this:
letta-supabase-app/├── server/│ ├── config/│ ├── routes/│ └── services/└── client/ ├── components/ └── services/We’ll build the backend first, then the frontend. This structure keeps Letta integration (server) separate from the user interface (client).
We’ll need API keys for Letta and Supabase to connect our application.
Create a Letta Account
If you don’t have one, sign up for a free account at letta.com.
Navigate to API Keys
Once logged in, click on API keys in the sidebar.
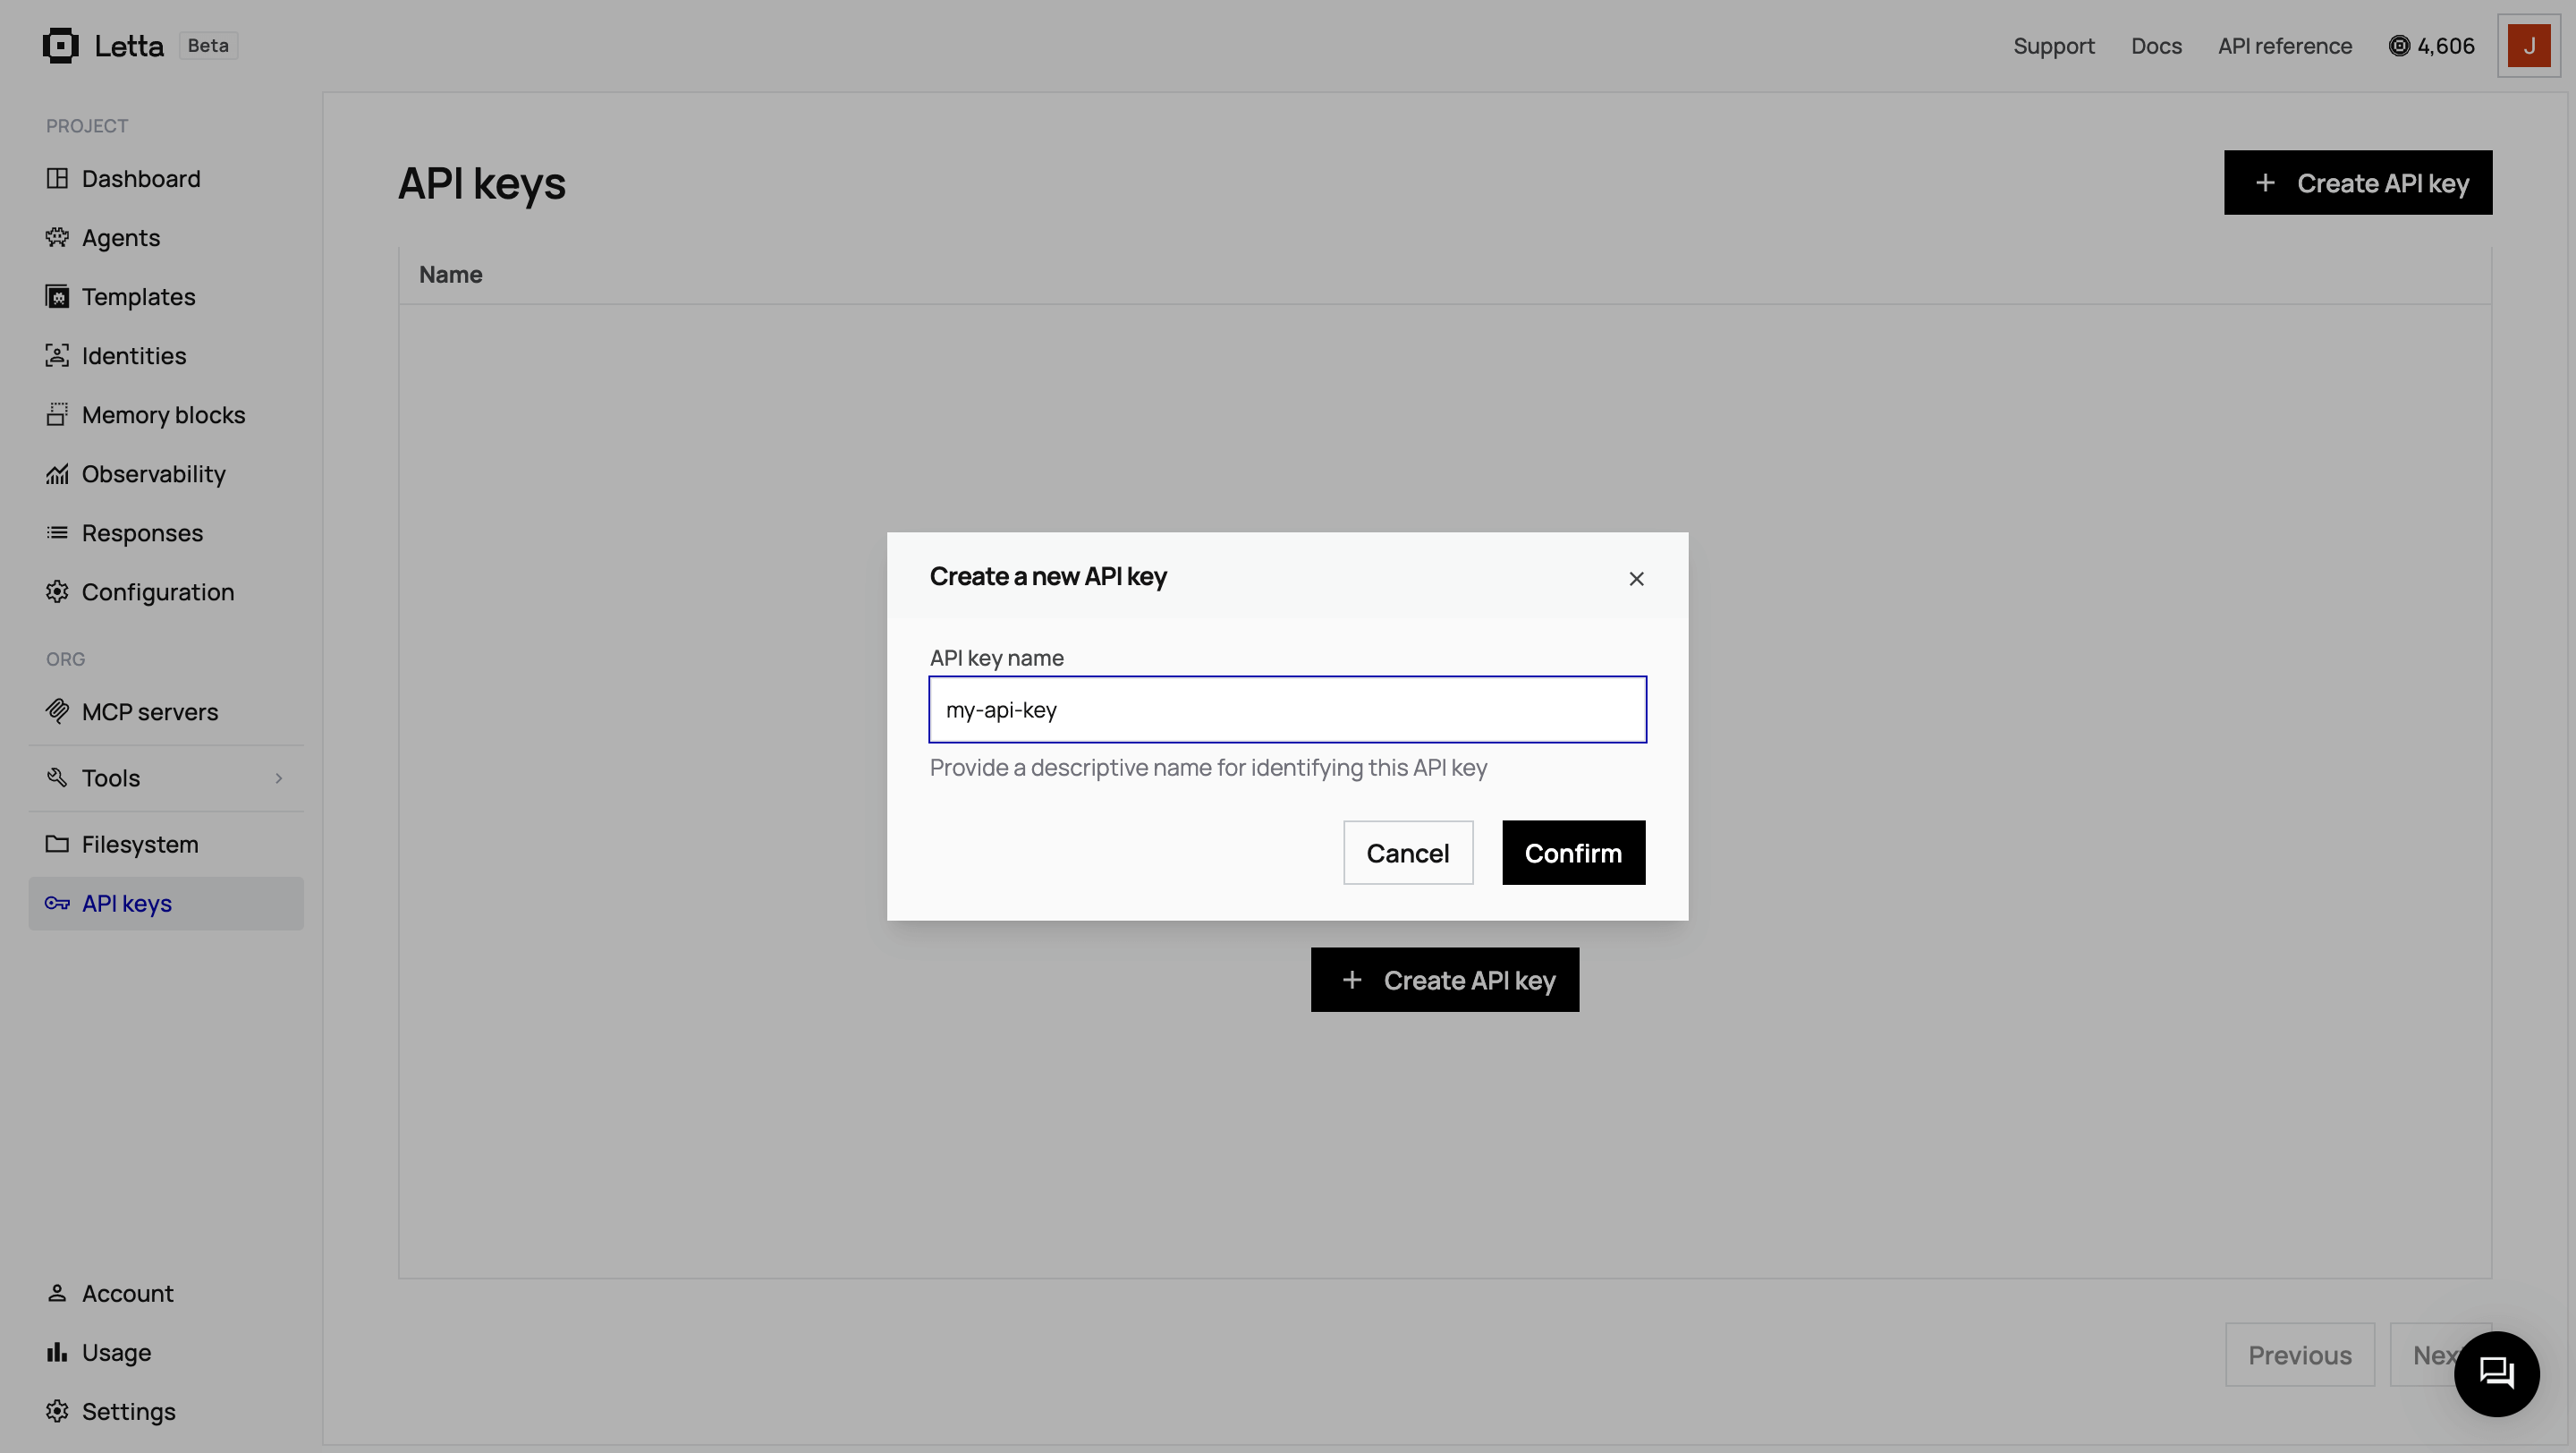
Create and Copy Your Key
Click + Create API key, give it a descriptive name, and click Confirm. Copy the key and save it somewhere safe.
Create a Supabase Project
Go to your Supabase dashboard and click + New project. Choose a project name, database password, and region. Wait for the project to finish setting up (this takes about two minutes).
Get Your API Credentials
Once your project is ready, click Connect in the top navigation, then select the App Frameworks tab. You’ll see your connection details:
Copy the values (not the environment variable names) for:
NEXT_PUBLIC_SUPABASE_URL=NEXT_PUBLIC_SUPABASE_PUBLISHABLE_DEFAULT_KEY=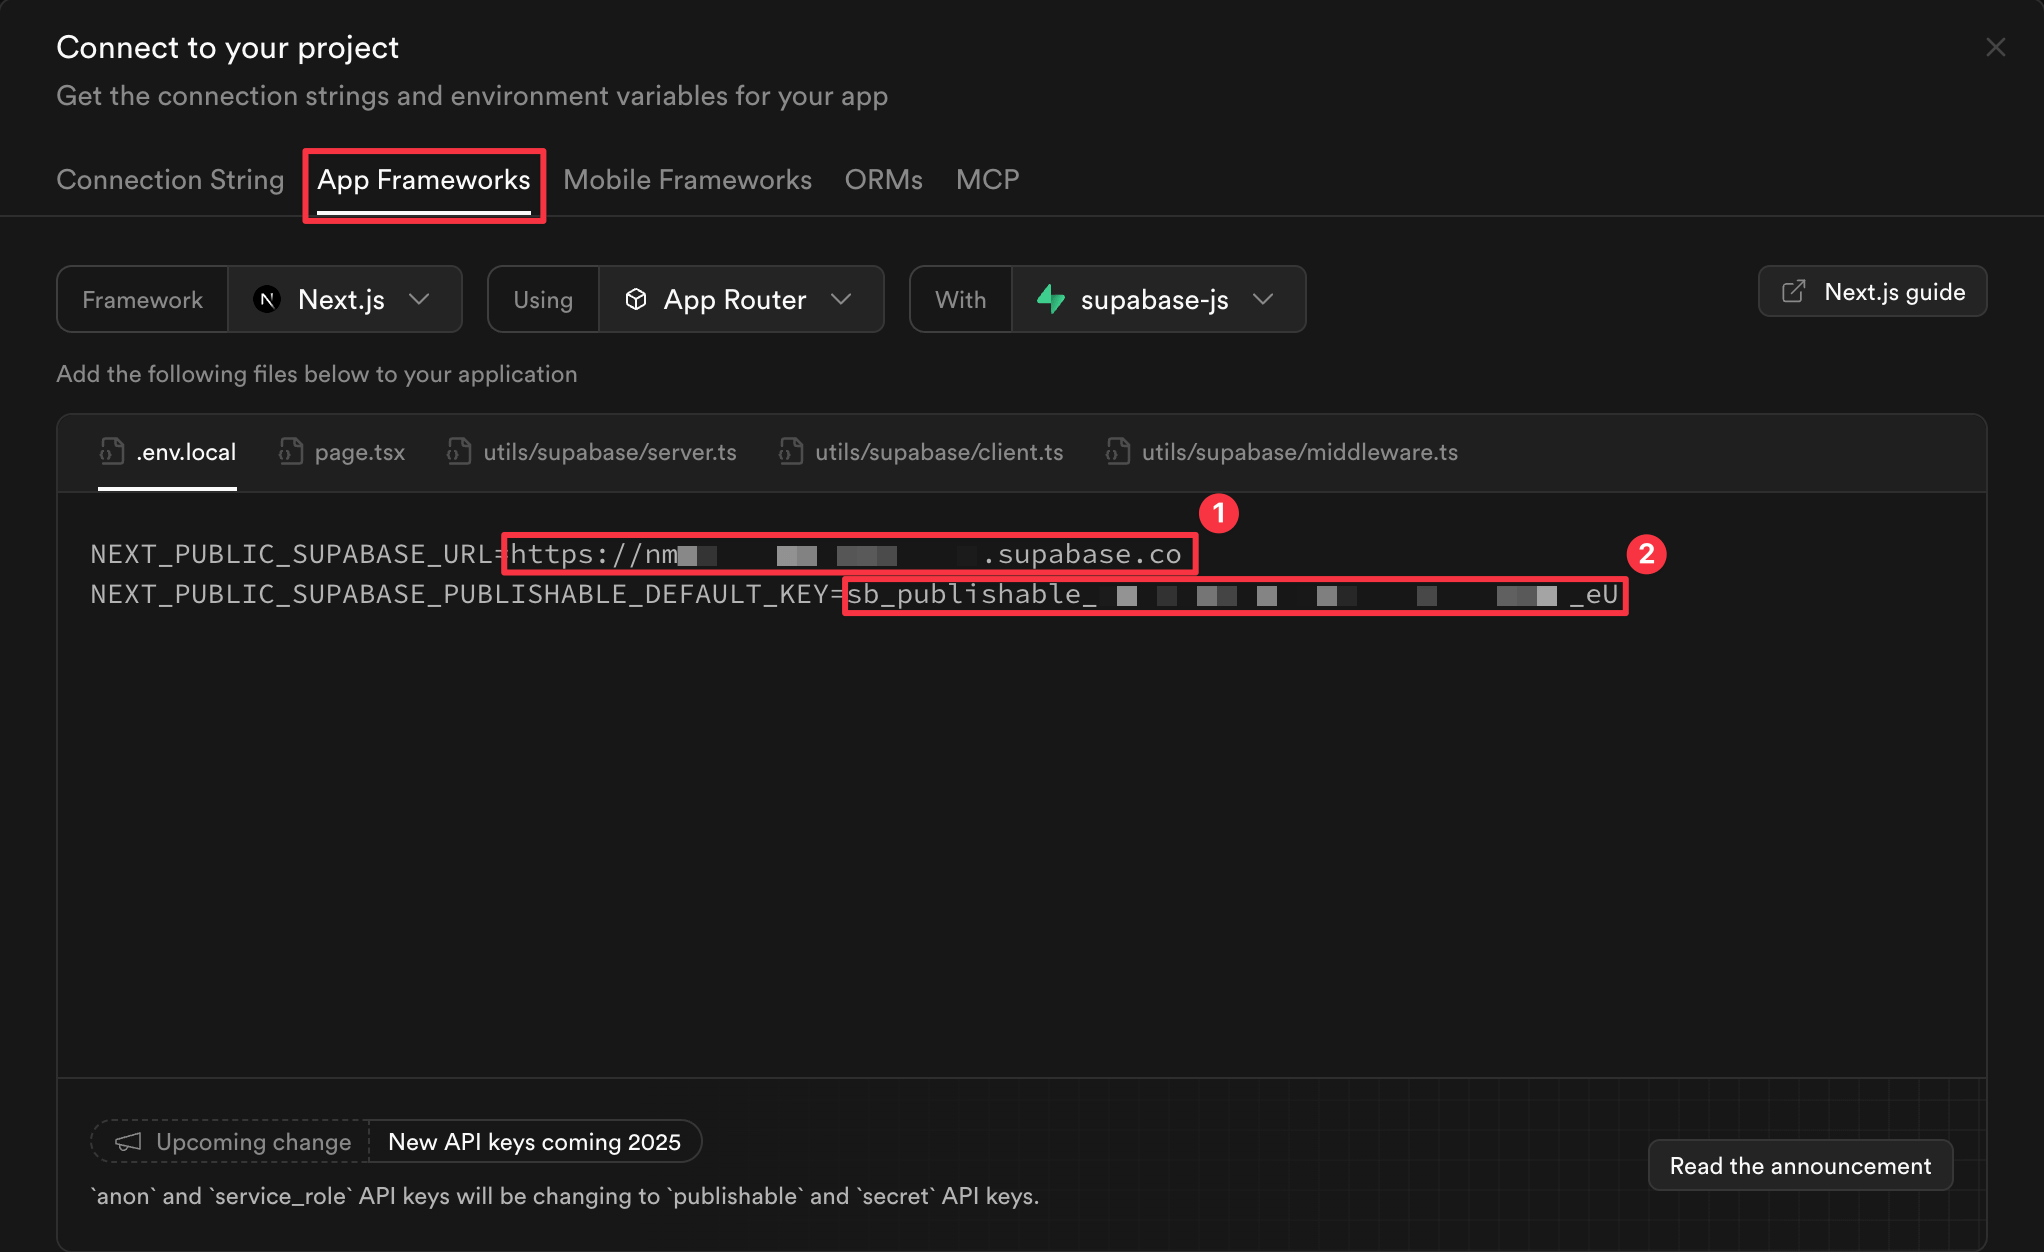
You’ll need both to configure your application.
In the server/ directory, create a .env file:
LETTA_API_KEY=your_letta_api_key_hereLETTA_PROJECT=default-project
SUPABASE_URL=your_supabase_url_hereSUPABASE_PUBLISHABLE_KEY=your_supabase_publishable_key_here
PORT=3000
Replace the placeholder values with your actual keys.
Before we write any code, we need to create the database tables that will store agent metadata and message history.
In your Supabase dashboard, go to the SQL Editor and create a new query. Paste this schema:
-- Table: agents-- Stores metadata about Letta agentsCREATE TABLE agents (  id UUID DEFAULT gen_random_uuid() PRIMARY KEY,  letta_agent_id TEXT NOT NULL UNIQUE,  name TEXT NOT NULL,  persona TEXT,  human_block TEXT,  model TEXT NOT NULL DEFAULT 'openai/gpt-4o-mini',  created_at TIMESTAMP WITH TIME ZONE DEFAULT NOW());
-- Table: messages-- Stores chat messages between users and agentsCREATE TABLE messages (  id UUID DEFAULT gen_random_uuid() PRIMARY KEY,  agent_id UUID NOT NULL REFERENCES agents(id) ON DELETE CASCADE,  letta_message_id TEXT,  role TEXT NOT NULL CHECK (role IN ('user', 'assistant', 'system')),  content TEXT NOT NULL,  created_at TIMESTAMP WITH TIME ZONE DEFAULT NOW());
-- Indexes for performanceCREATE INDEX idx_messages_agent_id ON messages(agent_id);CREATE INDEX idx_messages_created_at ON messages(created_at DESC);
Run the query. You should see “Success. No rows returned” in the results panel.
This schema separates concerns between Letta and Supabase:
The agents table tracks which agents exist and their configurations. The messages table stores every message exchanged. The ON DELETE CASCADE constraint ensures that when you delete an agent, all its messages are automatically deleted.
Navigate to the server/ directory and initialize a Node.js project:
cd servernpm init -yInstall the required packages:
npm install express cors dotenv @letta-ai/letta-client @supabase/supabase-jsHere’s what each package does:
express - Web framework for our REST APIcors - Enables the frontend to call the backend from a different origindotenv - Loads environment variables from the .env file@letta-ai/letta-client - Official Letta SDK for JavaScript/TypeScript@supabase/supabase-js - Supabase client for database operationsOpen package.json and add "type": "module" to enable ES6 module syntax:
... "version": "1.0.0", "type": "module", // Edit this line "main": "server.js",...Create two configuration files that initialize the Letta and Supabase clients. These files will be imported throughout the application.
Create server/config/letta.js:
import Letta from '@letta-ai/letta-client';import dotenv from 'dotenv';
dotenv.config();
const config = {  baseURL: process.env.LETTA_BASE_URL || 'https://api.letta.com',};
if (process.env.LETTA_API_KEY) {  config.apiKey = process.env.LETTA_API_KEY;}
export const client = new Letta(config);
console.log(`Letta client initialized: ${config.baseURL}`);
The Letta client connects to the Letta API using your API key. The project parameter organizes your agents into workspaces.
Create server/config/supabase.js:
import { createClient } from '@supabase/supabase-js';import dotenv from 'dotenv';
dotenv.config();
const supabaseUrl = process.env.SUPABASE_URL;const supabaseKey = process.env.SUPABASE_PUBLISHABLE_KEY;
if (!supabaseUrl || !supabaseKey) {  throw new Error('Missing Supabase environment variables');}
export const supabase = createClient(supabaseUrl, supabaseKey);
console.log('Supabase client initialized');
The Supabase client handles all database operations. We’re using the publishable key which works on both client and server. For production apps that need to bypass Row Level Security, you’d use the service role key instead (server-only).
The service layer separates business logic from API routes. We’ll create two services: one for Letta operations and one for Supabase operations. Letta manages agent runtime and conversations, while Supabase stores persistent data.
The Letta service handles agent creation, message sending, and agent deletion. These operations interact with the Letta API through the SDK.
Create server/services/lettaService.js and start by importing the Letta client we configured earlier:
import { client } from '../config/letta.js';Now we’ll build the function that creates Letta agents. Start with the function signature and extract the configuration parameters:
export async function createLettaAgent(config) { const { name, persona, humanBlock, model } = config;The config object contains the agent’s name, personality instructions, user information, and which LLM model to use.
Next, we’ll create the agent using Letta’s SDK.
const agent = await client.agents.create({ name: name || 'Agent', model: model || 'openai/gpt-4o-mini', embedding: 'openai/text-embedding-3-small', memory_blocks: [The model parameter determines which LLM processes the agent’s responses. Letta supports multiple providers including OpenAI, Anthropic, and Groq. The embedding parameter specifies which model generates vector embeddings for the agent’s memory system.
Memory blocks are persistent text blocks that the agent references during every conversation. We’ll configure two memory blocks:
{ label: 'persona', value: persona || 'I am a helpful AI assistant.', limit: 5000 },The persona block is injected into every conversation, telling the agent how to behave. The limit parameter controls how much text the block can hold—5000 characters is usually sufficient for most personality configurations.
Add the second memory block—the human block. This stores information about the user:
{ label: 'human', value: humanBlock || 'User information not yet provided.', limit: 5000 } ] });Letta uses the human block to maintain context about who it’s talking to. As conversations progress, the agent can update this block to remember details about the user.
Complete the function by logging the agent ID and returning the agent:
console.log(`Created Letta agent: ${agent.id}`); return agent;}Next, we’ll build the function that sends messages to agents. Add this function below createLettaAgent:
export async function sendMessageToAgent(agentId, content) {  const response = await client.agents.messages.create(agentId, {    messages: [{ role: 'user', content }]  });
  console.log(`Sent message to agent ${agentId}`);  return response;}
This function takes an agent ID and message content, sends it to Letta, and returns the agent’s response. Letta processes the message using the agent’s configured memory blocks and model, then generates a response that maintains conversation context.
Finally, add the deletion function:
export async function deleteLettaAgent(agentId) { await client.agents.delete(agentId); console.log(`Deleted Letta agent: ${agentId}`);}This removes the agent from Letta, including all its memory and conversation state.
Your complete lettaService.js file now handles the three core operations: creating agents with memory blocks, sending messages, and cleaning up agents when they’re no longer needed.
The Supabase service handles database operations for agents and messages. This is where we persist data that needs to survive beyond a single session.
Create server/services/supabaseService.js and import the Supabase client:
import { supabase } from '../config/supabase.js';We’ll start by building the function that stores agent metadata in Supabase. After creating an agent in Letta, we need to store its configuration in our database so we can track which agents exist and link them back to Letta.
Add the createAgent function:
export async function createAgent(agentData) {  const { lettaAgentId, name, persona, humanBlock, model } = agentData;
  const { data, error } = await supabase    .from('agents')    .insert([{      letta_agent_id: lettaAgentId,      name,      persona,      human_block: humanBlock,      model    }])    .select()    .single();
  if (error) throw new Error(`Failed to store agent: ${error.message}`);
  console.log(`Stored agent in Supabase: ${data.id}`);  return data;}
The letta_agent_id field links our Supabase record to the agent in Letta. When we need to send messages to the agent later, we’ll look up this ID to know which Letta agent to target.
Next, add the function to retrieve all agents:
export async function getAgents() {  const { data, error } = await supabase    .from('agents')    .select('*')    .order('created_at', { ascending: false });
  if (error) throw new Error(`Failed to fetch agents: ${error.message}`);  return data;}
This returns agents sorted by creation date, with the newest first.
Add the function to delete an agent:
export async function deleteAgent(agentId) {  const { error } = await supabase    .from('agents')    .delete()    .eq('id', agentId);
  if (error) throw new Error(`Failed to delete agent: ${error.message}`);  console.log(`Deleted agent from Supabase: ${agentId}`);}
Remember that our database schema includes ON DELETE CASCADE for the messages table. This means when we delete an agent, all its messages are automatically deleted too.
We also need a helper function to get a single agent by ID. Add this function:
export async function getAgentById(agentId) {  const { data, error } = await supabase    .from('agents')    .select('*')    .eq('id', agentId)    .single();
  if (error) throw new Error(`Failed to fetch agent: ${error.message}`);  return data;}
This function will be used by our API routes to look up the letta_agent_id when we need to send messages.
Now we’ll add functions to persist messages. This gives us queryable chat history that lives in Supabase, independent of Letta’s internal conversation state.
Add the function to store a single message:
export async function createMessage(messageData) {  const { agentId, lettaMessageId, role, content } = messageData;
  const { data, error } = await supabase    .from('messages')    .insert([{      agent_id: agentId,      letta_message_id: lettaMessageId,      role,      content    }])    .select()    .single();
  if (error) throw new Error(`Failed to store message: ${error.message}`);  return data;}
We store both user messages and assistant responses. The letta_message_id field is optional, we use it for assistant messages to link back to Letta’s message ID.
When an agent responds, it may generate multiple messages. Add a batch insert function for this:
export async function createMessages(messages) {  const { data, error } = await supabase    .from('messages')    .insert(messages)    .select();
  if (error) throw new Error(`Failed to store messages: ${error.message}`);
  console.log(`Stored ${data.length} messages in Supabase`);  return data;}
This function accepts an array of message objects and inserts them all at once, which is more efficient than making separate database calls.
Finally, add the function to retrieve all messages for an agent:
export async function getMessages(agentId) {  const { data, error } = await supabase    .from('messages')    .select('*')    .eq('agent_id', agentId)    .order('created_at', { ascending: true });
  if (error) throw new Error(`Failed to fetch messages: ${error.message}`);  return data;}
This returns messages in chronological order, so the chat history displays correctly.
Your supabaseService.js file now handles all database operations: storing and retrieving agent metadata, and persisting complete message history. This separation between Letta (agent runtime) and Supabase (data persistence) means Letta manages stateful conversations while Supabase provides queryable long-term storage.
The API routes orchestrate between Letta and Supabase. When an agent is created, we create it in both systems. When a message is sent, we send it to Letta and store the response in Supabase.
Create server/routes/agents.js and start with the imports and router setup:
import express from 'express';import * as lettaService from '../services/lettaService.js';import * as supabaseService from '../services/supabaseService.js';
const router = express.Router();
We import both service layers so we can coordinate operations across Letta and Supabase.
Now we’ll build the route that creates agents. This is where the orchestration happens—we need to create the agent in Letta first, then store its metadata in Supabase.
Add the POST route for agent creation:
router.post('/', async (req, res) => {  try {    const { name, persona, humanBlock, model } = req.body;
    if (!name) {      return res.status(400).json({ error: 'Agent name is required' });    }
We extract the agent configuration from the request body and validate that a name is provided.
Next, create the agent in Letta:
const lettaAgent = await lettaService.createLettaAgent({ name, persona, humanBlock, model: model || 'openai/gpt-4o-mini' });This calls our Letta service to create the agent with its memory blocks. Letta returns an agent object with an id field, we need to store it in Supabase to link the two systems.
Now store the agent metadata in Supabase:
const supabaseAgent = await supabaseService.createAgent({ lettaAgentId: lettaAgent.id, name, persona, humanBlock, model: model || 'openai/gpt-4o-mini' });Notice we pass lettaAgent.id as lettaAgentId. This creates the link between our database record and the Letta agent.
Return the combined data to the client:
res.status(201).json({ id: supabaseAgent.id, lettaAgentId: lettaAgent.id, name: supabaseAgent.name, persona: supabaseAgent.persona, humanBlock: supabaseAgent.human_block, model: supabaseAgent.model, createdAt: supabaseAgent.created_at }); } catch (error) { console.error('Error creating agent:', error); res.status(500).json({ error: error.message }); }});The frontend will use the Supabase ID (supabaseAgent.id) for subsequent operations. The Letta agent ID is stored in the database and retrieved when needed.
Add the GET route to retrieve all agents:
router.get('/', async (req, res) => { try { const agents = await supabaseService.getAgents(); res.json({ agents }); } catch (error) { console.error('Error listing agents:', error); res.status(500).json({ error: error.message }); }});We only query Supabase because that’s where we store the list of agents. We don’t need to call Letta here.
Add the DELETE route:
router.delete('/:id', async (req, res) => { try { const agent = await supabaseService.getAgentById(req.params.id); await lettaService.deleteLettaAgent(agent.letta_agent_id); await supabaseService.deleteAgent(req.params.id); res.json({ success: true }); } catch (error) { console.error('Error deleting agent:', error); res.status(500).json({ error: error.message }); }});We first fetch the agent from Supabase to get the letta_agent_id, then delete from Letta, then delete from Supabase. The database cascade rule automatically deletes all related messages.
Now we’ll build the route that will send messages to Letta agents and store the conversation in Supabase.
Start the POST route for messages:
router.post('/:id/messages', async (req, res) => {  try {    const { id } = req.params;    const { content } = req.body;
    if (!content) {      return res.status(400).json({ error: 'Message content is required' });    }
    const agent = await supabaseService.getAgentById(id);
We get the agent from Supabase using the ID from the URL. This gives us the letta_agent_id we need to send the message to Letta.
Send the message to Letta:
const lettaResponse = await lettaService.sendMessageToAgent( agent.letta_agent_id, content );Letta processes the message using the agent’s memory blocks and model, then returns a response object. The response contains a messages array with the agent’s replies.
Store the user’s message in Supabase:
await supabaseService.createMessage({ agentId: id, lettaMessageId: null, role: 'user', content: content });We store the user’s message first. The lettaMessageId is null for user messages since they don’t originate from Letta.
Now process Letta’s response. Letta returns an array of messages, but we only want to store the assistant’s messages:
    const messagesToStore = lettaResponse.messages      .filter(msg => msg.message_type === 'assistant_message')      .map(msg => ({        agent_id: id,        letta_message_id: msg.id,        role: 'assistant',        content: msg.content || ''      }));
    const storedMessages = await supabaseService.createMessages(messagesToStore);
We filter for assistant_message types and transform them into the format our database expects. Each message includes the Letta message ID for traceability.
Format the response for the frontend:
    const formattedMessages = [      { role: 'user', content: content, createdAt: new Date().toISOString() },      ...storedMessages.map(msg => ({        id: msg.id,        role: msg.role,        content: msg.content,        createdAt: msg.created_at      }))    ];
    res.json({ messages: formattedMessages });  } catch (error) {    console.error('Error sending message:', error);    res.status(500).json({ error: error.message });  }});
We return both the user’s message and the assistant’s responses so the frontend can display them immediately.
Finally, add the GET route to retrieve all messages for an agent:
router.get('/:id/messages', async (req, res) => { try { const messages = await supabaseService.getMessages(req.params.id); res.json({ messages }); } catch (error) { console.error('Error getting messages:', error); res.status(500).json({ error: error.message }); }});This route queries Supabase only. We don’t need to call Letta because we’ve persisted all messages to our database. This keeps message retrieval fast and reduces API calls to Letta.
Export the router at the end of the file:
export default router;Your agents.js file now contains all the routes needed to manage agents and messages.
The Express server loads configuration, sets up middleware, and mounts the API routes.
Create server/server.js:
import express from 'express';import cors from 'cors';import dotenv from 'dotenv';import agentsRouter from './routes/agents.js';
dotenv.config();
const app = express();const PORT = process.env.PORT || 3000;
app.use(cors());app.use(express.json());
app.use('/api/agents', agentsRouter);
app.use((err, req, res, next) => {  console.error('Error:', err);  res.status(500).json({ error: err.message });});
app.listen(PORT, () => {  console.log(`Server running on http://localhost:${PORT}`);});
We enable CORS so the frontend can call the API from a different origin during development. The /api/agents endpoint mounts all the agent routes we created earlier.
Test the server by running:
npm startYou should see:
Letta client initialized: https://api.letta.comSupabase client initializedServer running on http://localhost:3000The backend is complete. We can now create agents, send messages, and retrieve chat history. Next, we’ll build a frontend to interact with these endpoints.
The frontend is a single-page application using vanilla JavaScript. We’ll create an HTML page, an API client service, and components for creating agents and chatting with them.
Create client/index.html:
<!DOCTYPE html><html lang="en"><head>  <meta charset="UTF-8">  <meta name="viewport" content="width=device-width, initial-scale=1.0">  <title>Letta + Supabase Demo</title>  <link rel="stylesheet" href="styles.css"></head><body>  <div id="app">    <header class="header">      <h1>Letta + Supabase Demo</h1>    </header>
    <main class="container">      <div id="creator-view" class="view">        <section class="card">          <h2>Create New Agent</h2>          <form id="agent-form">            <div class="form-group">              <label for="agent-name">Agent Name</label>              <input type="text" id="agent-name" placeholder="e.g., Support Bot" required />            </div>
            <div class="form-group">              <label for="agent-persona">Persona</label>              <textarea id="agent-persona" rows="4"                placeholder="Describe the agent's personality and role"></textarea>            </div>
            <div class="form-group">              <label for="agent-human-block">Human Info</label>              <textarea id="agent-human-block" rows="3"                placeholder="Information about the user"></textarea>            </div>
            <div class="form-group">              <label for="agent-model">Model</label>              <select id="agent-model">                <option value="openai/gpt-4o-mini" selected>GPT-4o Mini</option>                <option value="anthropic/claude-3-5-haiku-20241022">Claude Haiku 4.5</option>                <option value="google_ai/gemini-2.5-flash">Gemini 2.5 Flash</option>              </select>            </div>
            <button type="submit" id="create-btn" class="btn btn-primary">Create Agent</button>          </form>        </section>
        <section class="card">          <h2>Your Agents</h2>          <div id="agents-list" class="agents-list">            <p class="loading">Loading agents...</p>          </div>        </section>      </div>
      <div id="chat-view" class="view" style="display: none;">        <div class="chat-header">          <button id="back-btn" class="btn btn-secondary">← Back</button>          <h2 id="chat-agent-name">Agent Name</h2>        </div>
        <div class="chat-container">          <div id="messages" class="messages">            <p class="loading">Loading chat history...</p>          </div>        </div>
        <form id="message-form" class="message-form">          <input type="text" id="message-input" placeholder="Type your message..." required />          <button type="submit" class="btn btn-primary">Send</button>        </form>      </div>    </main>  </div>
  <script type="module" src="app.js"></script></body></html>
The HTML defines a creator view for managing agents and a chat view for conversations. We use <script type="module"> to enable ES6 imports in the browser.
The API client is a thin wrapper around the browser’s Fetch API. It handles all HTTP requests to our backend and provides clean error handling.
Create client/services/api.js and start by defining the base URL:
const API_BASE_URL = 'http://localhost:3000/api';Now we’ll build the createAgent function . This shows the pattern all our API functions follow:
export async function createAgent(agentData) { const response = await fetch(`${API_BASE_URL}/agents`, { method: 'POST', headers: { 'Content-Type': 'application/json' }, body: JSON.stringify(agentData), });We use the Fetch API to make a POST request. The Content-Type header tells the server we’re sending JSON, and we stringify the agent data into the request body.
Add error handling:
  if (!response.ok) {    const error = await response.json();    throw new Error(error.error || 'Failed to create agent');  }
  return response.json();}
If the response status indicates an error (not in the 200-299 range), we parse the error message from the response and throw it. Otherwise, we return the parsed JSON data.
The remaining API functions follow this same pattern of configuring the fetch request, checking for errors, and returning the data. Add them to the api.js file:
export async function getAgents() {  const response = await fetch(`${API_BASE_URL}/agents`);
  if (!response.ok) {    const error = await response.json();    throw new Error(error.error || 'Failed to fetch agents');  }
  const data = await response.json();  return data.agents;}
export async function deleteAgent(agentId) {  const response = await fetch(`${API_BASE_URL}/agents/${agentId}`, {    method: 'DELETE',  });
  if (!response.ok) {    const error = await response.json();    throw new Error(error.error || 'Failed to delete agent');  }
  return response.json();}
export async function sendMessage(agentId, content) {  const response = await fetch(`${API_BASE_URL}/agents/${agentId}/messages`, {    method: 'POST',    headers: { 'Content-Type': 'application/json' },    body: JSON.stringify({ content }),  });
  if (!response.ok) {    const error = await response.json();    throw new Error(error.error || 'Failed to send message');  }
  return response.json();}
export async function getMessages(agentId) {  const response = await fetch(`${API_BASE_URL}/agents/${agentId}/messages`);
  if (!response.ok) {    const error = await response.json();    throw new Error(error.error || 'Failed to fetch messages');  }
  return response.json();}
Your api.js file now wraps all backend endpoints. Each function returns a promise and throws clear errors if requests fail, keeping the component code clean and focused on UI logic.
Create client/app.js:
import { initAgentCreator } from './components/agentCreator.js';import { initAgentList } from './components/agentList.js';import { initChatInterface } from './components/chatInterface.js';
let currentAgentId = null;
function showCreatorView() {  document.getElementById('creator-view').style.display = 'block';  document.getElementById('chat-view').style.display = 'none';  currentAgentId = null;}
function showChatView(agentId, agentName) {  document.getElementById('creator-view').style.display = 'none';  document.getElementById('chat-view').style.display = 'block';  document.getElementById('chat-agent-name').textContent = agentName;  currentAgentId = agentId;}
document.getElementById('back-btn').addEventListener('click', () => {  showCreatorView();  window.location.reload();});
initAgentCreator(() => {  window.location.reload();});
initAgentList((agentId, agentName) => {  showChatView(agentId, agentName);  initChatInterface(agentId);});
The main app coordinates view switching between the creator and chat views. When a user clicks an agent in the list, we show the chat view and initialize the chat interface for that agent.
The agent creator handles the form for creating new agents.
Create client/components/agentCreator.js:
import { createAgent } from '../services/api.js';
export function initAgentCreator(onAgentCreated) {  const form = document.getElementById('agent-form');  const submitBtn = document.getElementById('create-btn');
  form.addEventListener('submit', async (e) => {    e.preventDefault();
    const name = document.getElementById('agent-name').value;    const persona = document.getElementById('agent-persona').value;    const humanBlock = document.getElementById('agent-human-block').value;    const model = document.getElementById('agent-model').value;
    submitBtn.disabled = true;    submitBtn.textContent = 'Creating...';
    try {      await createAgent({ name, persona, humanBlock, model });      form.reset();      onAgentCreated();    } catch (error) {      alert(`Error: ${error.message}`);    } finally {      submitBtn.disabled = false;      submitBtn.textContent = 'Create Agent';    }  });}
This component collects the agent configuration and calls the API. The persona and humanBlock fields map directly to Letta’s memory blocks. After creating an agent, we reload the agent list.
Create client/components/agentList.js:
import { getAgents, deleteAgent } from '../services/api.js';
export function initAgentList(onAgentClick) {  loadAgents(onAgentClick);}
async function loadAgents(onAgentClick) {  const agentsList = document.getElementById('agents-list');
  try {    const agents = await getAgents();
    if (agents.length === 0) {      agentsList.innerHTML = '<p>No agents yet. Create one above.</p>';      return;    }
    agentsList.innerHTML = agents.map(agent => `      <div class="agent-item">        <div class="agent-info">          <h3>${agent.name}</h3>          <p>${agent.model}</p>        </div>        <div class="agent-actions">          <button class="btn btn-primary btn-sm" data-agent-id="${agent.id}" data-agent-name="${agent.name}">            Chat          </button>          <button class="btn btn-danger btn-sm" data-delete-id="${agent.id}">            Delete          </button>        </div>      </div>    `).join('');
    agentsList.querySelectorAll('[data-agent-id]').forEach(btn => {      btn.addEventListener('click', () => {        onAgentClick(btn.dataset.agentId, btn.dataset.agentName);      });    });
    agentsList.querySelectorAll('[data-delete-id]').forEach(btn => {      btn.addEventListener('click', async () => {        if (confirm('Delete this agent?')) {          await deleteAgent(btn.dataset.deleteId);          loadAgents(onAgentClick);        }      });    });  } catch (error) {    agentsList.innerHTML = `<p class="error">Error: ${error.message}</p>`;  }}
The agent list fetches all agents from Supabase and renders them. Each agent shows a Chat button to open the conversation and a Delete button to remove it from both Letta and Supabase.
The chat interface is where users interact with Letta agents. This component displays the conversation between the user and the agent.
Create client/components/chatInterface.js:
import { getMessages, sendMessage } from '../services/api.js';
export function initChatInterface(agentId) {  loadMessages(agentId);  initMessageForm(agentId);}
async function loadMessages(agentId) {  const messagesDiv = document.getElementById('messages');
  try {    const data = await getMessages(agentId);    const messages = data.messages || [];
    if (messages.length === 0) {      messagesDiv.innerHTML = '<p>No messages yet. Start chatting below.</p>';      return;    }
    messagesDiv.innerHTML = messages.map(msg => {      if (msg.role === 'user') {        return `<div class="message message-user"><p>${msg.content}</p></div>`;      } else if (msg.role === 'assistant') {        return `<div class="message message-assistant"><p>${msg.content}</p></div>`;      }      return '';    }).join('');
    messagesDiv.scrollTop = messagesDiv.scrollHeight;  } catch (error) {    messagesDiv.innerHTML = `<p class="error">Error loading messages: ${error.message}</p>`;  }}
function initMessageForm(agentId) {  const form = document.getElementById('message-form');  const input = document.getElementById('message-input');
  form.addEventListener('submit', async (e) => {    e.preventDefault();
    const content = input.value.trim();    if (!content) return;
    input.value = '';    input.disabled = true;
    const messagesDiv = document.getElementById('messages');
    if (messagesDiv.innerHTML.includes('No messages yet')) {      messagesDiv.innerHTML = '';    }
    messagesDiv.innerHTML += `<div class="message message-user"><p>${content}</p></div>`;    messagesDiv.scrollTop = messagesDiv.scrollHeight;
    try {      const data = await sendMessage(agentId, content);      const messages = data.messages || [];
      messages.slice(1).forEach(msg => {        if (msg.role === 'assistant') {          messagesDiv.innerHTML += `<div class="message message-assistant"><p>${msg.content}</p></div>`;        }      });
      messagesDiv.scrollTop = messagesDiv.scrollHeight;    } catch (error) {      alert(`Error: ${error.message}`);    } finally {      input.disabled = false;      input.focus();    }  });}
The chat interface handles displaying messages from Letta agents. When the agent responds, we display the assistant’s message along with the user’s original message.
Create client/styles.css:
* {  margin: 0;  padding: 0;  box-sizing: border-box;}
body {  font-family: system-ui, sans-serif;  line-height: 1.6;  color: #333;  background: #f5f5f5;}
.header {  background: #fff;  padding: 1rem 2rem;  border-bottom: 1px solid #ddd;}
.container {  max-width: 1200px;  margin: 0 auto;  padding: 2rem;}
.card {  background: #fff;  padding: 2rem;  margin-bottom: 2rem;  border-radius: 8px;  border: 1px solid #ddd;}
.form-group {  margin-bottom: 1rem;}
.form-group label {  display: block;  margin-bottom: 0.5rem;  font-weight: 500;}
.form-group input,.form-group textarea,.form-group select {  width: 100%;  padding: 0.5rem;  border: 1px solid #ddd;  border-radius: 4px;}
.btn {  padding: 0.5rem 1rem;  border: none;  border-radius: 4px;  cursor: pointer;}
.btn-primary {  background: #007bff;  color: #fff;}
.btn-secondary {  background: #6c757d;  color: #fff;}
.agents-list {  display: flex;  flex-direction: column;  gap: 1rem;}
.agent-item {  display: flex;  justify-content: space-between;  align-items: center;  padding: 1rem;  background: #f8f9fa;  border-radius: 4px;}
.agent-actions {  display: flex;  gap: 0.5rem;}
.chat-container {  background: #fff;  border: 1px solid #ddd;  border-radius: 8px;  height: 500px;  overflow-y: auto;  padding: 1rem;  margin-bottom: 1rem;}
.message {  margin-bottom: 1rem;  padding: 0.75rem;  border-radius: 4px;}
.message-user {  background: #e3f2fd;  margin-left: 20%;}
.message-assistant {  background: #f5f5f5;  margin-right: 20%;}
.message-form {  display: flex;  gap: 0.5rem;}
.message-form input {  flex: 1;  padding: 0.5rem;  border: 1px solid #ddd;  border-radius: 4px;}
The CSS is minimal and functional, providing clear visual distinction between user and assistant messages.
We now have a complete full-stack application. Let’s test it end to end.
Start the backend server in the server/ directory:
npm startIn a separate terminal, serve the frontend. Navigate to the client/ directory and use a simple HTTP server.
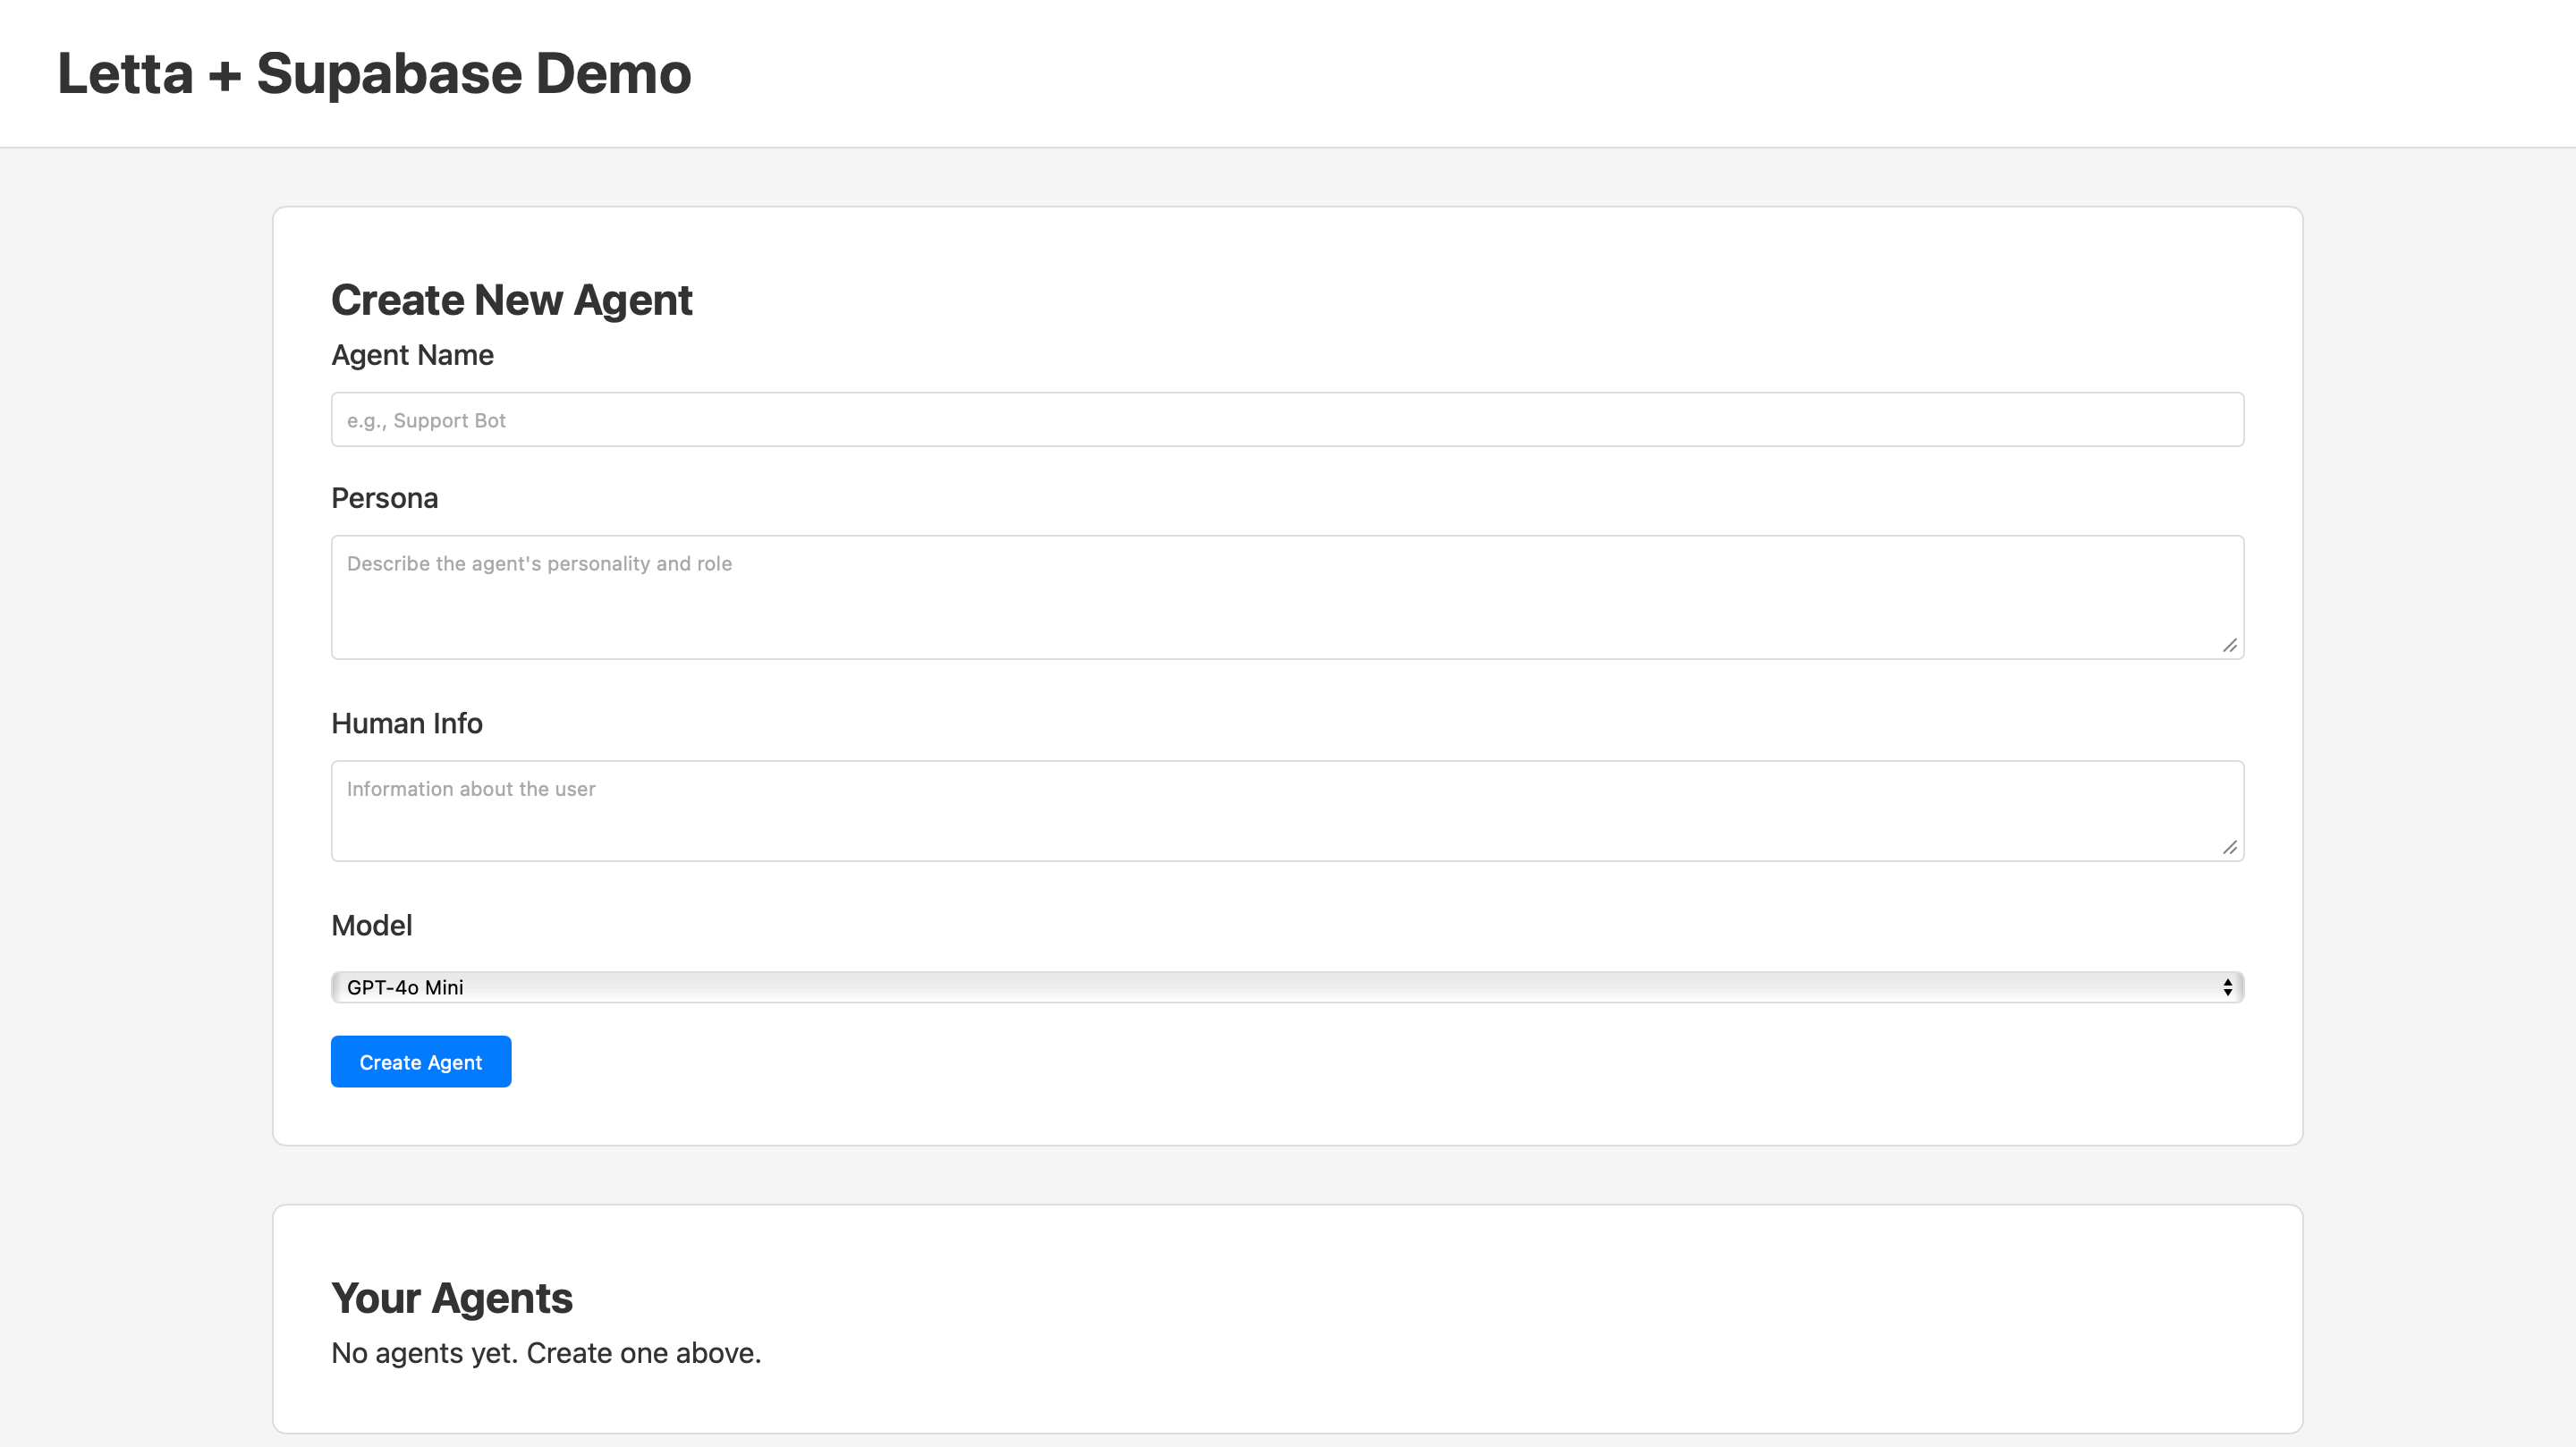
npx http-server -p 8000Open your browser and go to http://localhost:8000. You should see the application:

Fill out the agent creation form:
Click Create Agent. After a moment, your agent appears in the Your Agents list.
Click the Chat button next to your agent. The chat interface opens. Send a message that shares a preference:
I really love the color blue, especially navy blue. I wear it all the time.The agent will acknowledge your preference and update its memory about you. Now ask for advice:
What should I look for when shopping for a new jacket?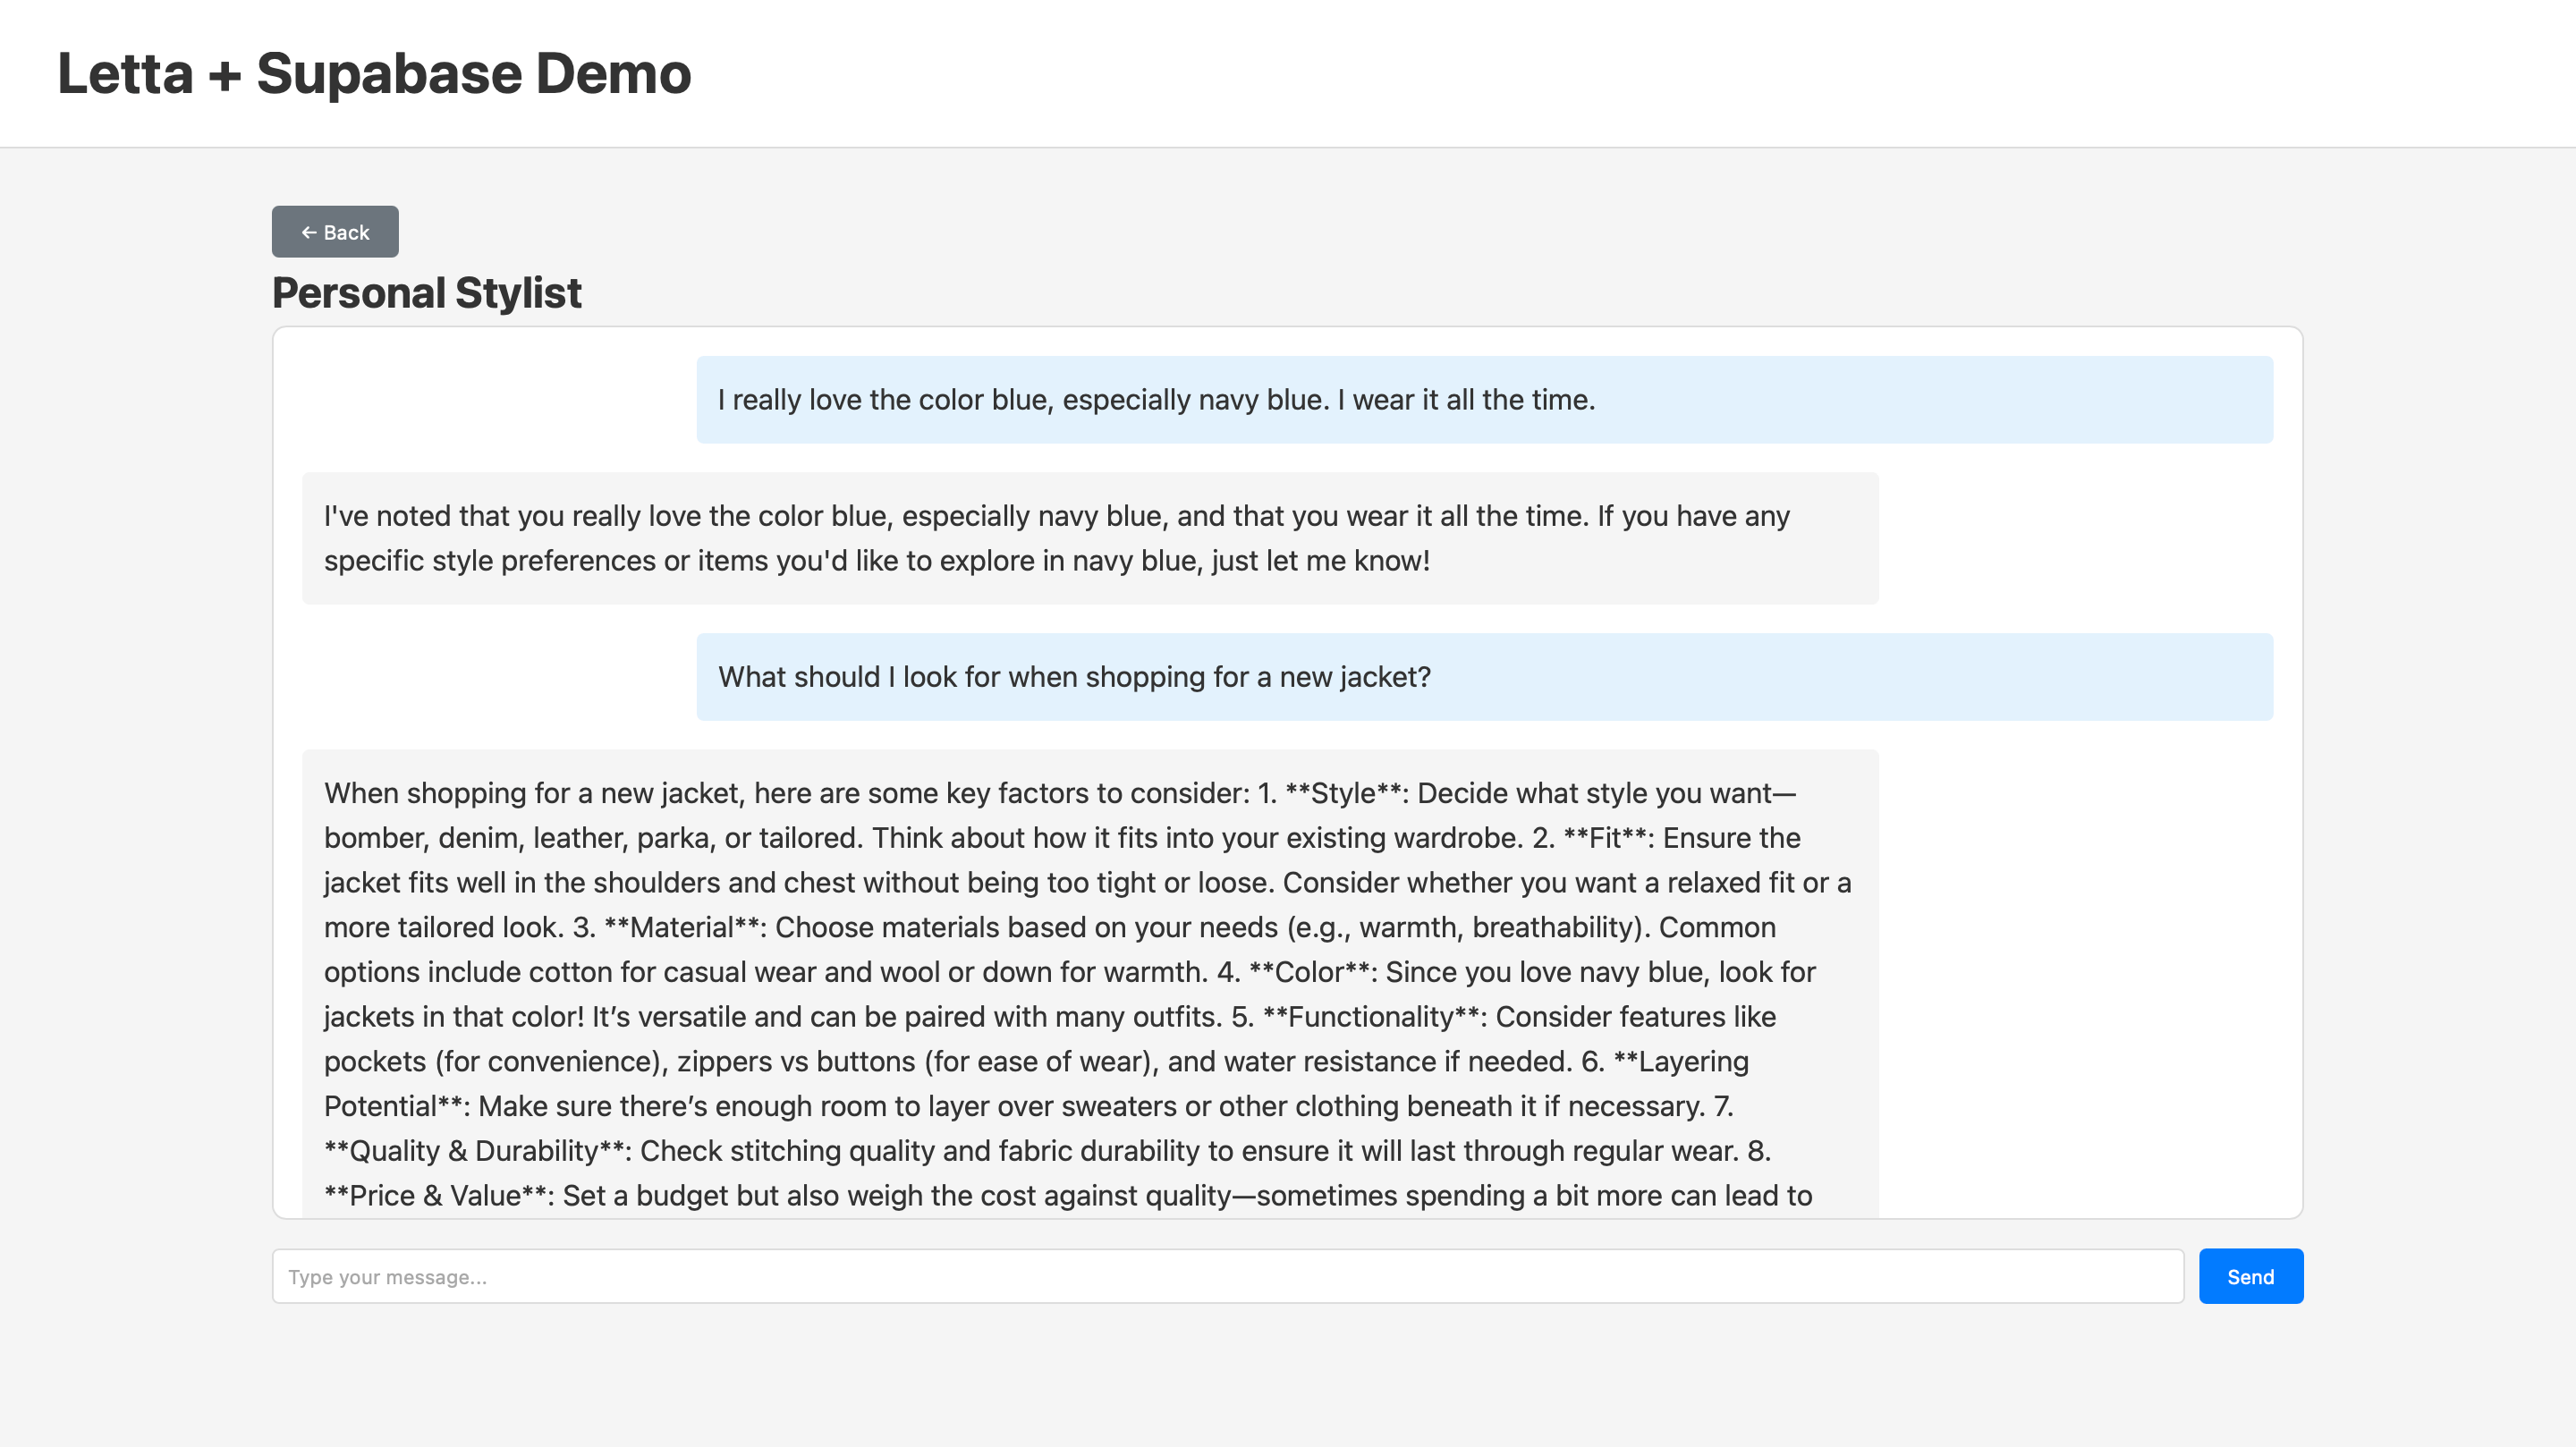
The agent remembers that you love navy blue and incorporates this into its recommendation. The agent stores information about you in its human memory block and references it in future responses.
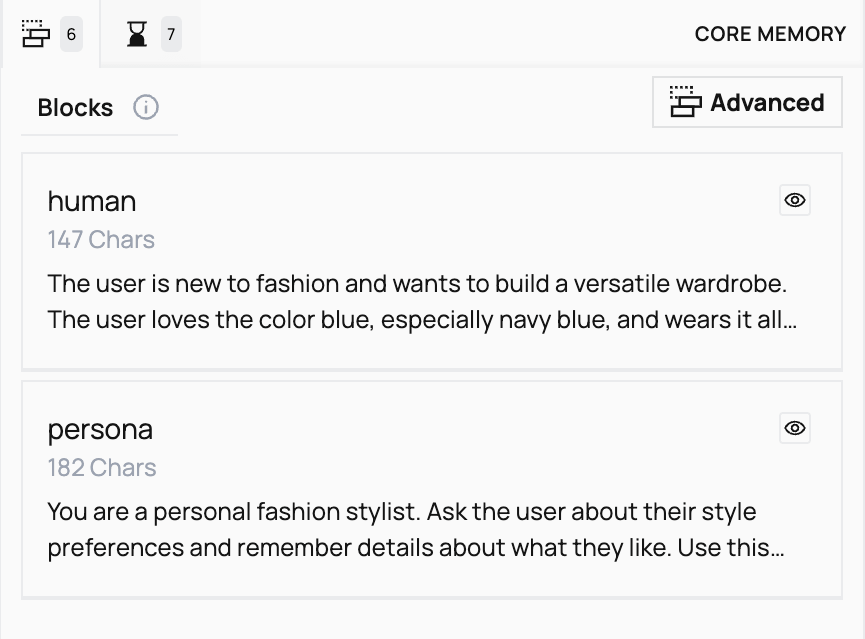
To see how Letta updated the agent’s memory, open the Letta dashboard, navigate to Agents in the sidebar, next to your personal stylist agent click the Open in ADE button. On the right of the ADE you’ll see that the human memory block now includes information about your preferences.
The chat history persists in Supabase. In the app we made, click Back to return to the agent list, then click Chat again. Your conversation loads from Supabase, showing all previous messages.
Open your Supabase dashboard and go to the Table Editor. You’ll see:
agents table contains your Personal Stylist agentmessages table contains all exchanged messages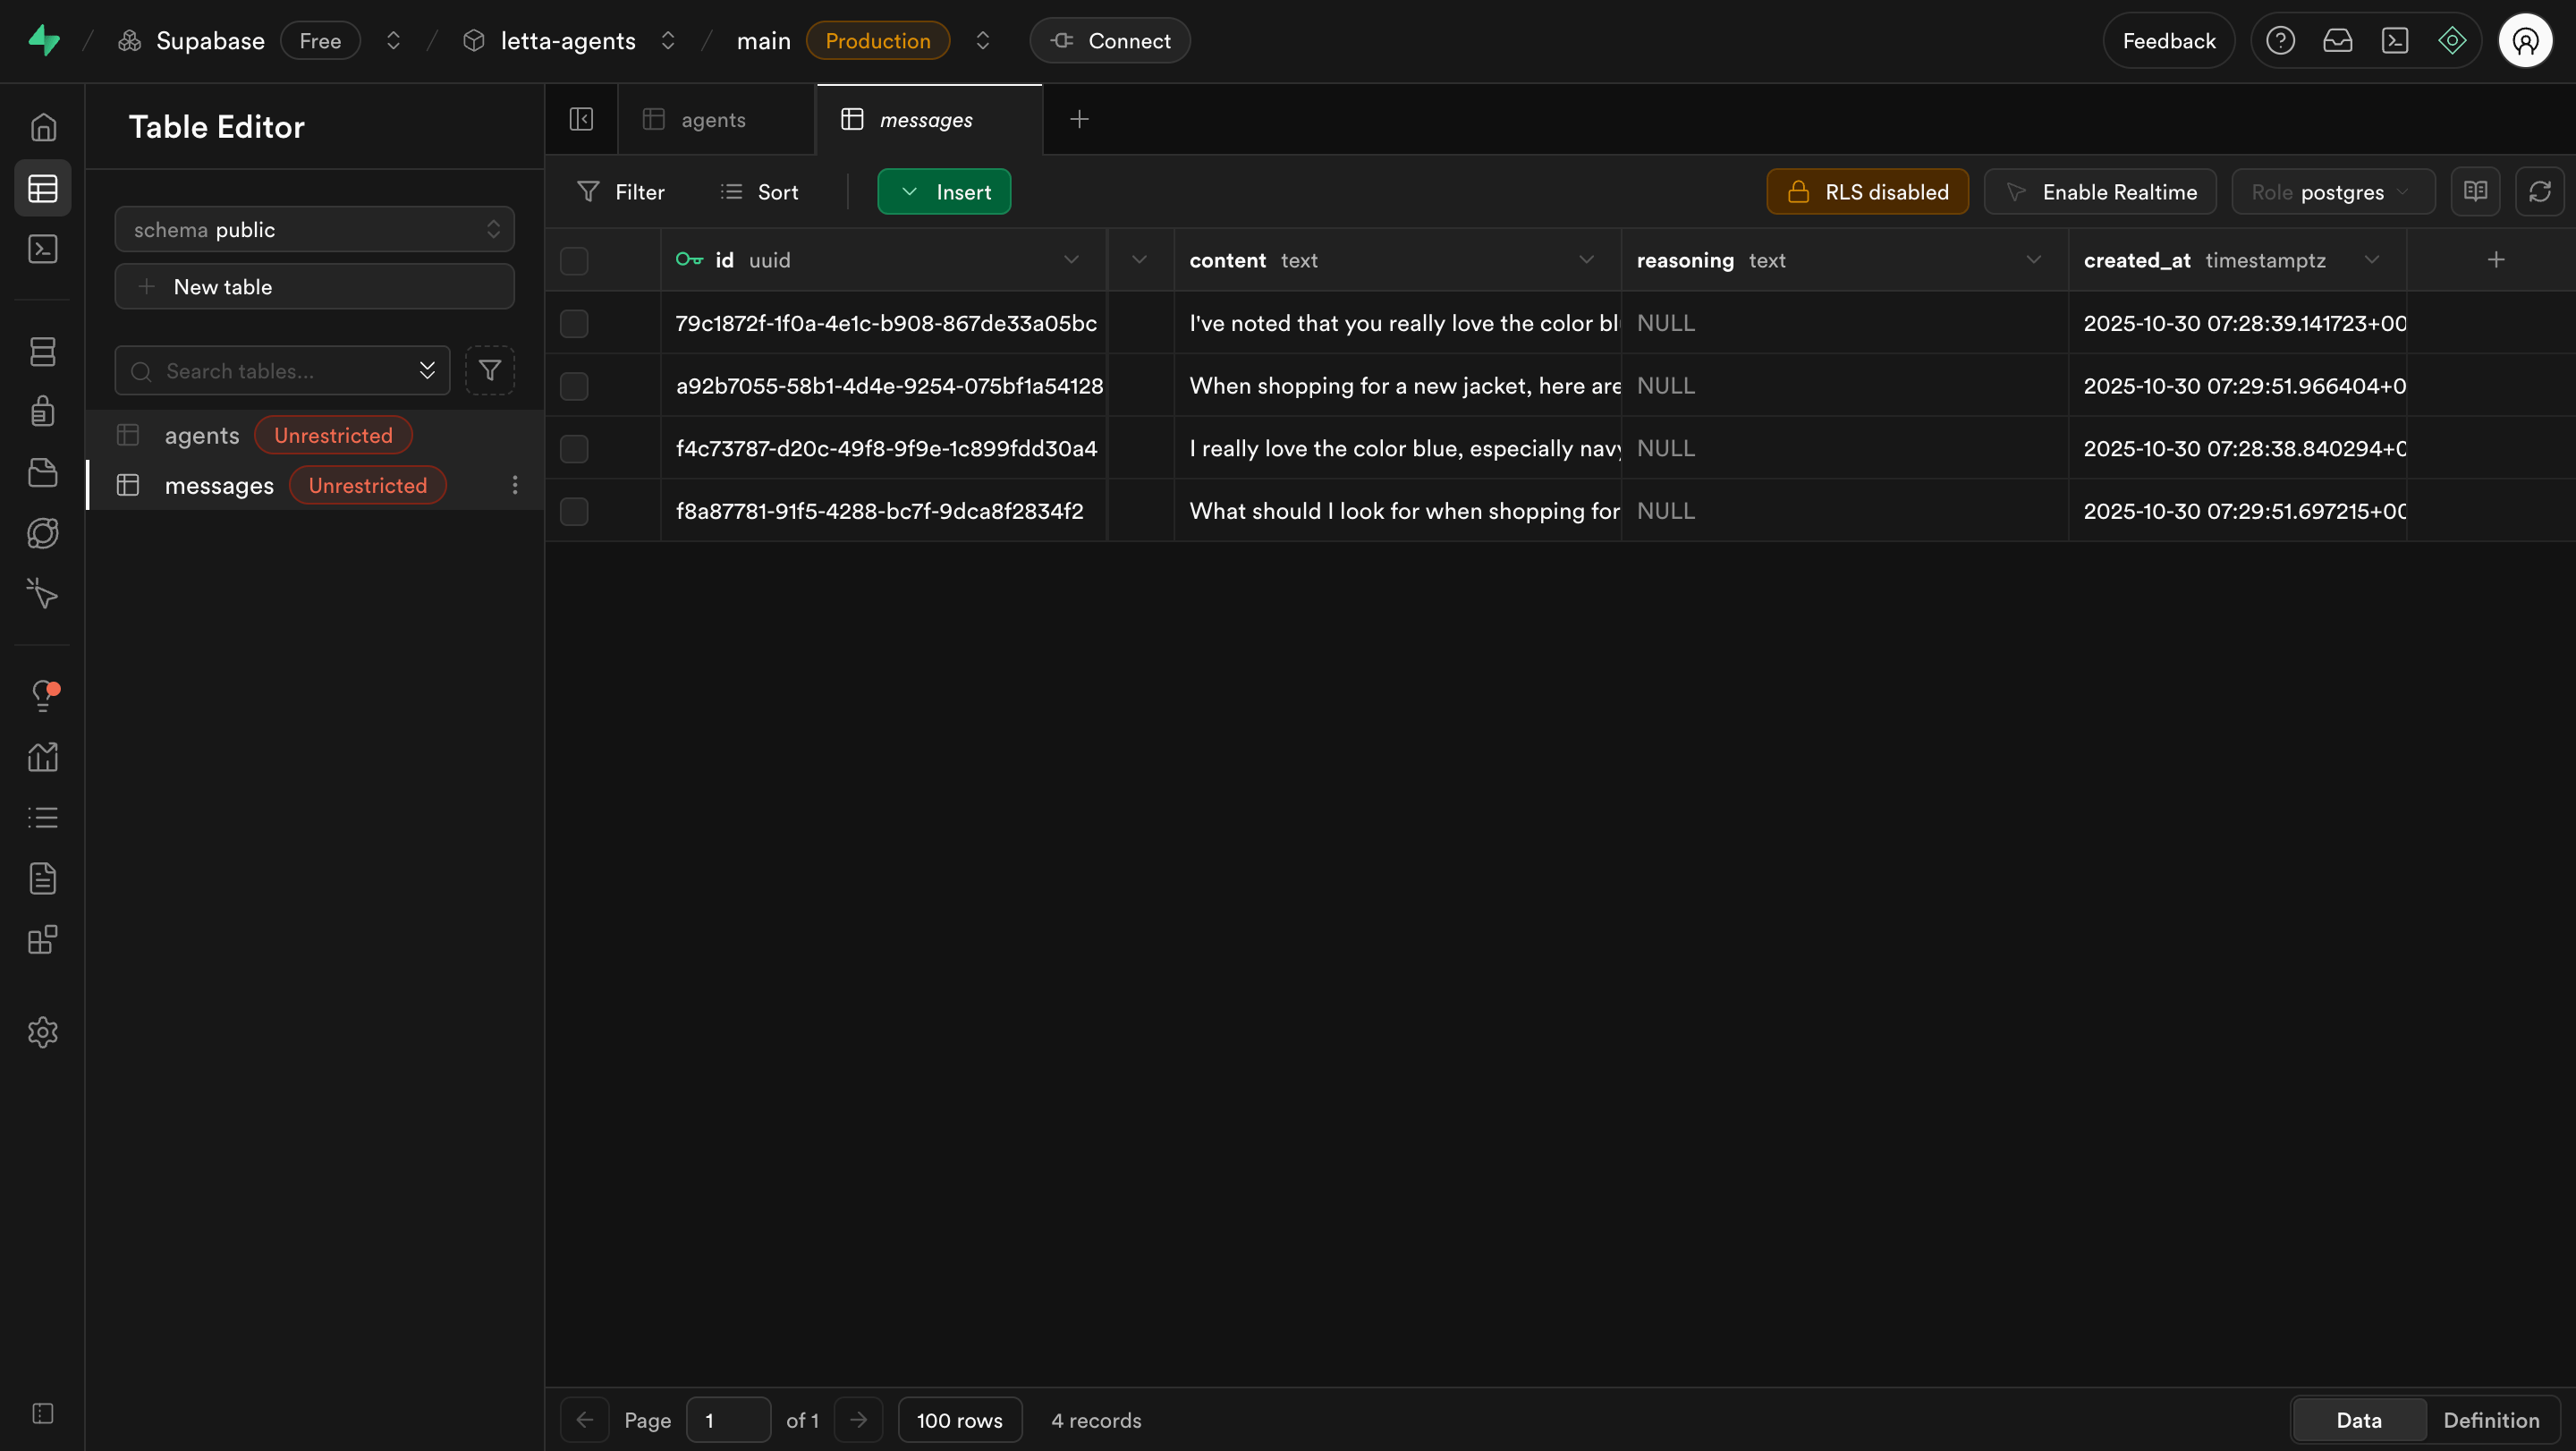
While Supabase stores the conversation history, Letta manages the agent’s memory updates. This separation gives you queryable chat history in Supabase while Letta handles stateful agent behavior.
You’ve built a full-stack application that integrates Letta agents with Supabase for persistent storage. Here are ways to extend this application with Letta’s capabilities:
Custom Tools
Create tools that let agents query your Supabase database directly for message history and user preferences.
Multi-User (Identities)
Use Letta’s Identity system to associate agents with users for multi-tenant applications.
Archival Memory
Add unlimited semantic storage for conversation logs and reference material beyond the context window.
Memory Blocks
Share memory blocks across multiple agents for common knowledge and organizational policies.