Memory Tools
Add tools for searching conversation history and storing knowledge beyond the context window.
Build a multi-user chatbot with Letta, Supabase, and Next.js.
When building with Letta, you need to understand where it fits in your stack. Letta is an AI agent service that manages agent memory and conversations.
This guide shows you how to build your own ChatGPT for your customers using Letta, Next.js, and Supabase. You’ll take Letta’s Next.js chatbot example, which has no backend, and add Supabase to create a production-ready application where each user can create and manage their own AI agents with persistent conversation history.
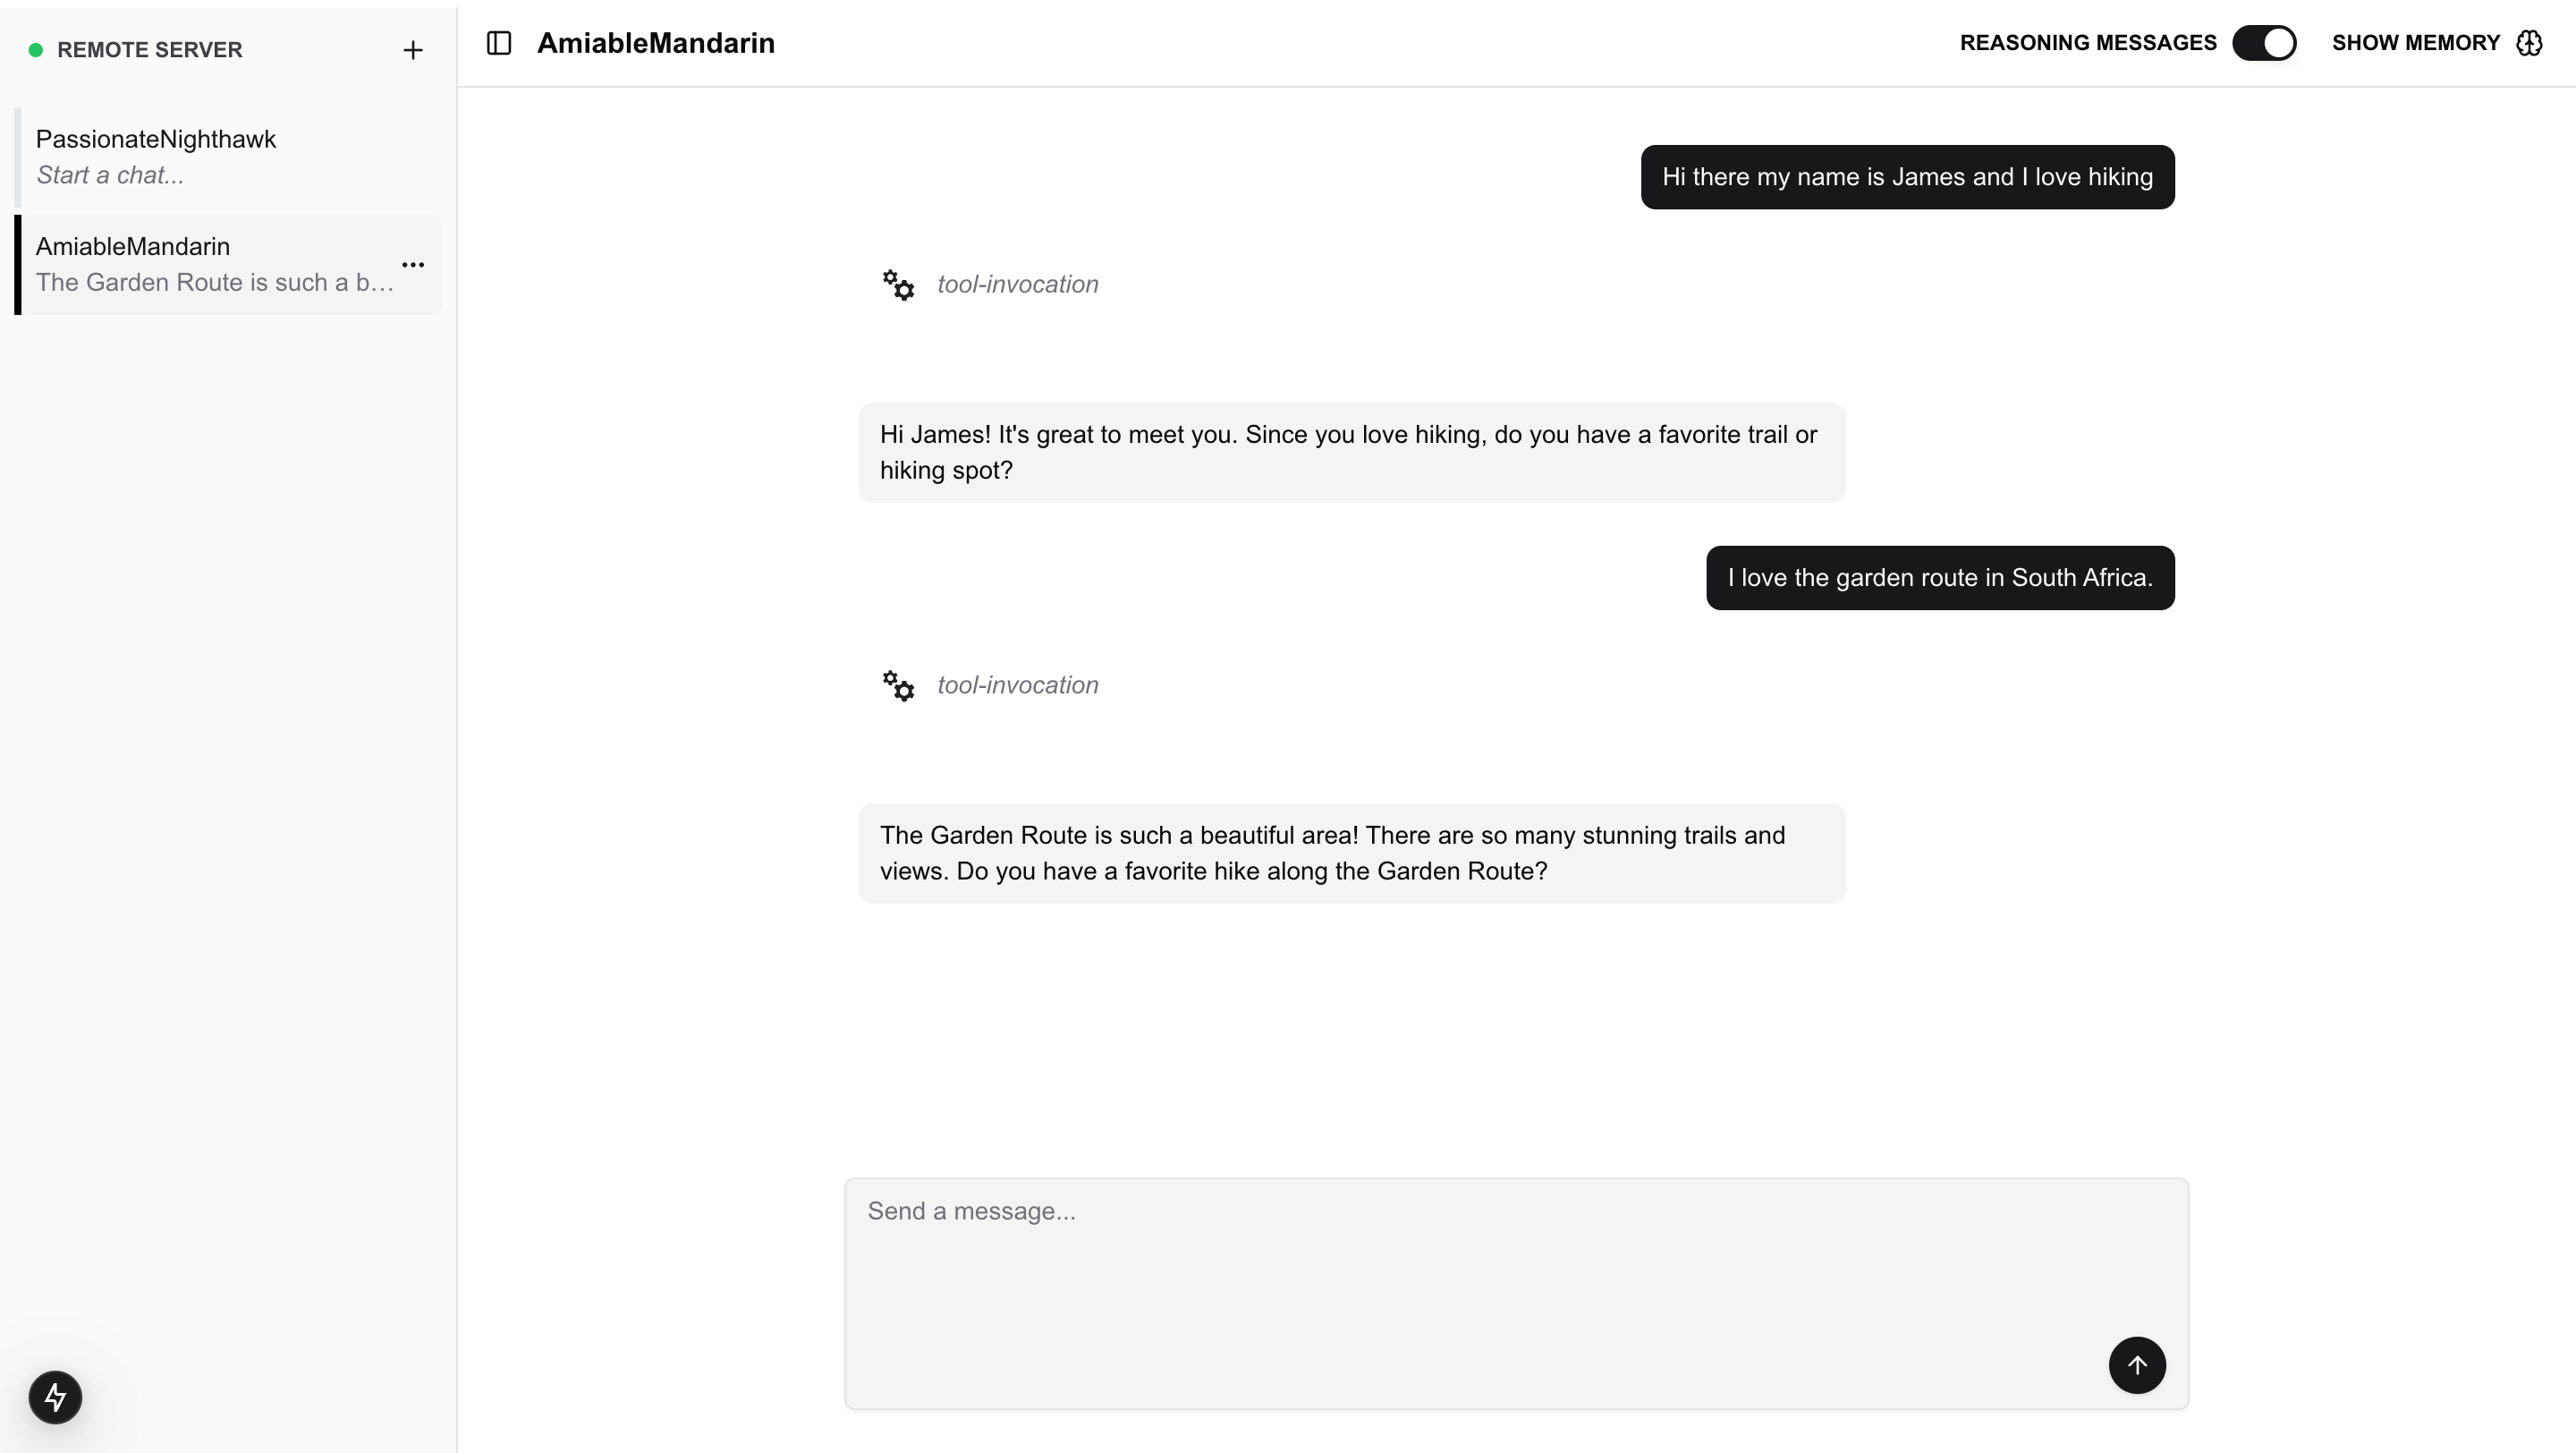
Here’s what we’ll build:
We’ll cover:
To follow this guide, you need:
We’ll start with Letta’s chatbot example and integrate Supabase step by step.
Before building, you need to understand how each piece of the stack works together.
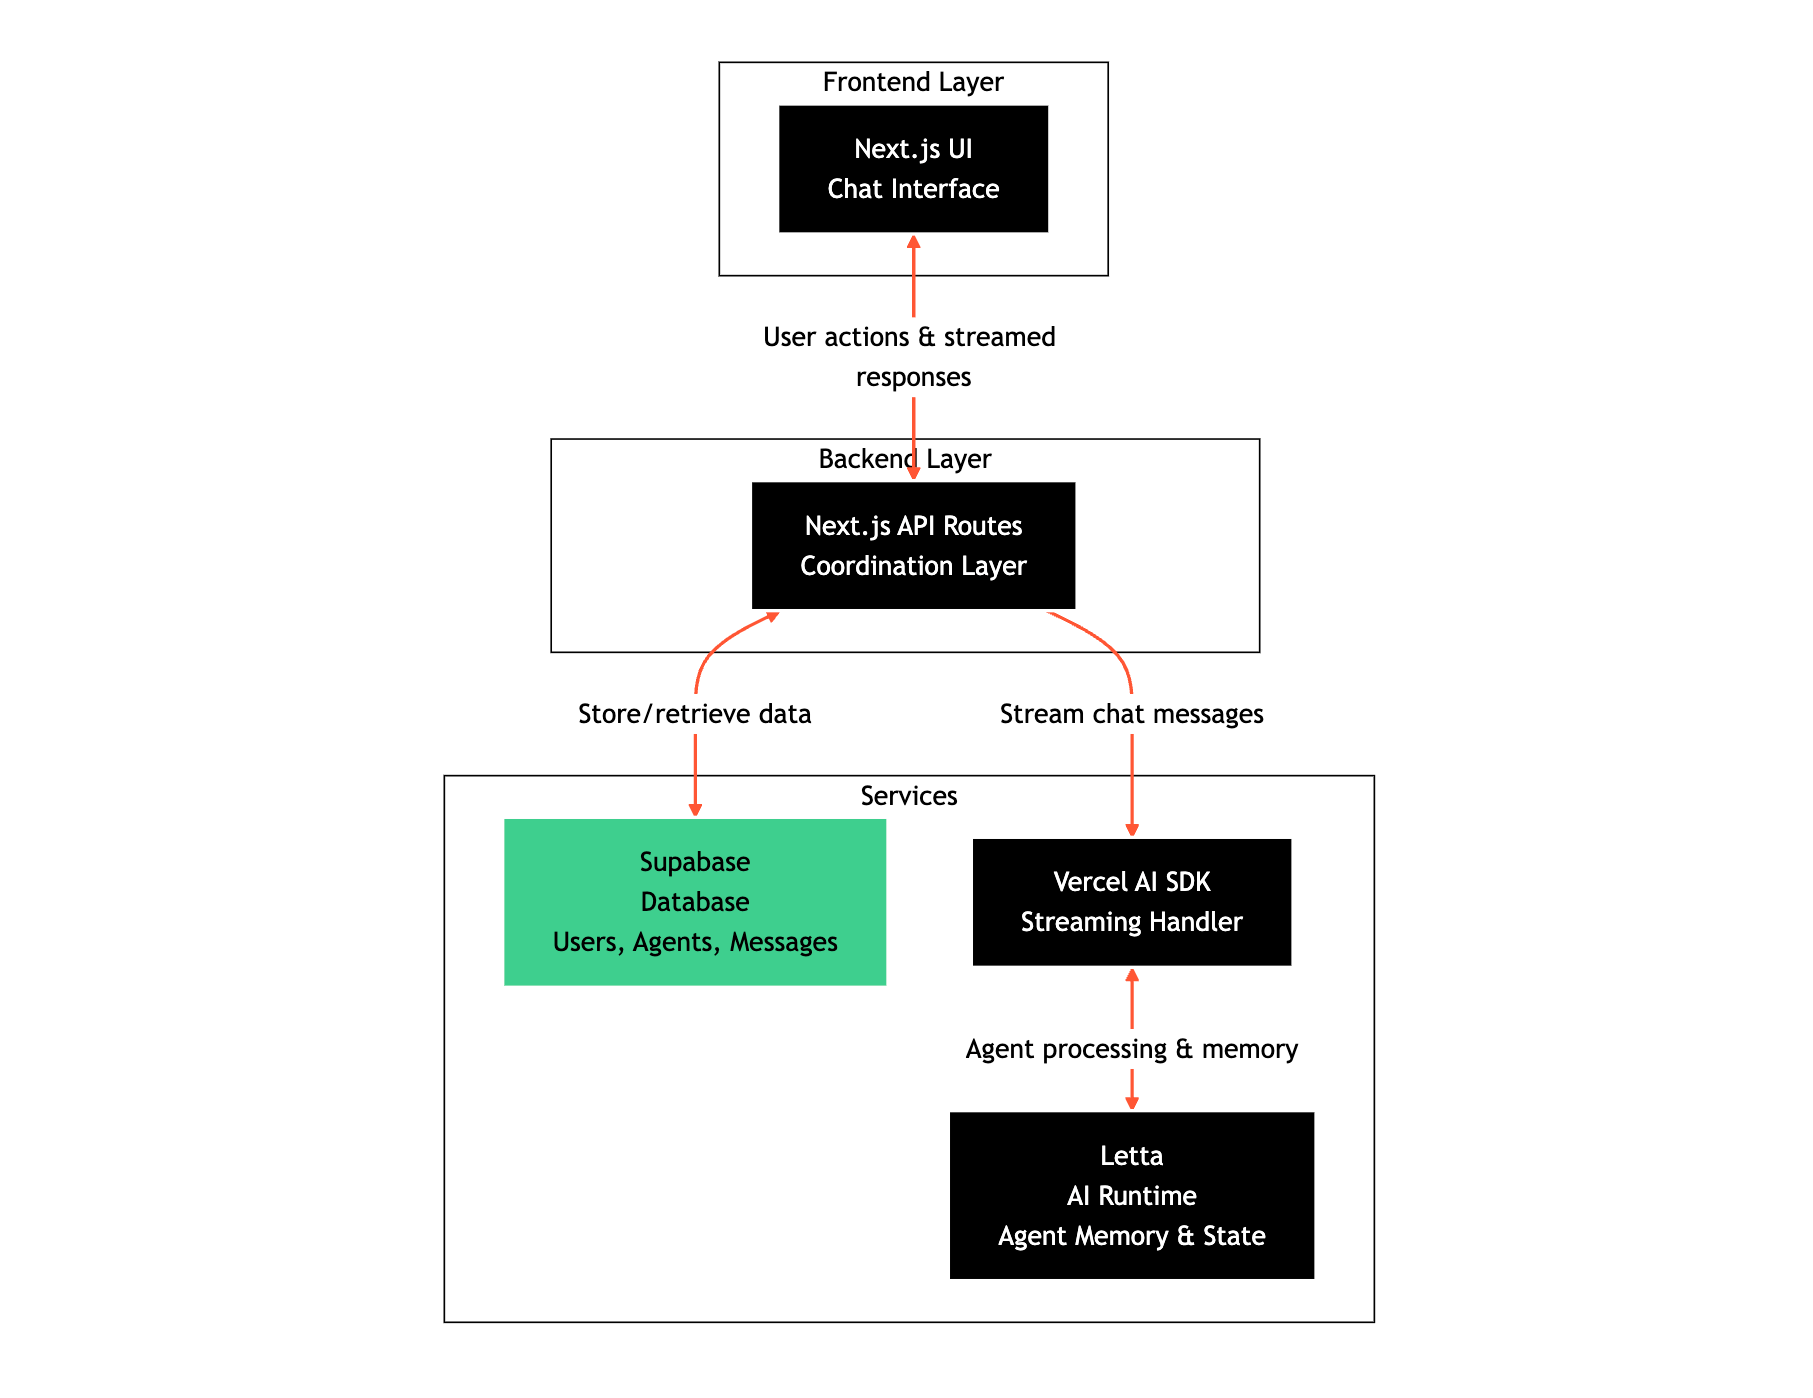
Next.js
Next.js provides the frontend UI and API routes. The UI displays the chat interface. The API routes act as the backend layer that coordinates between Letta and Supabase.
Vercel AI SDK
Vercel AI SDK handles streaming responses from Letta to the frontend. When a user sends a message, the SDK streams the AI response token by token, giving users real-time feedback.
Letta
Letta is an AI agent service. It manages your agents, their memory, and conversation state. When you create an agent or send a message, Letta processes it and maintains the agent’s memory across conversations.
Supabase
Supabase is your database. It stores user accounts, agent metadata (like names and settings), and message history. This gives you queryable data that persists across sessions.
These layers communicate in a specific order. The frontend talks to Next.js API routes. The API routes talk to both Letta (for AI processing) and Supabase (for data storage). Letta and Supabase don’t talk directly to each other. Your API routes coordinate between them.
Clone the Letta chatbot example repository:
git clone https://github.com/letta-ai/letta-chatbot-example.gitcd letta-chatbot-exampleInstall dependencies:
npm installInstall the Supabase JavaScript client:
npm install @supabase/supabase-jsUpdate the default agent configuration to use a model compatible with the Letta API. Open default-agent.json in the project root and update the DEFAULT_LLM value:
"DEFAULT_LLM": "openai/gpt-5-mini",The letta/letta-free model isn’t available on the Letta API. The Letta API requires the provider/model format (like openai/gpt-5-mini).
This starter project already has a working chatbot interface built with Next.js and the Vercel AI SDK. It uses Letta to create agents and have conversations, but lacks persistent storage and multi-user support. We’ll add those features by integrating Supabase.
Before we integrate Supabase, we need API keys for both Letta and Supabase.
Create a Letta Account
If you don’t have one, sign up for a free account at letta.com.
Navigate to API Keys
Once logged in, click on API keys in the sidebar.
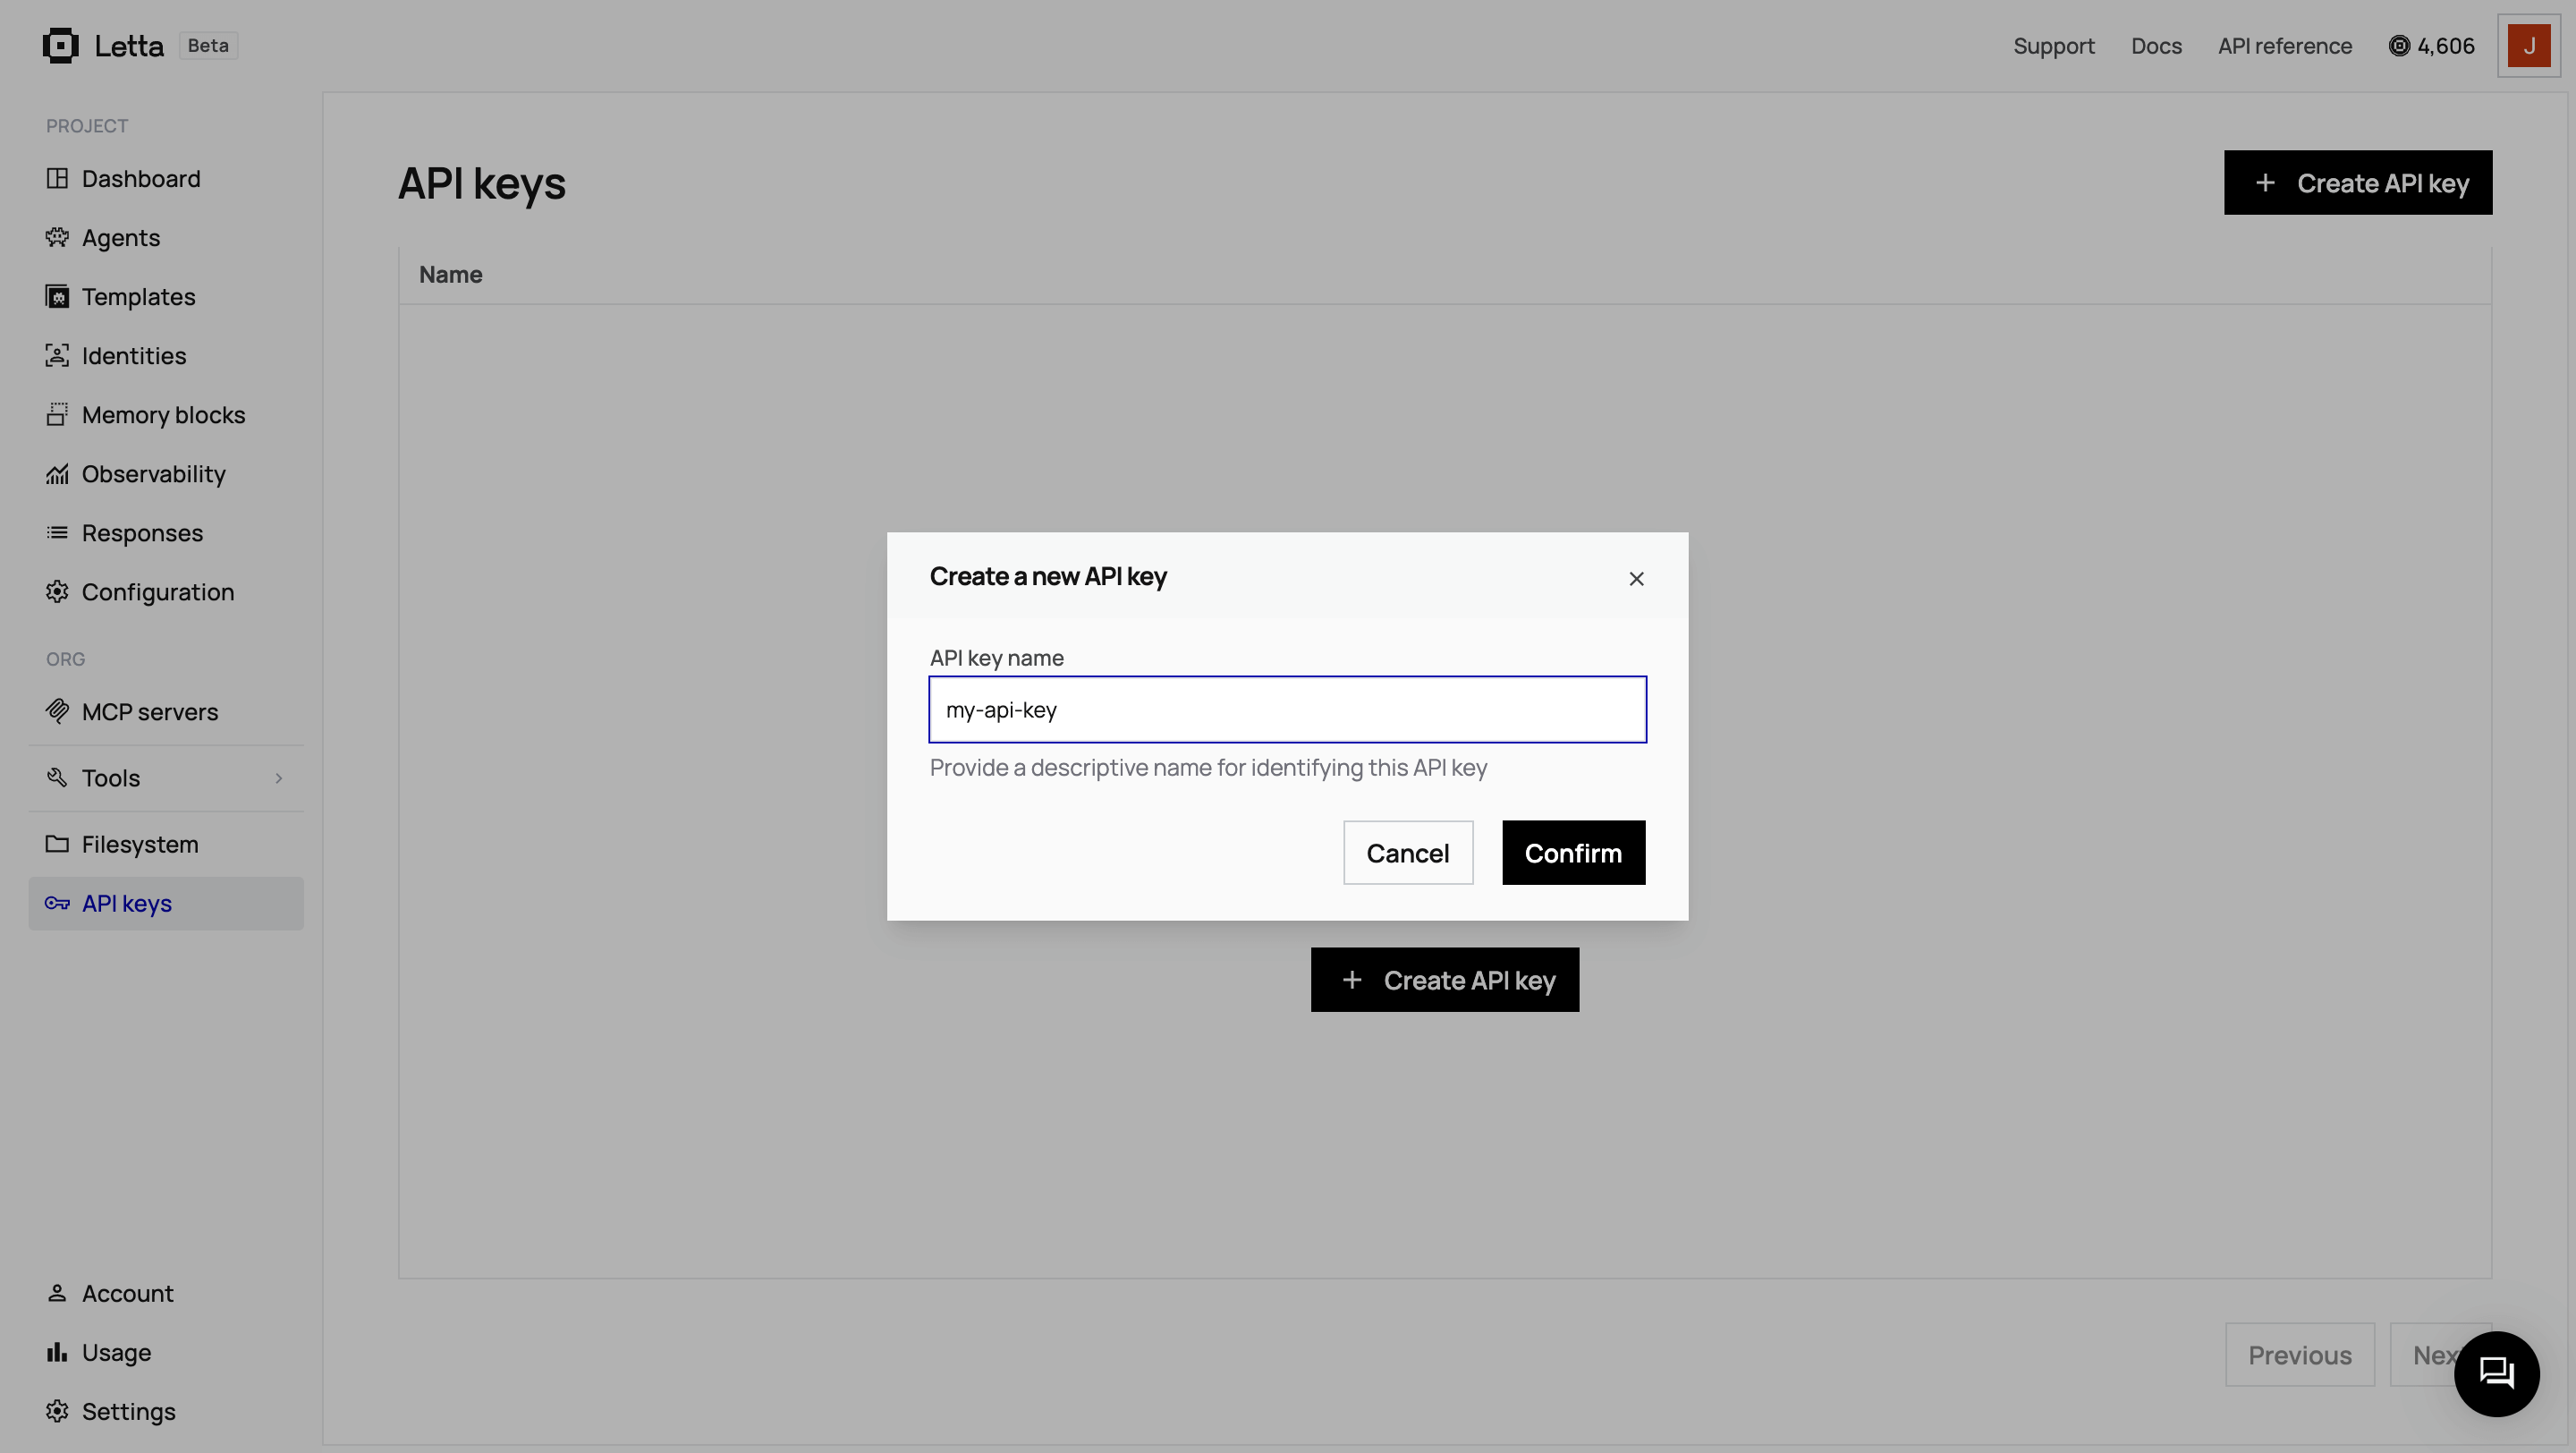
Create and Copy Your Key
Click + Create API key, give it a descriptive name, and click Confirm. Copy the key and save it somewhere safe.
Create a Supabase Project
Go to your Supabase dashboard and click + New project. Choose a project name, database password, and region. Wait for the project to finish setting up (this takes about two minutes).
Get Your API Credentials
Once your project is ready, click Connect in the top navigation, then select the App Frameworks tab. You’ll see your connection details:
Copy the values (not the environment variable names) for:
NEXT_PUBLIC_SUPABASE_URL=)NEXT_PUBLIC_SUPABASE_ANON_KEY=)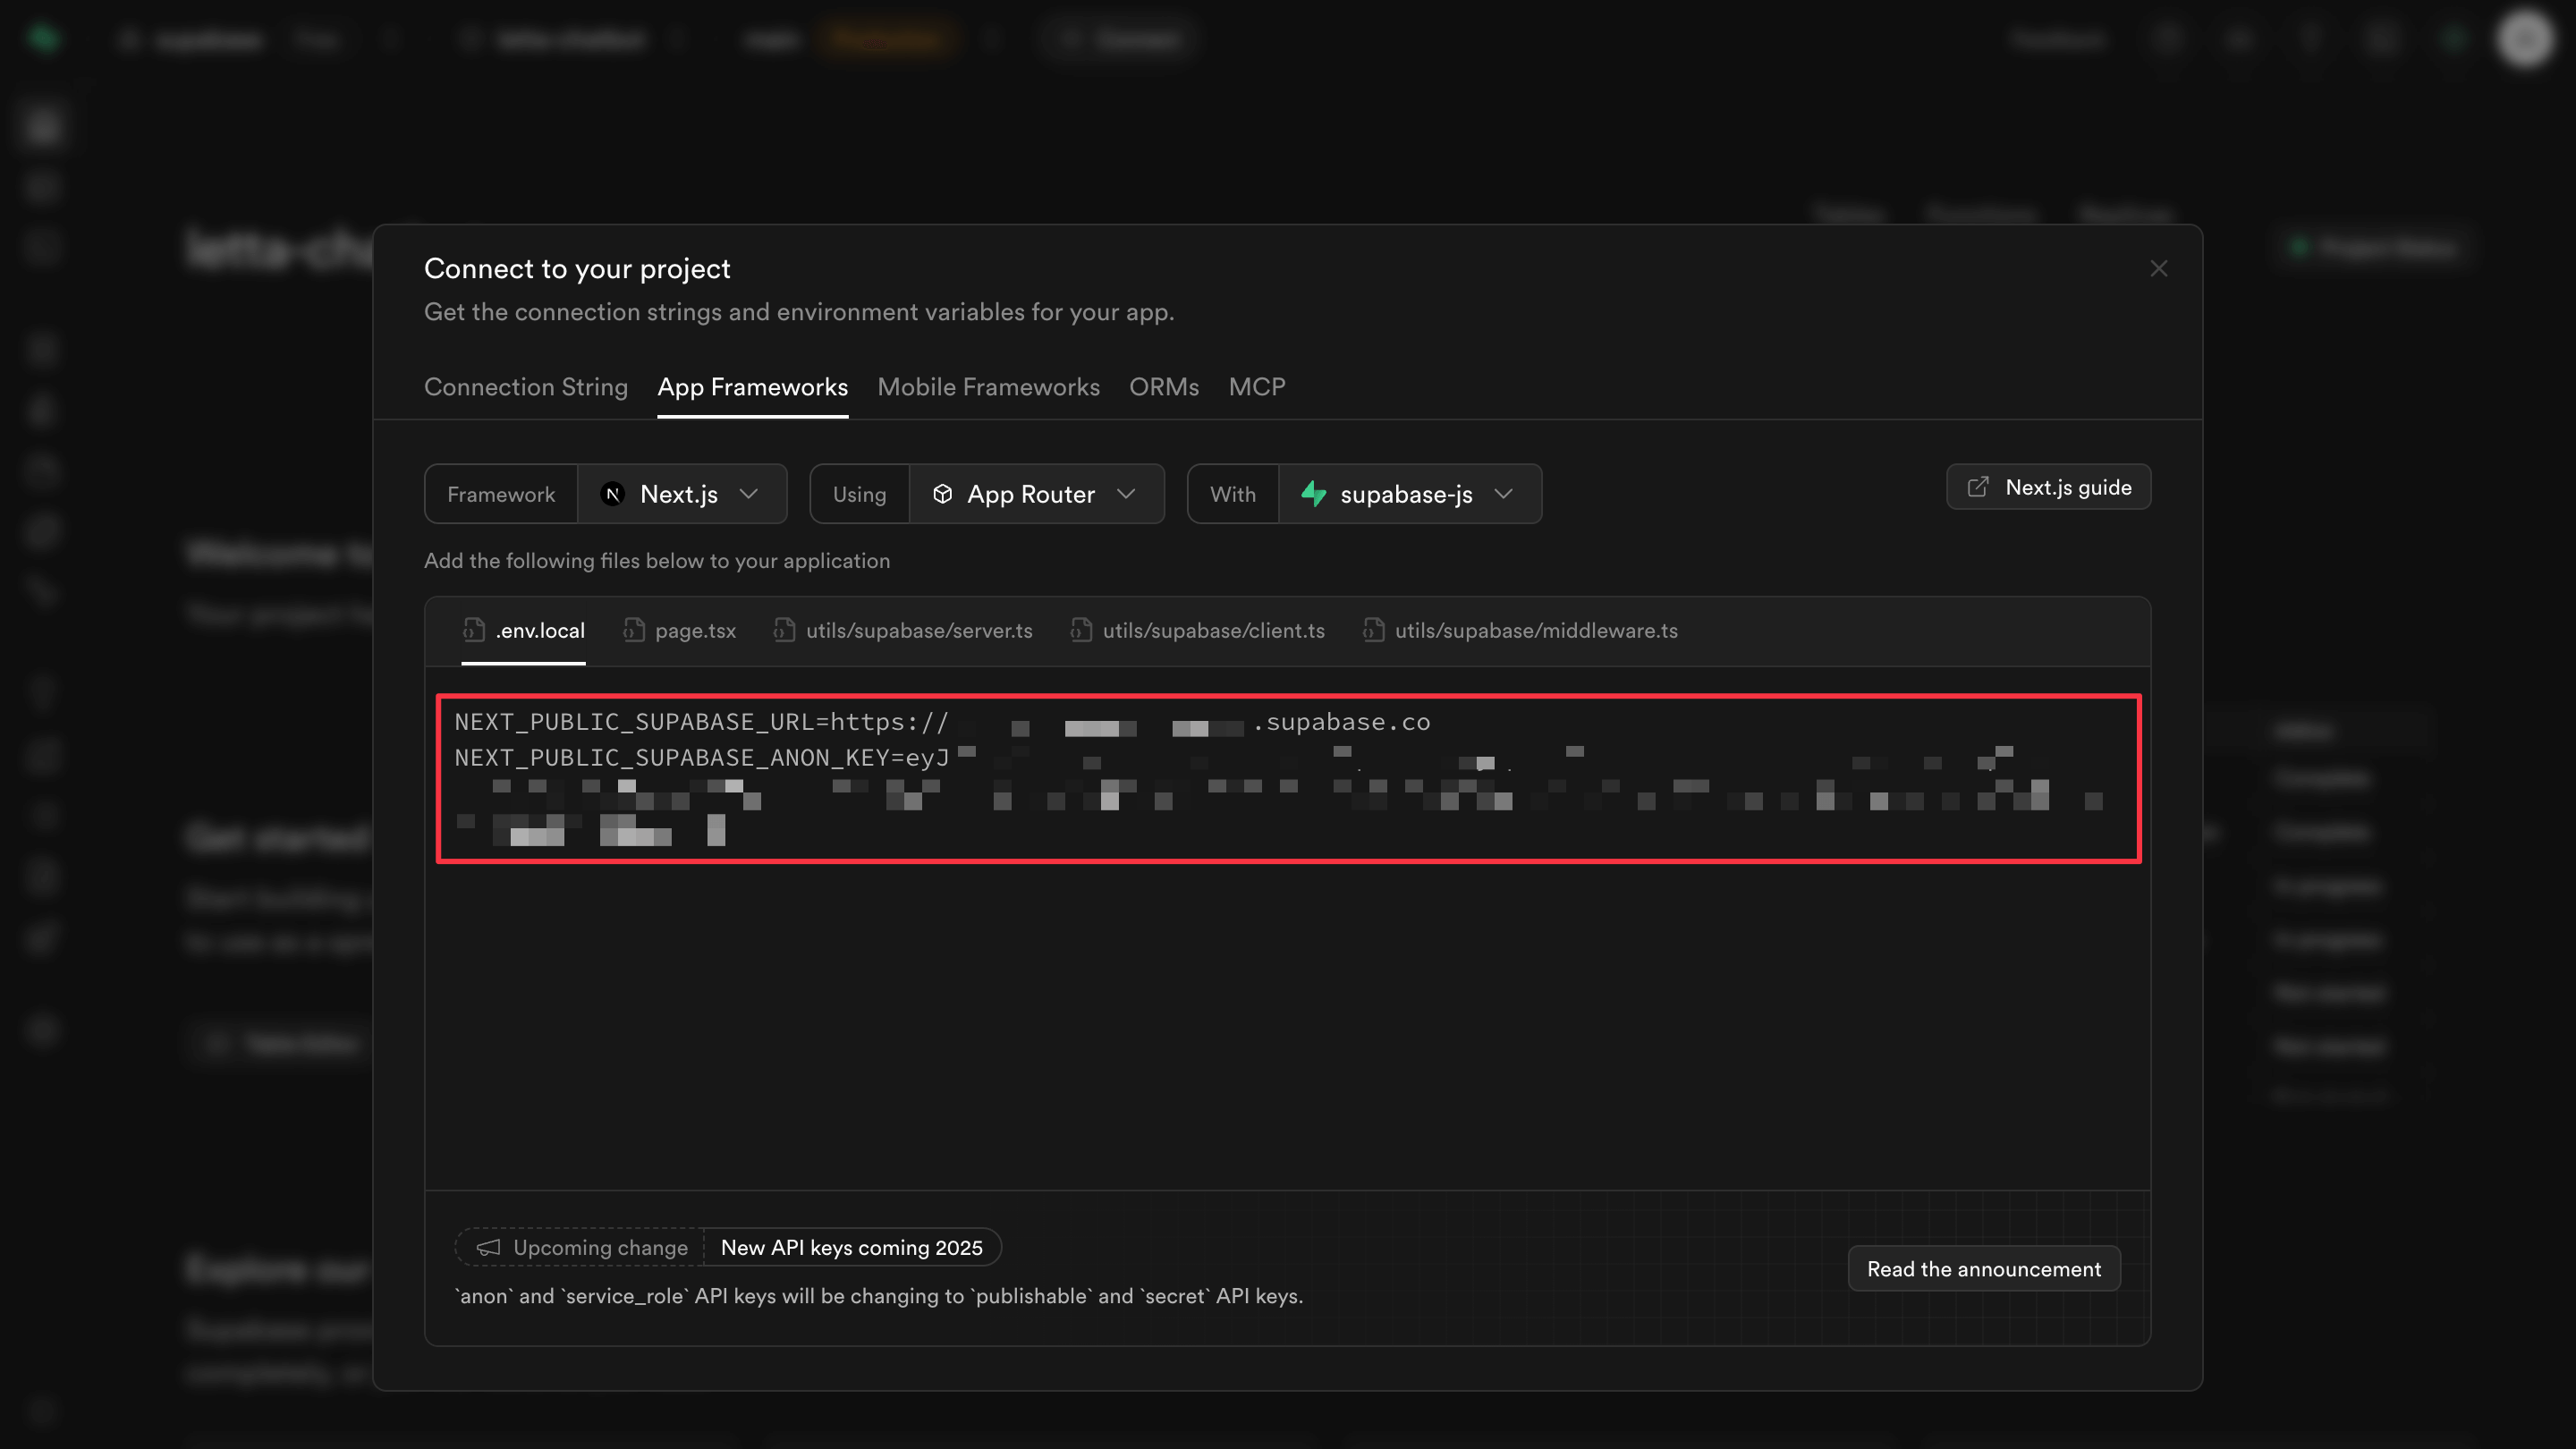
You’ll need both to configure your application.
In your project root, copy the environment template:
cp .env.template .envOpen .env and add your Supabase credentials:
# Letta settingsLETTA_API_KEY=your_letta_api_key_hereLETTA_BASE_URL=https://api.letta.com
# Authentication settingsUSE_COOKIE_BASED_AUTHENTICATION=trueNEXT_PUBLIC_CREATE_AGENTS_FROM_UI=true
# Supabase settingsSUPABASE_URL=https://your-project.supabase.coSUPABASE_ANON_KEY=your_supabase_anon_key_here
Replace your_letta_api_key_here with your Letta API key from app.letta.com, and update the Supabase values with your project URL and anon key.
We need three tables: one for users, one for agent metadata, and one for message history. In your Supabase dashboard, go to the SQL Editor and click New query.
Paste this schema:
-- Table: users-- Stores user information and links to Letta IdentitiesCREATE TABLE users (  id UUID DEFAULT gen_random_uuid() PRIMARY KEY,  cookie_uid TEXT NOT NULL UNIQUE,  letta_identity_id TEXT NOT NULL UNIQUE,  name TEXT,  email TEXT,  created_at TIMESTAMP WITH TIME ZONE DEFAULT NOW(),  updated_at TIMESTAMP WITH TIME ZONE DEFAULT NOW());
-- Table: agents-- Stores metadata about Letta agentsCREATE TABLE agents (  id UUID DEFAULT gen_random_uuid() PRIMARY KEY,  letta_agent_id TEXT NOT NULL UNIQUE,  user_id UUID NOT NULL REFERENCES users(id) ON DELETE CASCADE,  name TEXT NOT NULL,  persona TEXT,  human_block TEXT,  model TEXT NOT NULL DEFAULT 'openai/gpt-5-mini',  created_at TIMESTAMP WITH TIME ZONE DEFAULT NOW(),  updated_at TIMESTAMP WITH TIME ZONE DEFAULT NOW());
-- Table: messages-- Stores chat messages between users and agentsCREATE TABLE messages (  id UUID DEFAULT gen_random_uuid() PRIMARY KEY,  agent_id UUID NOT NULL REFERENCES agents(id) ON DELETE CASCADE,  letta_message_id TEXT,  role TEXT NOT NULL CHECK (role IN ('user', 'assistant', 'system')),  content TEXT NOT NULL,  created_at TIMESTAMP WITH TIME ZONE DEFAULT NOW());
-- Indexes for performanceCREATE INDEX idx_users_cookie_uid ON users(cookie_uid);CREATE INDEX idx_users_letta_identity_id ON users(letta_identity_id);CREATE INDEX idx_agents_user_id ON agents(user_id);CREATE INDEX idx_agents_letta_agent_id ON agents(letta_agent_id);CREATE INDEX idx_messages_agent_id ON messages(agent_id);CREATE INDEX idx_messages_created_at ON messages(created_at DESC);
-- Function to update updated_at timestampCREATE OR REPLACE FUNCTION update_updated_at_column()RETURNS TRIGGER AS $$BEGIN    NEW.updated_at = NOW();    RETURN NEW;END;$$ language 'plpgsql';
-- Triggers to automatically update updated_atCREATE TRIGGER update_users_updated_at    BEFORE UPDATE ON users    FOR EACH ROW    EXECUTE FUNCTION update_updated_at_column();
CREATE TRIGGER update_agents_updated_at    BEFORE UPDATE ON agents    FOR EACH ROW    EXECUTE FUNCTION update_updated_at_column();
Click Run to execute the schema. You should see “Success. No rows returned” in the results panel.
The schema creates a clear separation between Supabase and Letta responsibilities:
cookie_uid - Stores the anonymous session ID from the user’s browser cookieletta_identity_id - Links to the corresponding Identity object in Lettaletta_agent_id - Links to the actual agent in Letta (manages memory and conversation state)user_id - Foreign key that associates each agent with its creatorname, persona, model - Metadata stored in Supabase for quick queries (displaying agent lists, filtering, etc.)agent_id - Foreign key that links messages to agentsON DELETE CASCADE - Deleting an agent automatically deletes all its messagescookie_uid and letta_identity_id - Indexed because we look up users by these values frequentlymessages.agent_id - Indexed for querying messages by agentmessages.created_at - Indexed for sorting messages by timeCreate a new file to initialize the Supabase client. This client will be imported throughout your application for database operations.
Create src/config/supabase-client.ts:
import { createClient } from '@supabase/supabase-js'
const SUPABASE_URL = process.env.SUPABASE_URLconst SUPABASE_ANON_KEY = process.env.SUPABASE_ANON_KEY
if (!SUPABASE_URL) {  throw new Error(    'SUPABASE_URL is not set. Please add it to your .env file.'  )}
if (!SUPABASE_ANON_KEY) {  throw new Error(    'SUPABASE_ANON_KEY is not set. Please add it to your .env file.'  )}
export const supabase = createClient(SUPABASE_URL, SUPABASE_ANON_KEY)
console.log('Supabase client initialized')
This file reads your environment variables and creates a Supabase client. The error checks ensure you’ll see a clear message if credentials are missing. Next.js automatically loads .env files, so we don’t need additional configuration.
The service layer wraps database operations in TypeScript functions. This keeps your API routes clean and makes database queries reusable.
Create src/services/supabase-service.ts and start with user operations:
import { supabase } from '@/config/supabase-client'
// ==================== User Operations ====================
export interface CreateUserData {  cookieUid: string  lettaIdentityId: string  name?: string  email?: string}
export interface User {  id: string  cookie_uid: string  letta_identity_id: string  name: string | null  email: string | null  created_at: string  updated_at: string}
export async function createUser(userData: CreateUserData): Promise<User> {  const { cookieUid, lettaIdentityId, name, email } = userData
  const { data, error } = await supabase    .from('users')    .insert([      {        cookie_uid: cookieUid,        letta_identity_id: lettaIdentityId,        name: name || null,        email: email || null      }    ])    .select()    .single()
  if (error) {    throw new Error(`Failed to create user: ${error.message}`)  }
  console.log(`Created user in Supabase: ${data.id}`)  return data}
export async function getUserByCookieUid(cookieUid: string): Promise<User | null> {  const { data, error } = await supabase    .from('users')    .select('*')    .eq('cookie_uid', cookieUid)    .single()
  if (error) {    if (error.code === 'PGRST116') {      return null    }    throw new Error(`Failed to fetch user: ${error.message}`)  }
  return data}
The createUser function inserts a new user row with links to both the cookie UID and Letta Identity. The getUserByCookieUid function retrieves a user by their session cookie. The special error code PGRST116 means “no rows returned”, which we handle by returning null instead of throwing an error.
Continue the service file with agent operations. Add this to the same file:
// ==================== Agent Operations ====================
export interface CreateAgentData {  lettaAgentId: string  userId: string  name: string  persona?: string  humanBlock?: string  model: string}
export interface Agent {  id: string  letta_agent_id: string  user_id: string  name: string  persona: string | null  human_block: string | null  model: string  created_at: string  updated_at: string}
export async function createAgent(agentData: CreateAgentData): Promise<Agent> {  const { lettaAgentId, userId, name, persona, humanBlock, model } = agentData
  const { data, error } = await supabase    .from('agents')    .insert([      {        letta_agent_id: lettaAgentId,        user_id: userId,        name,        persona: persona || null,        human_block: humanBlock || null,        model      }    ])    .select()    .single()
  if (error) {    throw new Error(`Failed to create agent: ${error.message}`)  }
  console.log(`Created agent in Supabase: ${data.id}`)  return data}
export async function getAgentsByUserId(userId: string): Promise<Agent[]> {  const { data, error } = await supabase    .from('agents')    .select('*')    .eq('user_id', userId)    .order('created_at', { ascending: false })
  if (error) {    throw new Error(`Failed to fetch agents: ${error.message}`)  }
  return data}
export async function getAgentByLettaId(lettaAgentId: string): Promise<Agent | null> {  const { data, error } = await supabase    .from('agents')    .select('*')    .eq('letta_agent_id', lettaAgentId)    .single()
  if (error) {    if (error.code === 'PGRST116') {      return null    }    throw new Error(`Failed to fetch agent: ${error.message}`)  }
  return data}
export async function deleteAgent(agentId: string): Promise<void> {  const { error } = await supabase    .from('agents')    .delete()    .eq('id', agentId)
  if (error) {    throw new Error(`Failed to delete agent: ${error.message}`)  }
  console.log(`Deleted agent from Supabase: ${agentId}`)}
These functions manage agent metadata in Supabase. Notice getAgentByLettaId looks up agents using the Letta agent ID, which is how we link our Supabase records to agents in Letta.
Finally, add message operations to the same file:
// ==================== Message Operations ====================
export interface CreateMessageData {  agentId: string  lettaMessageId?: string  role: 'user' | 'assistant' | 'system'  content: string}
export interface Message {  id: string  agent_id: string  letta_message_id: string | null  role: string  content: string  created_at: string}
export async function createMessages(messages: CreateMessageData[]): Promise<Message[]> {  const rows = messages.map((msg) => ({    agent_id: msg.agentId,    letta_message_id: msg.lettaMessageId || null,    role: msg.role,    content: msg.content  }))
  const { data, error } = await supabase    .from('messages')    .insert(rows)    .select()
  if (error) {    throw new Error(`Failed to create messages: ${error.message}`)  }
  console.log(`Created ${data.length} messages in Supabase`)  return data}
export async function getMessagesByAgentId(agentId: string): Promise<Message[]> {  const { data, error } = await supabase    .from('messages')    .select('*')    .eq('agent_id', agentId)    .order('created_at', { ascending: true })
  if (error) {    throw new Error(`Failed to fetch messages: ${error.message}`)  }
  return data}
The createMessages function accepts an array for batch inserts, which is more efficient when storing both user and assistant messages from a single conversation turn.
Letta Identities were how Letta managed multi-user applications. An Identity represents a user in your application and links them to their agents. Each Identity has an id (generated by Letta), an identifierKey (your application’s user identifier), a name (human-readable label), and an identityType (usually “user”).
When you create an agent, you pass identityIds to associate it with specific users. Later, you can list agents by filtering with identifierKeys.
Create src/services/letta-identity-service.ts:
import client from '@/config/letta-client'
export interface CreateIdentityData {  identifierKey: string  name?: string  identityType?: 'user' | 'org' | 'other'}
export interface LettaIdentity {  id?: string  identifierKey: string  name: string  identityType: string  agentIds: string[]}
export async function createIdentity(  identityData: CreateIdentityData): Promise<LettaIdentity> {  const { identifierKey, name, identityType = 'user' } = identityData
  try {    const identity = await client.identities.create({      identifierKey,      name: name || identifierKey,      identityType    })
    console.log(`Created Letta Identity: ${identity.id} for ${identifierKey}`)    return identity as LettaIdentity  } catch (error) {    console.error('Error creating Letta Identity:', error)    throw new Error(`Failed to create Letta Identity: ${error}`)  }}
export async function getIdentityByKey(identifierKey: string): Promise<LettaIdentity | null> {  try {    const identities = await client.identities.list()    const identity = identities.find((i) => i.identifierKey === identifierKey)    return identity ? (identity as LettaIdentity) : null  } catch (error) {    console.error('Error fetching Letta Identities:', error)    return null  }}
export async function getOrCreateIdentity(  identifierKey: string,  name?: string): Promise<LettaIdentity> {  const existing = await getIdentityByKey(identifierKey)
  if (existing) {    return existing  }
  return createIdentity({ identifierKey, name })}
The getOrCreateIdentity helper function checks if an Identity exists before creating a new one. This makes it idempotent, we can call it multiple times safely.
The user manager coordinates between Supabase and Letta to keep both systems in sync. When a user visits your app, the middleware calls this function to ensure they exist in both systems.
Create src/lib/user-manager.ts:
import * as supabaseService from '@/services/supabase-service'import * as lettaIdentityService from '@/services/letta-identity-service'
export interface UserData {  supabaseUserId: string  lettaIdentityId: string  cookieUid: string  isNewUser: boolean}
export async function getOrCreateUser(cookieUid: string): Promise<UserData> {  // Check if user already exists in Supabase  const existingUser = await supabaseService.getUserByCookieUid(cookieUid)
  if (existingUser) {    return {      supabaseUserId: existingUser.id,      lettaIdentityId: existingUser.letta_identity_id,      cookieUid: existingUser.cookie_uid,      isNewUser: false    }  }
  // User doesn't exist, create in both systems  console.log(`Creating new user for cookie: ${cookieUid}`)
  try {    // Create Letta Identity first    const lettaIdentity = await lettaIdentityService.getOrCreateIdentity(      cookieUid,      `User ${cookieUid.substring(0, 8)}`    )
    // Create user in Supabase with Letta Identity reference    const supabaseUser = await supabaseService.createUser({      cookieUid,      lettaIdentityId: lettaIdentity.id,      name: lettaIdentity.name || undefined    })
    console.log(      `Created new user: Supabase ID ${supabaseUser.id}, Letta Identity ${lettaIdentity.id}`    )
    return {      supabaseUserId: supabaseUser.id,      lettaIdentityId: lettaIdentity.id,      cookieUid: supabaseUser.cookie_uid,      isNewUser: true    }  } catch (error) {    console.error('Failed to create user:', error)    throw new Error(`User creation failed: ${error}`)  }}
This function creates the Identity in Letta first, then stores the user in Supabase with the Identity ID. The order matters because we need the Identity ID to create the Supabase user record. If the user already exists, we return their data immediately without making any API calls to Letta.
The middleware runs on every request and uses the user manager to ensure users exist in both systems. This happens before any API routes execute.
Add the import
Open src/middleware.ts and add the import at the top with the other imports:
import { getOrCreateUser } from '@/lib/user-manager'Make the function async
Change the function declaration from function to async function:
export async function middleware(request: NextRequest) {Add user management logic
Add this code after the closing brace } of the cookie setup block, just before the final return response:
// Ensure user exists in Supabase + Letta// This creates the user if they don't exist yettry {  const userData = await getOrCreateUser(lettaUid)
  // Attach user data to request headers  // API routes can access this data without additional DB queries  response.headers.set('x-user-id', userData.supabaseUserId)  response.headers.set('x-letta-identity-id', userData.lettaIdentityId)  response.headers.set('x-cookie-uid', userData.cookieUid)
  // Optional: Log new user creation  if (userData.isNewUser) {    console.log(`New user created: ${userData.supabaseUserId}`)  }} catch (error) {  console.error('Middleware: Failed to setup user:', error)  // Continue anyway - API routes will handle missing headers  // This prevents the entire app from breaking if Supabase/Letta is down}
The middleware calls getOrCreateUser() which handles the Supabase and Letta Identity creation. The user data gets attached to request headers, making it available to all API routes without additional database queries.
The middleware changes you just made create an import chain that pulls in letta-client.ts. That file contains dotenv code, which causes an Edge Runtime error. Open src/config/letta-client.ts and remove these lines:
import { config } from 'dotenv'
config()
Next.js automatically loads .env files, so this doesn’t affect functionality.
Now we’ll modify the agent routes to use Letta Identities instead of tags. The starter project uses tags for user identification (checking agent.tags.includes('user:${userId}')), but Identities provide better multi-user support.
Add Supabase import to helpers
Open src/app/(server)/api/agents/helpers.ts and add the Supabase import after the existing imports:
import * as supabaseService from '@/services/supabase-service'Add getUserFromRequest function
Add a new getUserFromRequest() function before the validateAgentOwner() function:
export interface UserData {  supabaseUserId: string  lettaIdentityId: string  cookieUid: string}
/** * Get user data from request headers (set by middleware) */export function getUserFromRequest(req: NextRequest): UserData | null {  if (!USE_COOKIE_BASED_AUTHENTICATION) {    return {      supabaseUserId: 'default',      lettaIdentityId: 'default',      cookieUid: 'default'    }  }
  const supabaseUserId = req.headers.get('x-user-id')  const lettaIdentityId = req.headers.get('x-letta-identity-id')  const cookieUid = req.headers.get('x-cookie-uid')
  if (!supabaseUserId || !lettaIdentityId || !cookieUid) {    return null  }
  return {    supabaseUserId,    lettaIdentityId,    cookieUid  }}
This function extracts the user data that middleware attached to request headers.
Update validateAgentOwner function
In the validateAgentOwner() function, find this section:
const userId = getUserId(req)if (!userId) { return NextResponse.json({ error: 'User ID is required' }, { status: 400 })}Replace it with:
const user = getUserFromRequest(req)if (!user) { return NextResponse.json({ error: 'User authentication required' }, { status: 401 })}Then find this part that checks tags:
if (!agent.tags.includes(`user:${userId}`)) { return NextResponse.json({ error: 'Agent not found' }, { status: 404 })}Replace it with Supabase ownership verification:
// Verify ownership via Supabaseconst agentMetadata = await supabaseService.getAgentByLettaId(agentId)if (!agentMetadata || agentMetadata.user_id !== user.supabaseUserId) { return NextResponse.json({ error: 'Agent not found' }, { status: 404 })}Finally, update the return statement from:
return { userId: userId, agentId: agentId, agent: agent}To:
return { userId: user.supabaseUserId, agentId: agentId, agent: agent, user: user}Remove getUserTagId function
Find and delete the getUserTagId() function entirely, since we’re no longer using tags:
export function getUserTagId(userId: string) { if (!USE_COOKIE_BASED_AUTHENTICATION) { return [] } return [`user:${userId}`]}The helper functions now check ownership through Supabase instead of checking Letta agent tags.
Now we’ll update the agent routes to use Identities instead of tags.
Update imports in agent routes
Open src/app/(server)/api/agents/route.ts and change the imports at the top from:
import { getUserTagId, getUserId } from './helpers'To:
import { getUserFromRequest } from './helpers'import * as supabaseService from '@/services/supabase-service'Update getAgents function
In the getAgents function, replace the user ID check:
const userId = getUserId(req)if (!userId) { return NextResponse.json({ error: 'User ID is required' }, { status: 400 })}With:
const user = getUserFromRequest(req)if (!user) { return NextResponse.json({ error: 'User authentication required' }, { status: 401 })}Then replace the agent listing logic that uses tags:
const agents = await client.agents.list({ tags: getUserTagId(userId), matchAllTags: true,})With Identity-based filtering:
// Fetch agents from Letta using Identityconst agents = await client.agents.list({ identifierKeys: [user.cookieUid]})This lists only agents associated with the user’s Identity.
Update createAgent function
In the createAgent function, replace the user ID check:
const userId = getUserId(req)if (!userId) { return NextResponse.json({ error: 'User ID is required' }, { status: 400 })}With:
const user = getUserFromRequest(req)if (!user) { return NextResponse.json({ error: 'User authentication required' }, { status: 401 })}Then replace the agent creation that uses tags:
const newAgent = await client.agents.create({  memory_blocks: DEFAULT_MEMORY_BLOCKS,  model: DEFAULT_LLM,  embedding: DEFAULT_EMBEDDING,  tags: getUserTagId(userId)})
return NextResponse.json(newAgent)
With Identity-based creation and Supabase storage:
// Step 1: Create agent in Letta with Identityconst newAgent = await client.agents.create({  memory_blocks: DEFAULT_MEMORY_BLOCKS,  model: DEFAULT_LLM,  embedding: DEFAULT_EMBEDDING,  identityIds: [user.lettaIdentityId]})
// Step 2: Store agent metadata in Supabaseconst personaBlock = DEFAULT_MEMORY_BLOCKS.find(b => b.label === 'persona')const humanBlock = DEFAULT_MEMORY_BLOCKS.find(b => b.label === 'human')
await supabaseService.createAgent({  lettaAgentId: newAgent.id,  userId: user.supabaseUserId,  name: newAgent.name || 'New Agent',  persona: personaBlock?.value,  humanBlock: humanBlock?.value,  model: DEFAULT_LLM})
console.log(`Agent created: Letta ID ${newAgent.id}, Supabase metadata stored`)
return NextResponse.json(newAgent)
This creates the agent in Letta with identityIds to link it to the user’s Identity, then stores metadata in Supabase. The Supabase record includes the letta_agent_id to link back to Letta and the user_id for ownership tracking.
When a user deletes an agent, we need to remove it from both Letta and Supabase.
Add Supabase import
Open src/app/(server)/api/agents/[agentId]/route.ts and add the Supabase import after the existing imports:
import * as supabaseService from '@/services/supabase-service'Update deleteAgentById function
In the deleteAgentById function, find this line:
await client.agents.delete(agentId)return NextResponse.json({ message: 'Agent deleted successfully' })Replace it with:
// Step 1: Get Supabase agent record using Letta agent IDconst supabaseAgent = await supabaseService.getAgentByLettaId(agentId)if (!supabaseAgent) {  return NextResponse.json({ error: 'Agent not found' }, { status: 404 })}
const supabaseAgentId = supabaseAgent.id
// Step 2: Delete from Lettaawait client.agents.delete(agentId)
// Step 3: Delete metadata from Supabase (cascades to messages)await supabaseService.deleteAgent(supabaseAgentId)
console.log(`Agent deleted: Letta ID ${agentId} and Supabase metadata`)
return NextResponse.json({ message: 'Agent deleted successfully' })
This removes the agent from both systems. The ON DELETE CASCADE constraint in your database schema automatically deletes all associated messages when the agent metadata is removed.
The message route handles streaming responses from Letta while persisting the conversation to Supabase. The Vercel AI SDK provides the streaming infrastructure, and we’ll add persistence that doesn’t interfere with the real-time UX.
Add Supabase imports
Open src/app/(server)/api/agents/[agentId]/messages/route.ts and add the Supabase imports at the top:
import { getAgentByLettaId, createMessages } from '@/services/supabase-service'Look up the Supabase agent
In the sendMessage function, find the line where we extract messages from the request:
const { messages } = await req.json()Right after this line, add code to look up the Supabase agent:
// Get Supabase agent to store messagesconst supabaseAgent = await getAgentByLettaId(agentId)if (!supabaseAgent) { console.warn(`Agent ${agentId} not found in Supabase, skipping message persistence`)}This looks up the agent metadata we stored earlier. If it’s not found, we log a warning but continue with the chat (graceful degradation).
Add onFinish callback to streamText
Find the streamText() call:
const result = streamText({ model: letta(), providerOptions: { agent: { id: agentId } }, messages: convertToModelMessages(messages)})Add an onFinish callback to persist messages after streaming completes:
const result = streamText({  model: letta(),  providerOptions: {    agent: {      id: agentId    }  },  messages: convertToModelMessages(messages),  async onFinish({ text }) {    // Persist messages to Supabase after streaming completes    if (supabaseAgent) {      try {        const userMessage = messages[messages.length - 1]
        // Extract content from message structure        // Vercel AI SDK messages have a parts array with text content        let userContent = ''        if (typeof userMessage === 'string') {          userContent = userMessage        } else if (userMessage.content) {          userContent = userMessage.content        } else if (userMessage.parts && Array.isArray(userMessage.parts)) {          // Extract text from parts array          userContent = userMessage.parts            .filter((part: any) => part.type === 'text')            .map((part: any) => part.text)            .join('')        }
        await createMessages([          {            agentId: supabaseAgent.id,            role: 'user',            content: userContent          },          {            agentId: supabaseAgent.id,            role: 'assistant',            content: text          }        ])
        console.log(`Persisted conversation to Supabase for agent ${agentId}`)      } catch (error) {        console.error('Failed to persist messages to Supabase:', error)        // Don't fail the request, just log the error      }    }  }})
The onFinish callback runs after the streaming response completes. This is the perfect time to persist messages because:
text parameter contains the full responseThe content extraction logic handles different message formats from the Vercel AI SDK. Messages can be strings, objects with a content property, or objects with a parts array. We check for all three formats to reliably extract the user’s message text.
We use createMessages() with an array to insert both messages in a single database transaction, which is more efficient than two separate inserts.
If persistence fails, we log the error but don’t throw it. This ensures the chat continues working even if Supabase is temporarily unavailable.
Now that all the integration code is in place, let’s test the complete flow. Start the development server:
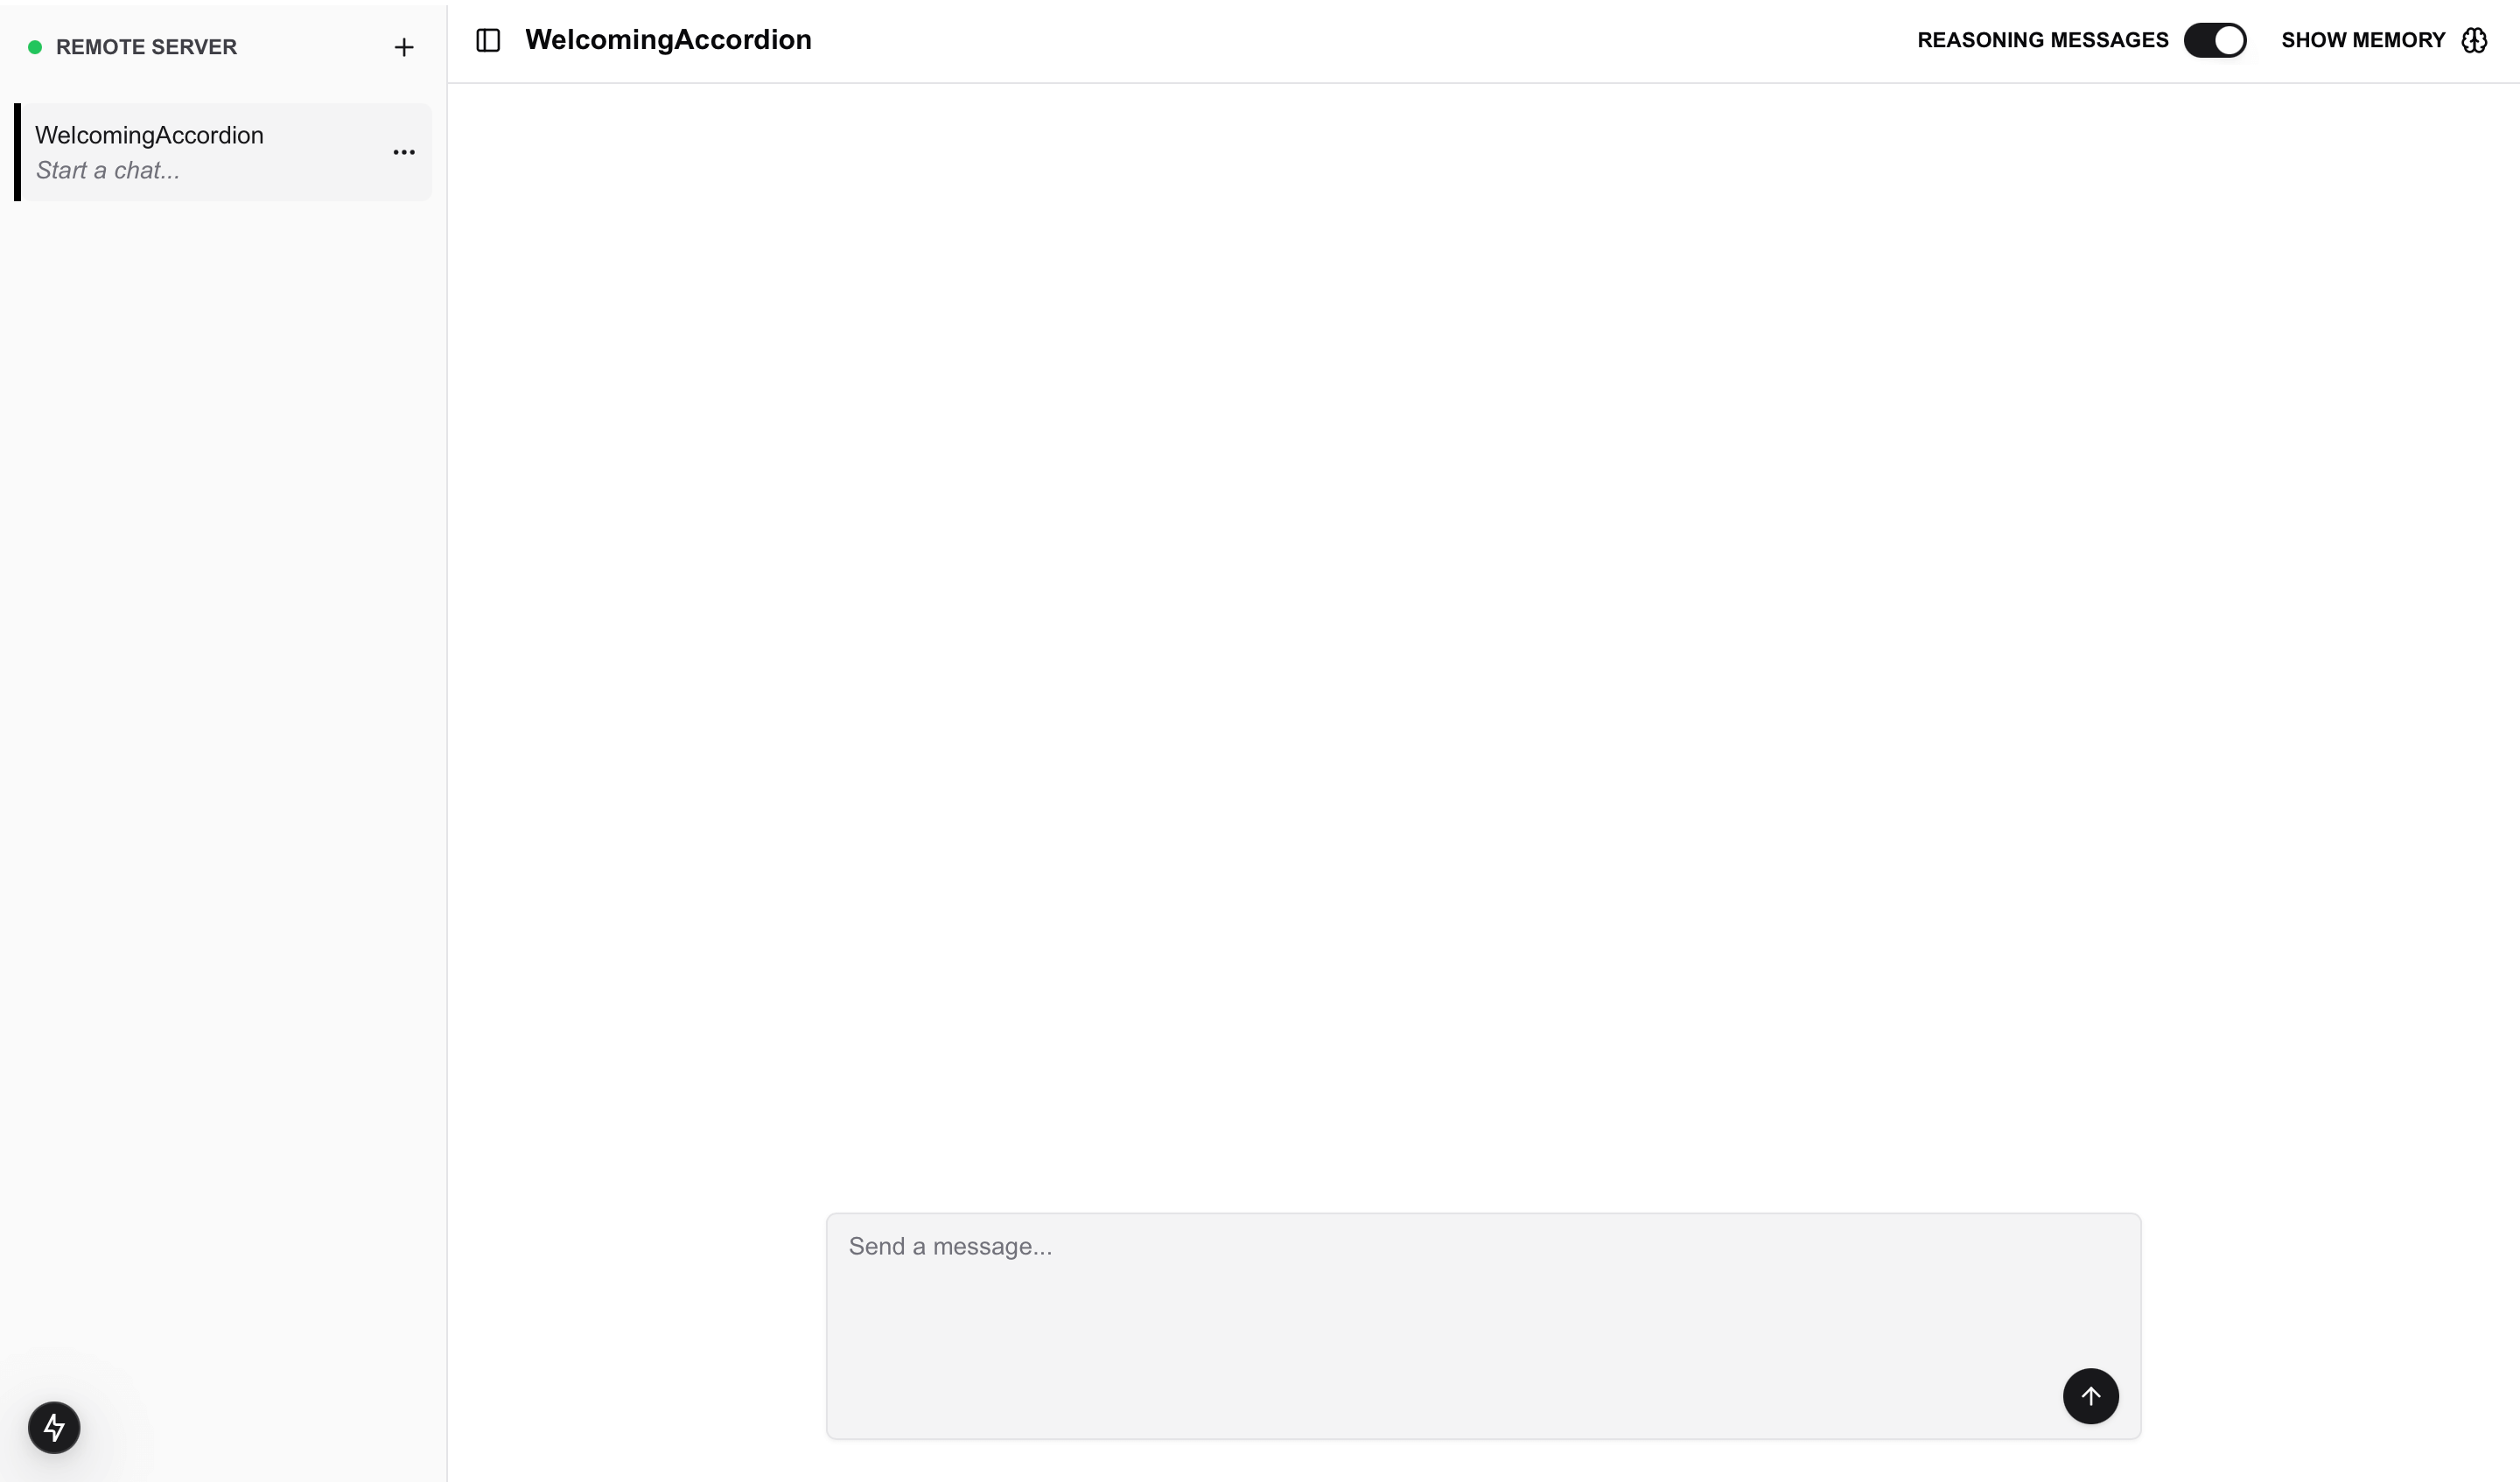
npm run devOpen http://localhost:3000 in your browser. You should see the chatbot interface.
Test user creation
Open your browser’s developer tools and check the Network tab. Refresh the page and look for requests to your API routes. In the terminal where your dev server is running, you should see logs like:
Supabase client initializedCreated Letta Identity: identity-xxx for <cookie-uid>Created user in Supabase: <user-id>New user created: <user-id>This confirms the middleware created a user in both Supabase and Letta.
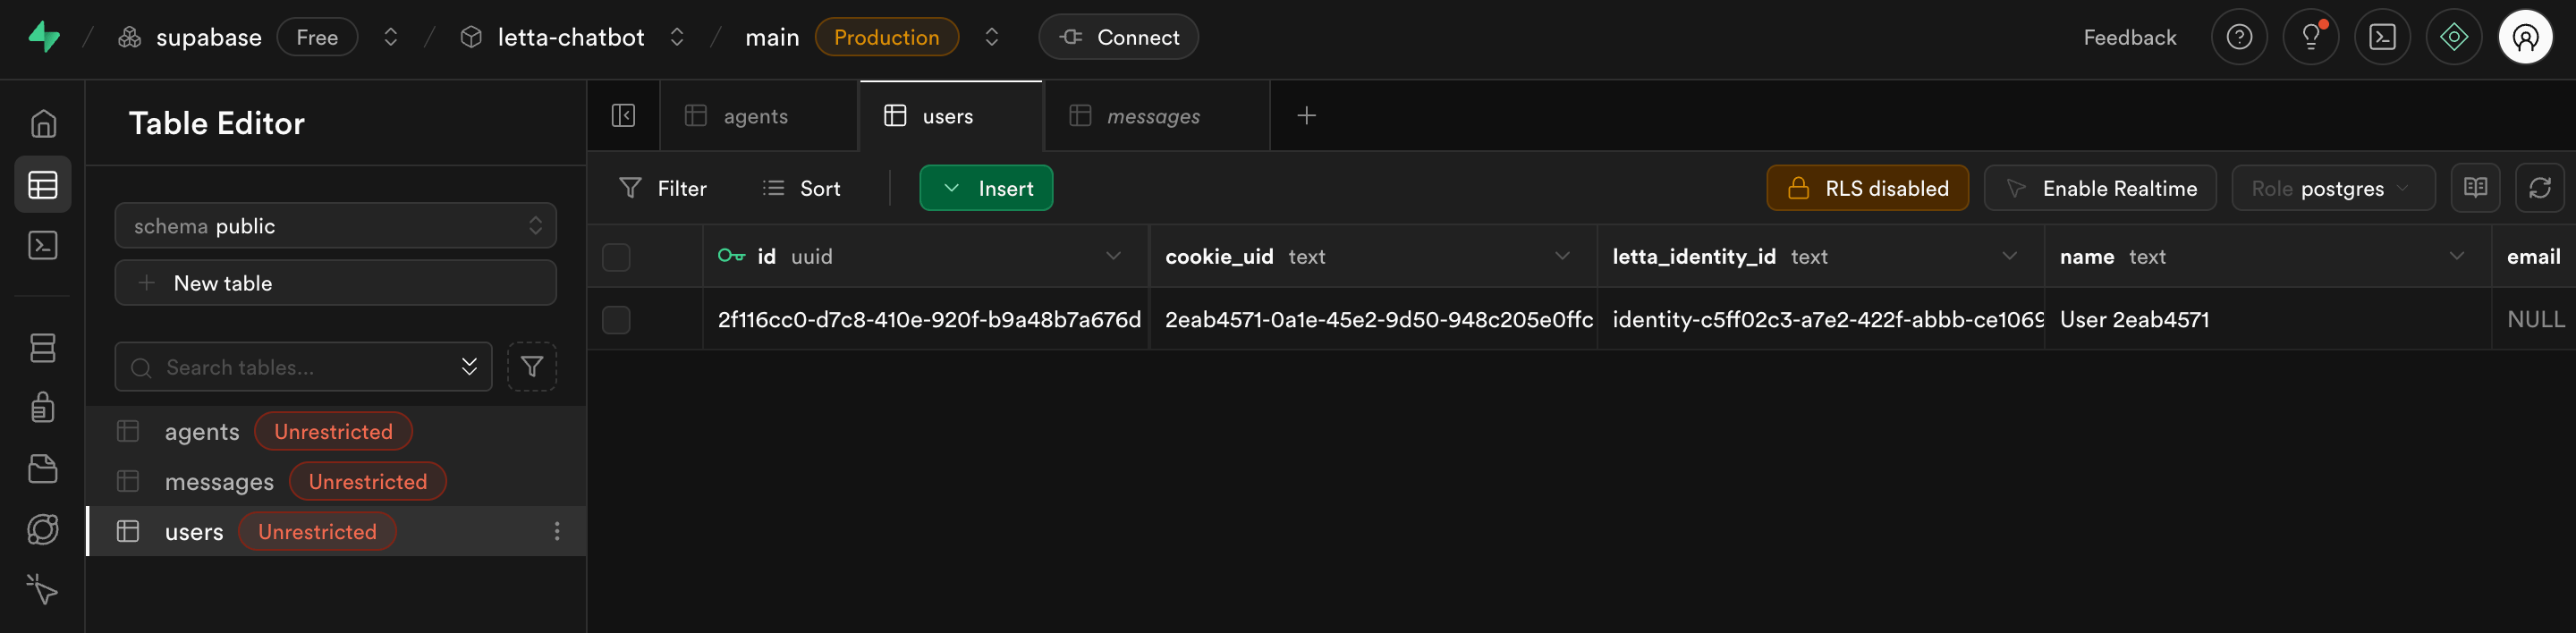
Verify in Supabase by going to your project dashboard, selecting Table Editor, and opening the users table. You should see one row with your cookie UID and Letta Identity ID.
Test agent creation
In the chatbot interface, create a new agent by clicking New Agent or the agent creation button. After the agent is created, check your terminal logs:
Created Letta Identity: identity-xxx for <cookie-uid>Agent created: Letta ID agent-xxx, Supabase metadata storedCheck the agents table in Supabase. You should see a row with:
letta_agent_iduser_id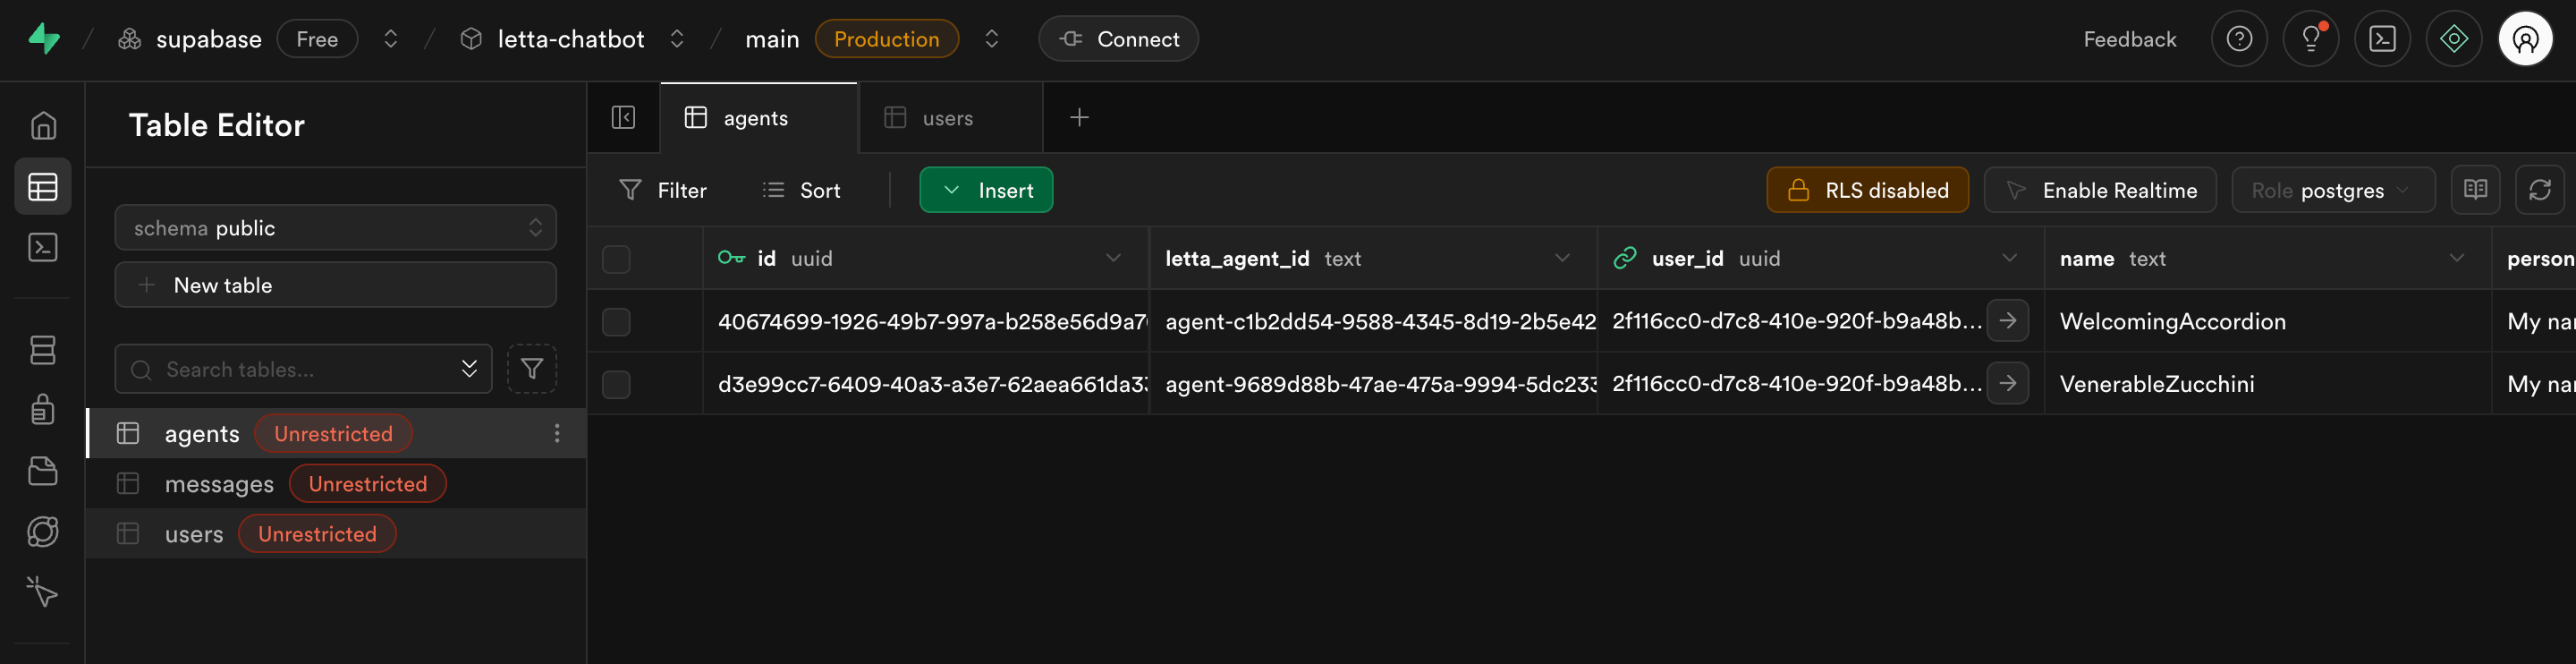
Test message streaming and persistence
Send a message to your agent. You should see the response stream in real-time, token by token. This is the Vercel AI SDK providing smooth UX.
After the response completes, check your terminal:
Persisted conversation to Supabase for agent agent-xxxOpen the messages table in Supabase. You should see two new rows:
role: 'user' containing your messagerole: 'assistant' containing the agent’s response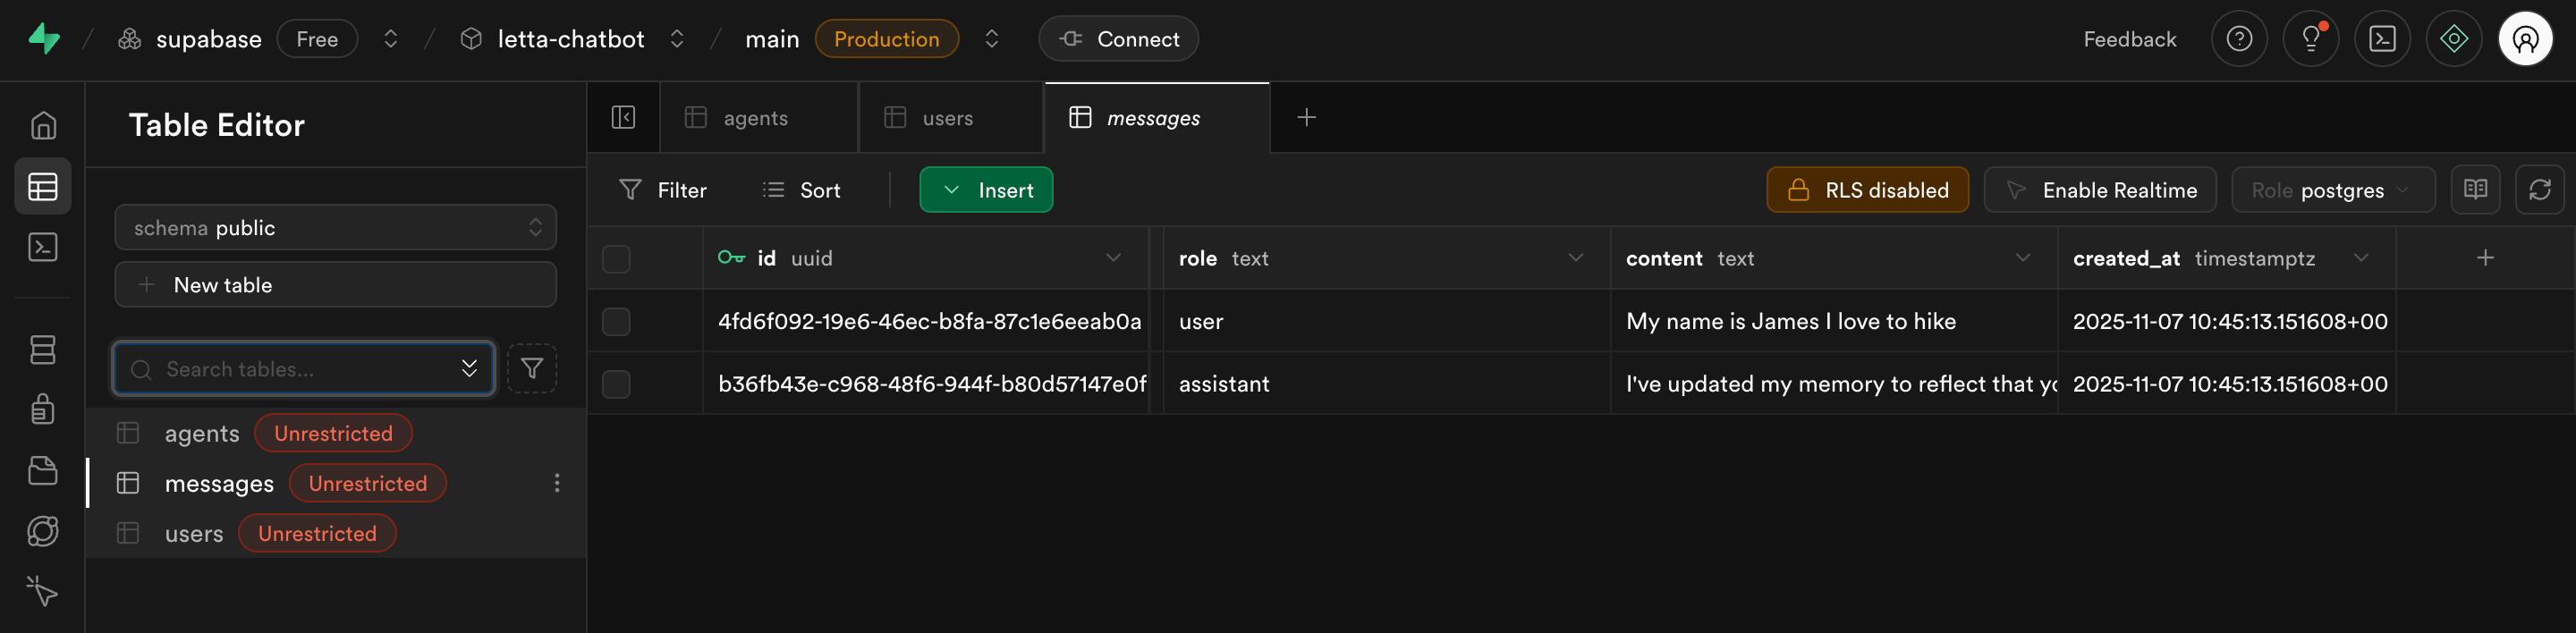
Both messages link to the same agent via the agent_id foreign key.
Test agent deletion
Delete an agent from the interface. Check the Supabase tables:
agents tablemessages table (thanks to ON DELETE CASCADE)Your terminal should show:
Agent deleted: Letta ID agent-xxx and Supabase metadataTest multi-user isolation
To verify users only see their own agents, open a different browser (or an incognito window). This creates a new cookie session:
Each browser has its own cookie, Supabase user, and Letta Identity. Agents are properly isolated by user.
You now have a production-ready multi-user chatbot with persistent storage. Here are some ways to extend it:
Search conversation history beyond the context window
Access conversation history beyond what fits in the agent’s context window. Letta provides tools for this:
Conversation Search - Attached by default, searches through actual past messages. Agents can use conversation_search("What did the user say about their preferences?") to retrieve literal conversation history.
Archival Memory - For curated facts and knowledge the agent stores intentionally:
// Ensure agent has archival memory tools attachedawait client.agents.tools.attach(agentId, archivalMemoryInsertToolId)await client.agents.tools.attach(agentId, archivalMemorySearchToolId)
// Agents decide what's worth remembering long-term:// archival_memory_insert("User prefers Python for data science projects")// archival_memory_search("What are the user's technology preferences?")
// Batch-insert conversation summaries from your Supabase messages:const messages = await getMessagesByAgentId(supabaseAgent.id)for (const msg of messages) {  await client.archival.insert(agentId, `${msg.role}: ${msg.content}`)}
Use conversation_search for retrieving what was actually said. Use archival memory for storing distilled facts and knowledge. Learn more in the archival memory docs and prebuilt tools docs.
Create custom tools for database queries
Build Letta tools that let agents query Supabase directly. For example, a tool that retrieves user conversation statistics:
const getUserStatsTool = {  name: 'get_user_stats',  description: 'Get conversation statistics for the current user',  parameters: {},  func: async () => {    const { data } = await supabase      .from('messages')      .select('created_at')      .eq('user_id', currentUserId)
    return {      totalMessages: data.length,      firstMessage: data[0]?.created_at    }  }}
This lets agents access database information without hardcoding queries in prompts.
Share memory blocks across agents
Use Letta’s shared memory blocks to give multiple agents access to common information. Letta tracks shared blocks internally, so you just need to create a block once and attach it to multiple agents:
// Step 1: Create a shared memory block onceconst sharedBlock = await client.blocks.create({  label: "company_policies",  value: "Our company values X, Y, Z..."})
// Step 2: Attach to multiple agentsawait client.agents.create({  ...agentConfig,  memory_blocks: [    sharedBlock.id,  // Shared across all agents    personalBlock.id  // Unique to this agent  ]})
This gives consistent knowledge across all agents in your organization. Optionally, you can track which blocks are shared in Supabase if you need app-level metadata about block organization.
Add user authentication
Replace cookie-based sessions with Supabase Auth:
// In middleware, use Supabase session instead of cookiesconst { data: { session } } = await supabase.auth.getSession()if (session) { const userData = await getOrCreateUser(session.user.email) // Link to Letta Identity}This gives you email/password login, social auth, and proper user management while maintaining the Letta Identity integration.
Memory Tools
Add tools for searching conversation history and storing knowledge beyond the context window.
Custom Tools
Create tools that let agents query your Supabase database directly for advanced analytics and data retrieval.
Memory Blocks
Share memory blocks across multiple agents for common knowledge and organizational policies.
Multi-User (Identities)
Learn more about Letta Identities and advanced multi-user patterns for building tenant-isolated applications.