Building a Voice Agent with Letta and Vapi
Complete guide to creating a voice-enabled AI agent using Letta for conversational AI and Vapi for voice infrastructure.
A complete guide to creating a voice-enabled AI agent using Letta for conversational AI and Vapi for voice infrastructure.
Overview
Section titled “Overview”This guide will show you how to:
- Create a conversational AI agent with Letta
- Connect it to Vapi for voice capabilities
- Make phone calls and web-based voice interactions with your agent
Architecture:
graph LR
    A[User Voice/Phone] --> B[Vapi]
    B --> C[Letta Agent]
    C --> D[Response]
    D --> B
    B --> A
Prerequisites
Section titled “Prerequisites”Accounts Needed
Section titled “Accounts Needed”- Letta Account - app.letta.com (free tier available)
- Vapi Account - vapi.ai (paid service, ~$0.05/minute)
Tools Required
Section titled “Tools Required”- Python 3.8+ installed
- Terminal/command line access
- Text editor or IDE
Step 1: Set Up Your Development Environment
Section titled “Step 1: Set Up Your Development Environment”Create Project Directory
Section titled “Create Project Directory”mkdir letta-voice-agentcd letta-voice-agentCreate Virtual Environment
Section titled “Create Virtual Environment”# Create virtual environmentpython3 -m venv venv
# Activate itsource venv/bin/activate# Create virtual environmentpython -m venv venv
# Activate itvenv\Scripts\activateInstall Dependencies
Section titled “Install Dependencies”Create requirements.txt:
letta-client>=0.1.319python-dotenv>=1.0.0requests>=2.31.0Install packages:
pip install -r requirements.txtCreate Environment File
Section titled “Create Environment File”Create .env:
# Letta API ConfigurationLETTA_API_KEY=your_letta_api_key_here
# Vapi API ConfigurationVAPI_API_KEY=your_vapi_private_key_here
# Will be filled in laterLETTA_AGENT_ID=VAPI_ASSISTANT_ID=
Create .gitignore:
.envvenv/__pycache__/*.pycStep 2: Get Your Letta API Key
Section titled “Step 2: Get Your Letta API Key”- Go to app.letta.com/settings
- Navigate to API Keys tab
- Click Create New Key (or copy existing key)
- Copy the key and add it to
.env:
LETTA_API_KEY=sk-your-actual-key-hereStep 3: Create a Letta Agent
Section titled “Step 3: Create a Letta Agent”Option A: Using Python SDK
Section titled “Option A: Using Python SDK”Create create_agent.py:
#!/usr/bin/env python3"""Create a Letta agent optimized for voice conversations."""
import osfrom dotenv import load_dotenvfrom letta_client import Letta
# Load environment variablesload_dotenv()
# Initialize Letta clientclient = Letta(api_key=os.getenv('LETTA_API_KEY'))
print("Creating Letta agent...")
# Create the agentagent = client.agents.create(    name="Voice Assistant",
    # Memory blocks define the agent's context    memory_blocks=[        {            "label": "human",            "value": "Name: Unknown\nPreferences: Unknown"        },        {            "label": "persona",            "value": """You are a helpful AI assistant with voice capabilities.You speak naturally and conversationally.Keep responses concise and clear for voice interactions.Avoid using special characters, markdown, or formatting that doesn't translate well to speech."""        }    ],
    # Model configuration    model="openai/gpt-4o-mini",
    # Note: embedding config is only needed for self-hosted    # The Letta API handles this automatically)
print(f"\n✅ Agent created successfully!")print(f"Agent ID: {agent.id}")print(f"Name: {agent.name}")
print(f"\n📝 Add this to your .env file:")print(f"LETTA_AGENT_ID={agent.id}")
# Test the agentprint(f"\n🧪 Testing agent...")response = client.agents.messages.create(    agent_id=agent.id,    messages=[{"role": "user", "content": "Hello! Introduce yourself briefly in one sentence."}])
# Display responsefor message in response.messages:    if message.message_type == "assistant_message":        print(f"\nAgent: {message.content}")
print(f"\n✅ Agent is working! Ready for voice integration.")
Run it:
python create_agent.pyCopy the Agent ID and add it to .env
Option B: Using Letta Dashboard
Section titled “Option B: Using Letta Dashboard”- Go to app.letta.com
- Click Create Agent
- Configure:
- Name: Voice Assistant
- Model: gpt-4o-mini (recommended for cost/performance)
- Memory: Add persona and human blocks as shown above
- Click Create
- Copy the Agent ID from the URL (format:
agent-xxxxxxxxx) - Add to
.env:
LETTA_AGENT_ID=agent-your-id-hereStep 4: Set Up Vapi
Section titled “Step 4: Set Up Vapi”Get Vapi API Keys
Section titled “Get Vapi API Keys”- Go to dashboard.vapi.ai
- Navigate to Settings → API Keys
- Copy your Private Key (for server-side operations)
- Add to
.env:
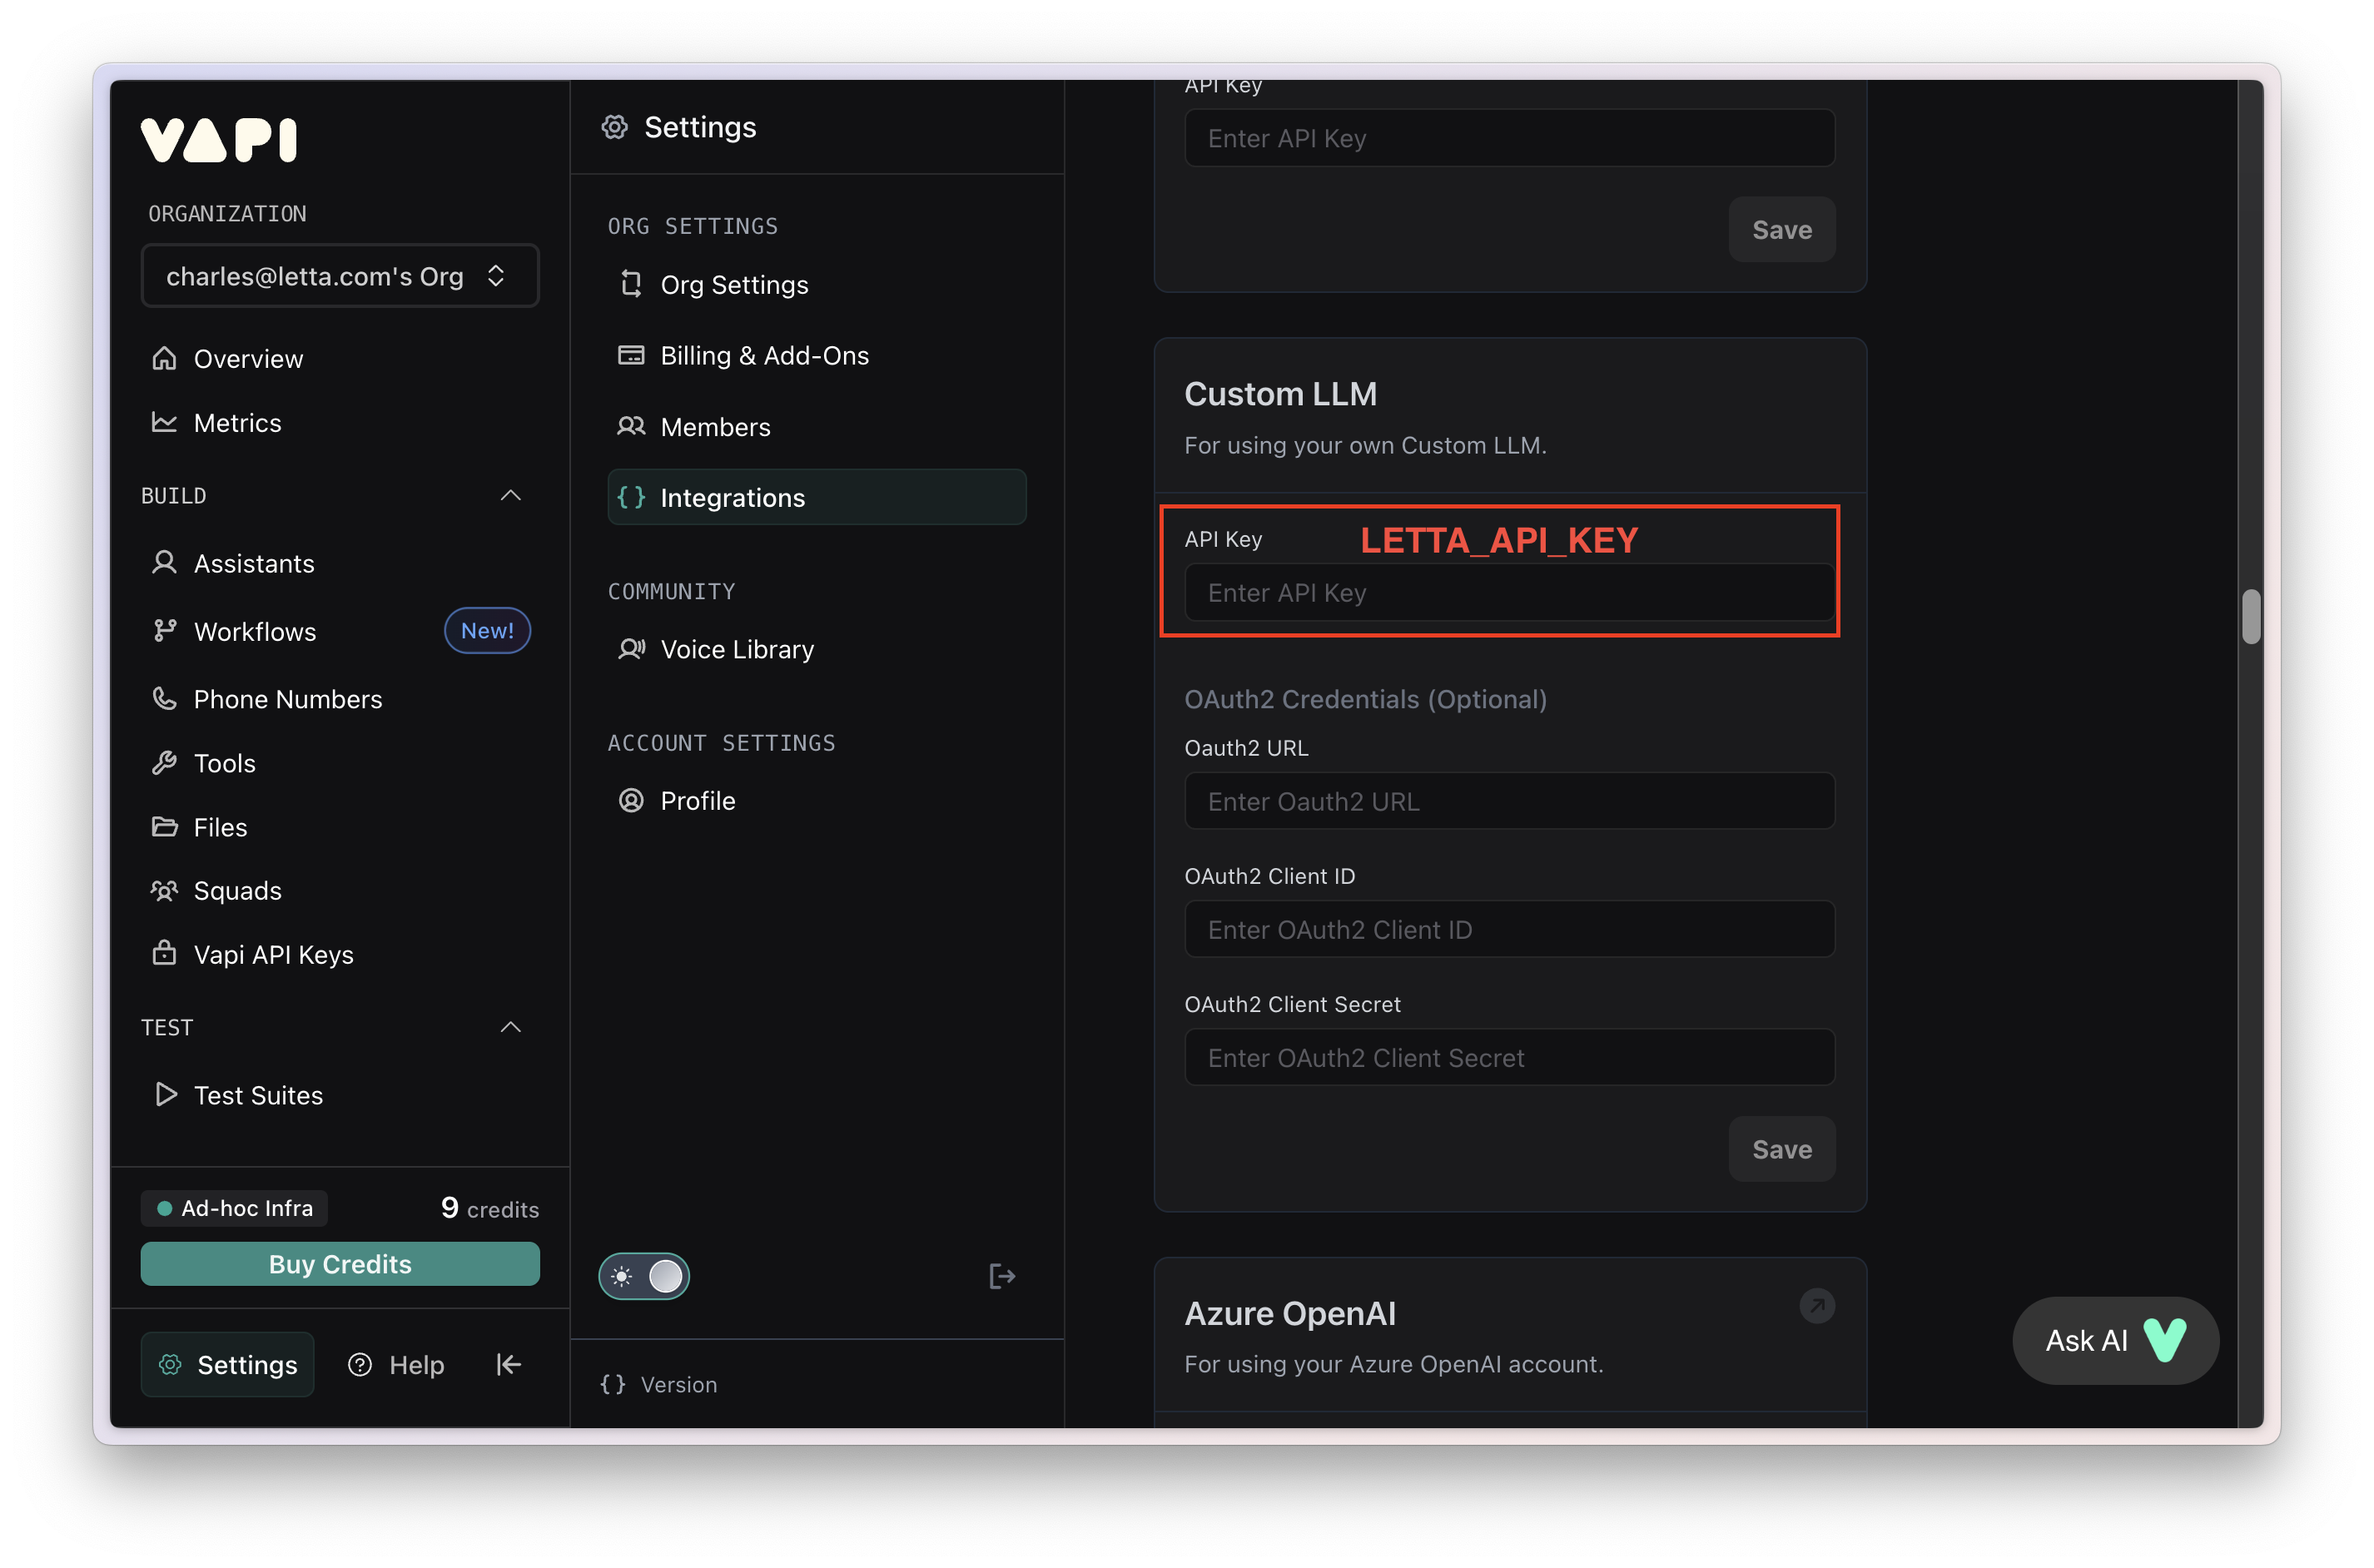
VAPI_API_KEY=your_vapi_private_key_hereAdd Letta as Custom LLM Integration
Section titled “Add Letta as Custom LLM Integration”- Go to dashboard.vapi.ai/settings/integrations
- Scroll to Custom LLM section
- Enter your Letta API key in the field
- Click Save
Create Vapi Assistant
Section titled “Create Vapi Assistant”-
Click Create Assistant → Blank Template
-
Configure the assistant:
Model Settings:
- Provider: Custom LLM
- Endpoint:
https://api.letta.com/v1/chat/completions - Model:
agent-YOUR_AGENT_ID(replace with your actual agent ID)
Voice Settings:
- Provider: Vapi (or ElevenLabs for higher quality)
- Voice: Kylie (or browse other options)
Transcriber:
- Provider: Deepgram
- Model: nova-2
- Language: en
First Message:
- Mode: Assistant speaks first
- Message:
Hello! How can I help you today?
-
Click Save
-
Copy the Assistant ID and add to
.env

Step 5: Test Your Voice Agent
Section titled “Step 5: Test Your Voice Agent”Web-Based Test
Section titled “Web-Based Test”The easiest way to test is directly in the Vapi dashboard:
- Go to your assistant in dashboard.vapi.ai/assistants
- Click the Talk button in the top right
- Allow microphone access when prompted
- Start speaking to test your agent
Phone Call Test
Section titled “Phone Call Test”-
Get a Phone Number (optional, costs ~$2/month):
- In Vapi dashboard, go to Phone Numbers
- Click Buy Number
- Select a number and complete purchase
-
Assign Assistant to Number:
- Click on your phone number
- Select your assistant from dropdown
- Click Save
-
Make a Test Call:
- Call the phone number
- Talk with your agent!
Programmatic Web Call
Section titled “Programmatic Web Call”For embedding voice in your web app:
<!DOCTYPE html><html><head>    <title>Voice Agent Test</title></head><body>    <button id="start-call">Start Voice Call</button>    <button id="end-call" disabled>End Call</button>
    <script src="https://cdn.jsdelivr.net/npm/@vapi-ai/web@latest/dist/index.js"></script>    <script>        const vapi = new Vapi('YOUR_VAPI_PUBLIC_KEY');
        const startButton = document.getElementById('start-call');        const endButton = document.getElementById('end-call');
        startButton.addEventListener('click', async () => {            await vapi.start('YOUR_ASSISTANT_ID');            startButton.disabled = true;            endButton.disabled = false;        });
        endButton.addEventListener('click', () => {            vapi.stop();            startButton.disabled = false;            endButton.disabled = true;        });
        vapi.on('call-start', () => {            console.log('Call started');        });
        vapi.on('call-end', () => {            console.log('Call ended');            startButton.disabled = false;            endButton.disabled = true;        });
vapi.on('message', (message) => { console.log('Message:', message); }); </script></body></html>Customizing Your Agent
Section titled “Customizing Your Agent”Update Agent Persona
Section titled “Update Agent Persona”You can modify your agent’s behavior by updating its memory blocks:
from letta_client import Lettaimport osfrom dotenv import load_dotenv
load_dotenv()client = Letta(api_key=os.getenv('LETTA_API_KEY'))agent_id = os.getenv('LETTA_AGENT_ID')
# Get current memory blocksblocks = client.agents.blocks.list(agent_id=agent_id)
# Find the persona blockpersona_block = next(b for b in blocks if b.label == "persona")
# Update itclient.agents.blocks.update(    agent_id=agent_id,    block_id=persona_block.id,    value="""You are a helpful tutor specializing in physics.Keep explanations clear and concise for voice conversations.Use analogies and real-world examples to make concepts accessible.Ask clarifying questions when needed.""")
print("✅ Persona updated!")
Change Voice Settings
Section titled “Change Voice Settings”In the Vapi dashboard or via API:
Available Voice Providers:
- Vapi - Fast, low latency (included)
- ElevenLabs - High quality, natural ($0.30/1K chars additional)
- Azure - Microsoft voices
- PlayHT - Wide variety of voices
- Deepgram - Ultra-fast, good quality
To change voice in the dashboard:
- Go to your assistant
- Click Edit
- Scroll to Voice section
- Select provider and voice
- Click Save
Add Custom Tools
Section titled “Add Custom Tools”Give your agent capabilities like web search or data lookup:
# When creating agent, add tools parameteragent = client.agents.create( name="Voice Assistant with Tools", memory_blocks=[...], model="openai/gpt-4o-mini", tools=["web_search", "archival_memory_search"])Connecting to Self-Hosted Letta Server
Section titled “Connecting to Self-Hosted Letta Server”If you’re running your own Letta server, you can still use Vapi:
-
Set up ngrok (to expose localhost):
Terminal window # Install ngrok from ngrok.comngrok config add-authtoken YOUR_NGROK_TOKENngrok http http://localhost:8283Copy the forwarding URL (e.g.,
https://abc123.ngrok.app) -
Configure Vapi Assistant:
- Model endpoint:
https://abc123.ngrok.app/v1/chat/completions - Model:
agent-YOUR_AGENT_ID - Add your Letta server auth token (if using password protection)
- Model endpoint:
-
Test the connection:
- Use the Talk feature in Vapi dashboard
- Monitor your Letta server logs for incoming requests
Troubleshooting
Section titled “Troubleshooting”Issue: “pipeline-error-custom-llm-llm-failed”
Section titled “Issue: “pipeline-error-custom-llm-llm-failed””Cause: API key not set in Vapi or incorrect endpoint
Solution:
- Verify Letta API key is set in Vapi integrations
- Check endpoint is exactly:
https://api.letta.com/v1/chat/completions - Verify agent ID format is
agent-xxxxxxxxx(not just the ID) - Test agent directly in Letta dashboard to confirm it works
Issue: “400-bad-request-validation-failed”
Section titled “Issue: “400-bad-request-validation-failed””Cause: First message configuration error
Solution: Change first message mode to “assistant-speaks-first” with a static message:
- Set mode: Assistant speaks first
- Set message:
Hello! How can I help you today? - Do NOT use “assistant-speaks-first-with-model-generated-message” (causes issues)
Issue: Echo or Feedback in Calls
Section titled “Issue: Echo or Feedback in Calls”Cause: Microphone picking up speaker output
Solution:
- Always use headphones when testing
- Enable echo cancellation in Vapi settings
- For phone calls, this is handled automatically by the phone network
Issue: Agent Not Responding
Section titled “Issue: Agent Not Responding”Solution:
- Test Letta agent directly first:
from letta_client import Lettaimport osfrom dotenv import load_dotenv
load_dotenv()client = Letta(api_key=os.getenv('LETTA_API_KEY'))
response = client.agents.messages.create(    agent_id=os.getenv('LETTA_AGENT_ID'),    messages=[{"role": "user", "content": "Hello"}])
for msg in response.messages: if msg.message_type == "assistant_message": print(msg.content)- Check Vapi call logs at dashboard.vapi.ai/logs
- Verify your agent has appropriate tools and permissions
Issue: High Latency / Slow Responses
Section titled “Issue: High Latency / Slow Responses”Solutions:
- Use
gpt-4o-miniinstead ofgpt-4(much faster, lower cost) - Keep agent context/memory blocks concise
- Avoid complex tool chains
- Use Vapi’s built-in voices (lower latency than ElevenLabs)
- Consider Deepgram Aura for ultra-low-latency TTS
Cost Optimization
Section titled “Cost Optimization”Voice agents can get expensive quickly. Here’s how to keep costs down:
Model Selection
Section titled “Model Selection”- gpt-4o-mini: ~$0.15/1M input tokens (recommended)
- gpt-4o: ~$2.50/1M input tokens (use only if needed)
- gpt-4-turbo: ~$10/1M input tokens (avoid for voice)
Vapi Usage
Section titled “Vapi Usage”- ~$0.05/minute for Vapi base (transcription + basic TTS)
- +$0.30/1K characters for ElevenLabs voices
- +$2/month for phone numbers
Best Practices
Section titled “Best Practices”- Set
max_tokensto reasonable limits (150-300 for voice) - Keep context windows small (clear history periodically)
- Use Vapi’s built-in voices instead of premium providers
- Monitor usage in both Letta and Vapi dashboards
- Implement conversation timeouts
- Use streaming (automatic with Vapi)