Building customer-specific relationship agents with Letta
Companies generally have customer success agents that handle dozens or even hundreds of accounts. This is a natural pattern to follow when building out AI-based agents too.
But what if each of your customers had their own dedicated customer success agent?
This guide shows you how to get started with customer-specific agents in Letta. Instead of generic chatbots, you’ll create persistent agents with dedicated memory for each customer that can research their background and send personalized communications.
As a demo, we’ll build a customer success agent template where each new customer gets their own dedicated agent, created from the template, that researches their background, updates its memory, and sends personalized welcome emails.
Prerequisites
Section titled “Prerequisites”To follow along, you need free accounts for the following platforms:
- Letta: To access the agent development platform
- Gmail: To configure the agent’s email sending capability
- Zapier MCP: To set up the MCP email tool integration
- Exa: To configure MCP research and LinkedIn lookup tools
Step 1: Create an agent template
Section titled “Step 1: Create an agent template”Agent templates serve as blueprints that define your agent’s memory structure, tools, and behavior patterns. From the Letta dashboard, click Templates → + New template → Start from scratch.
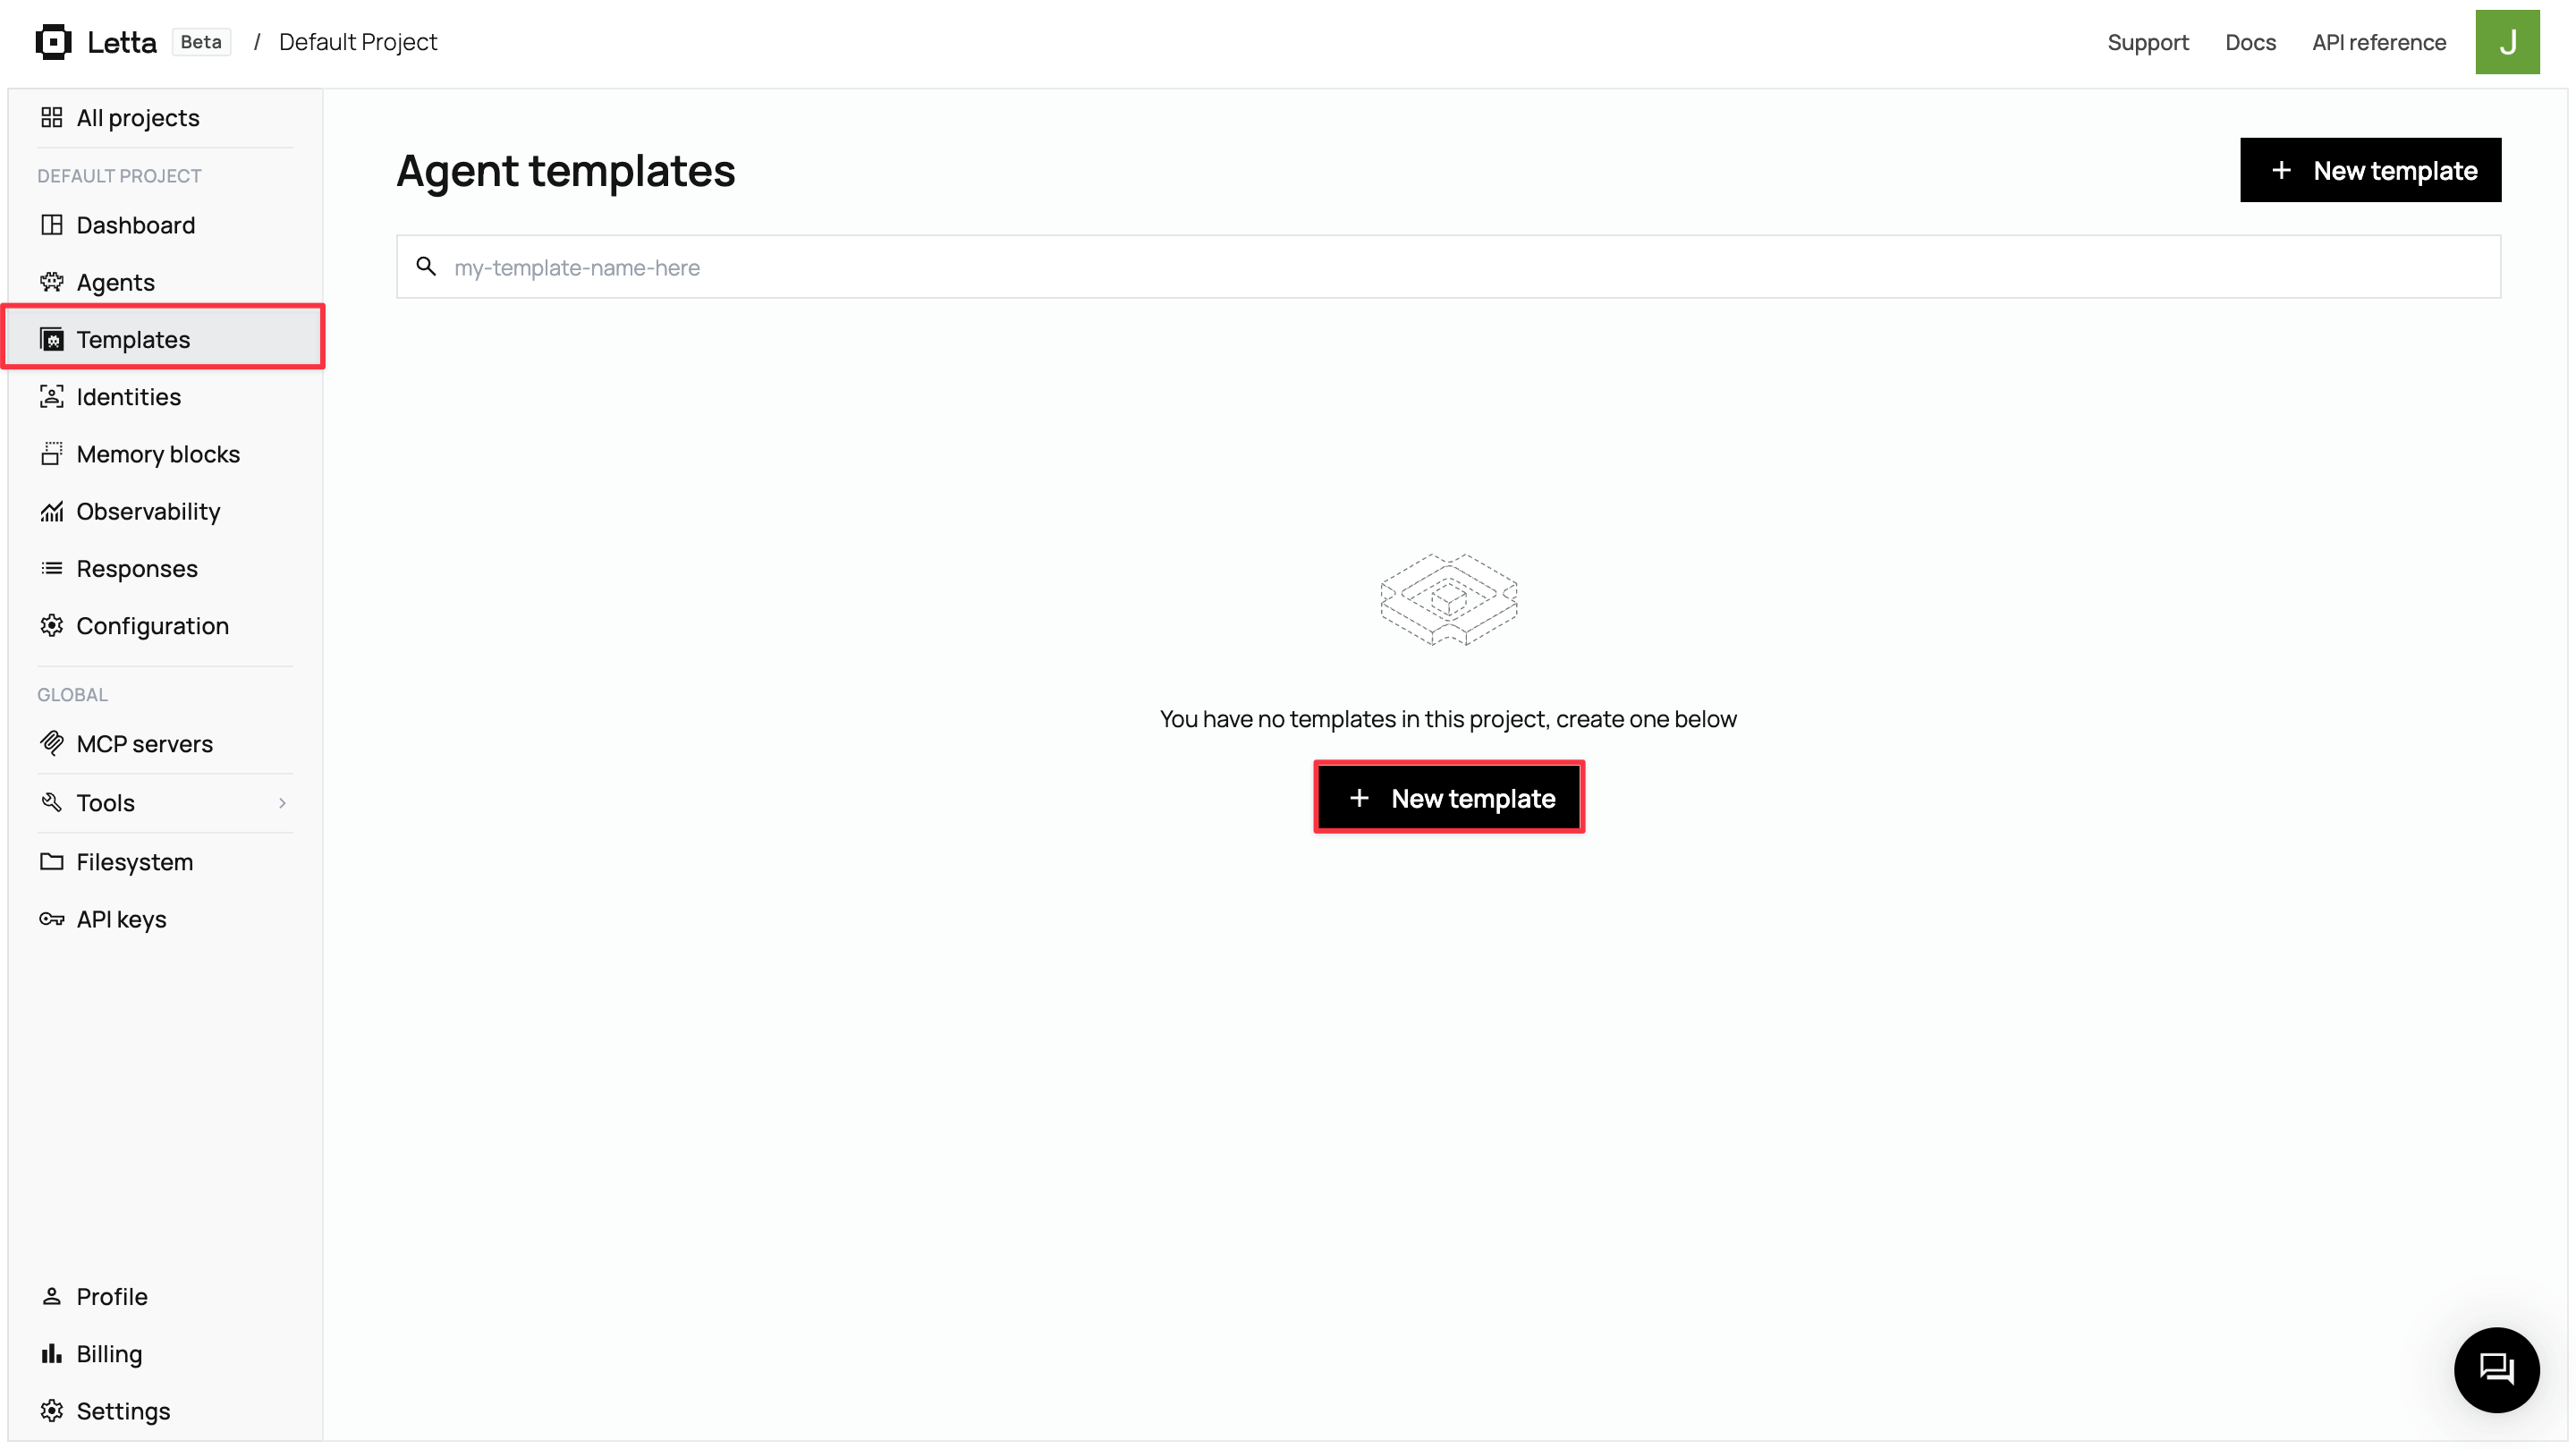
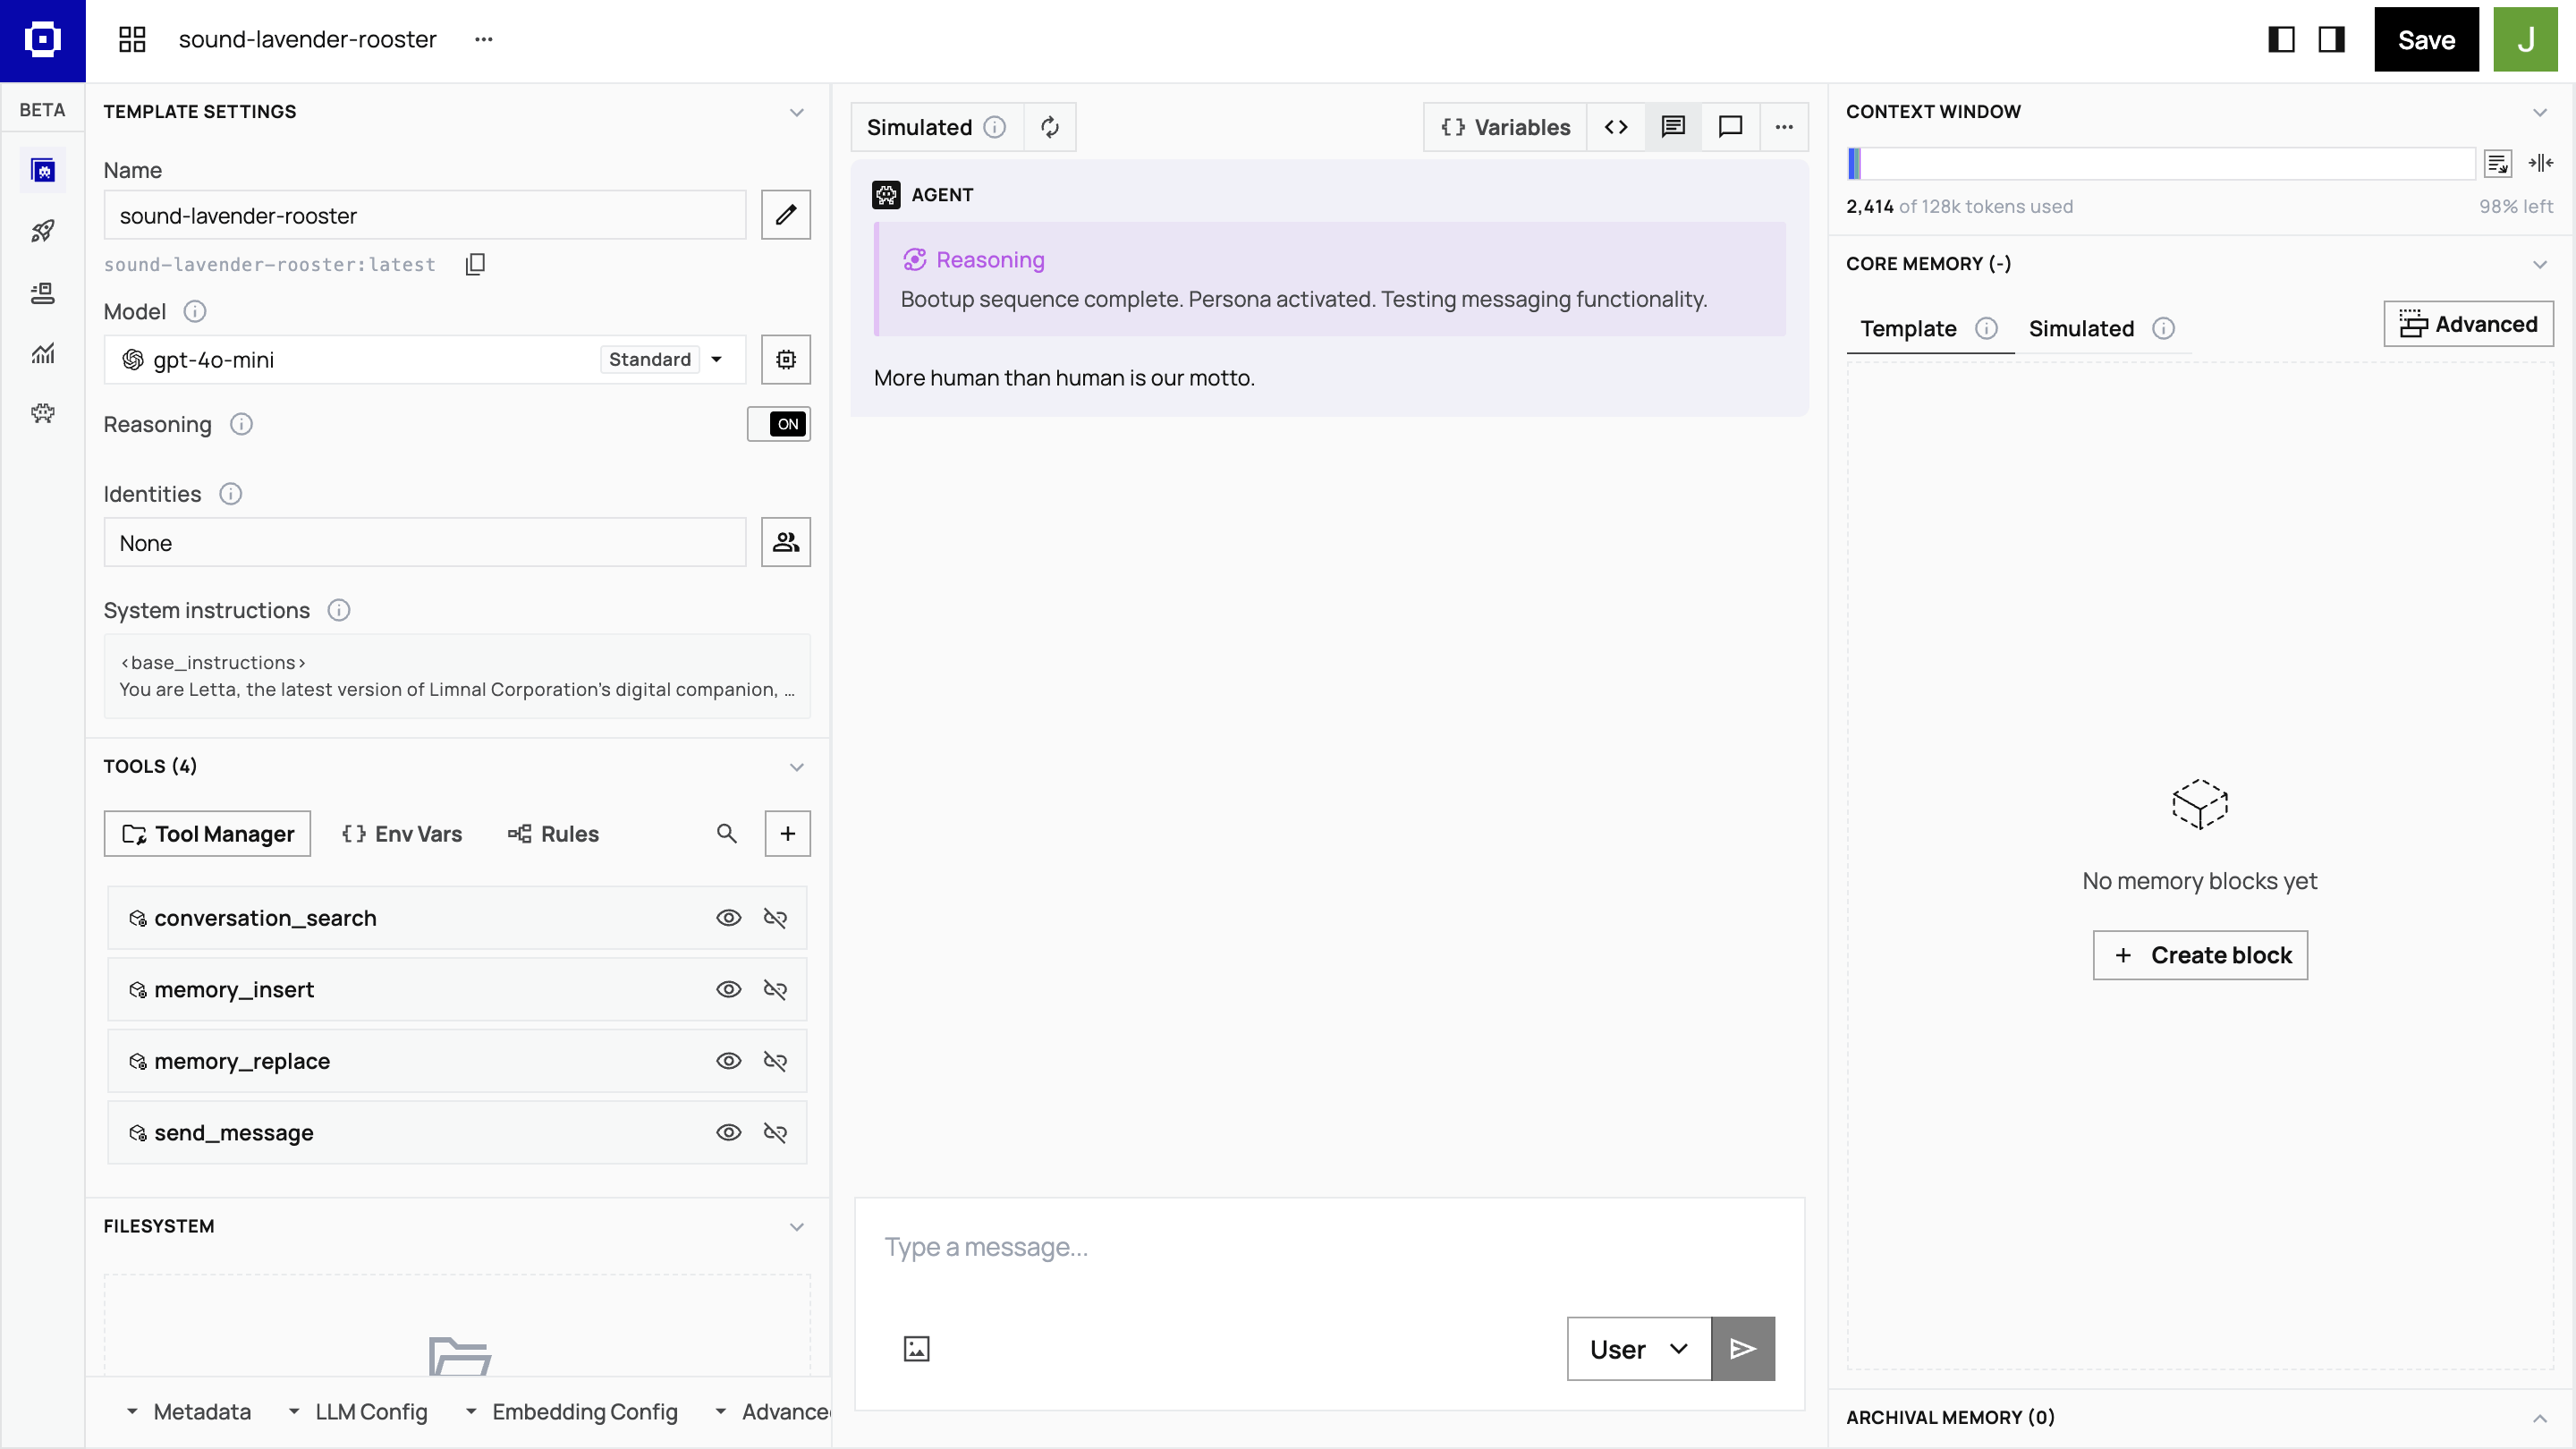
This launches the Agent Development Environment (ADE) with three key areas: a center chat simulator for testing, a left sidebar for configuration (template settings, tools, LLM config), and a right panel showing memory architecture with real-time context utilization.
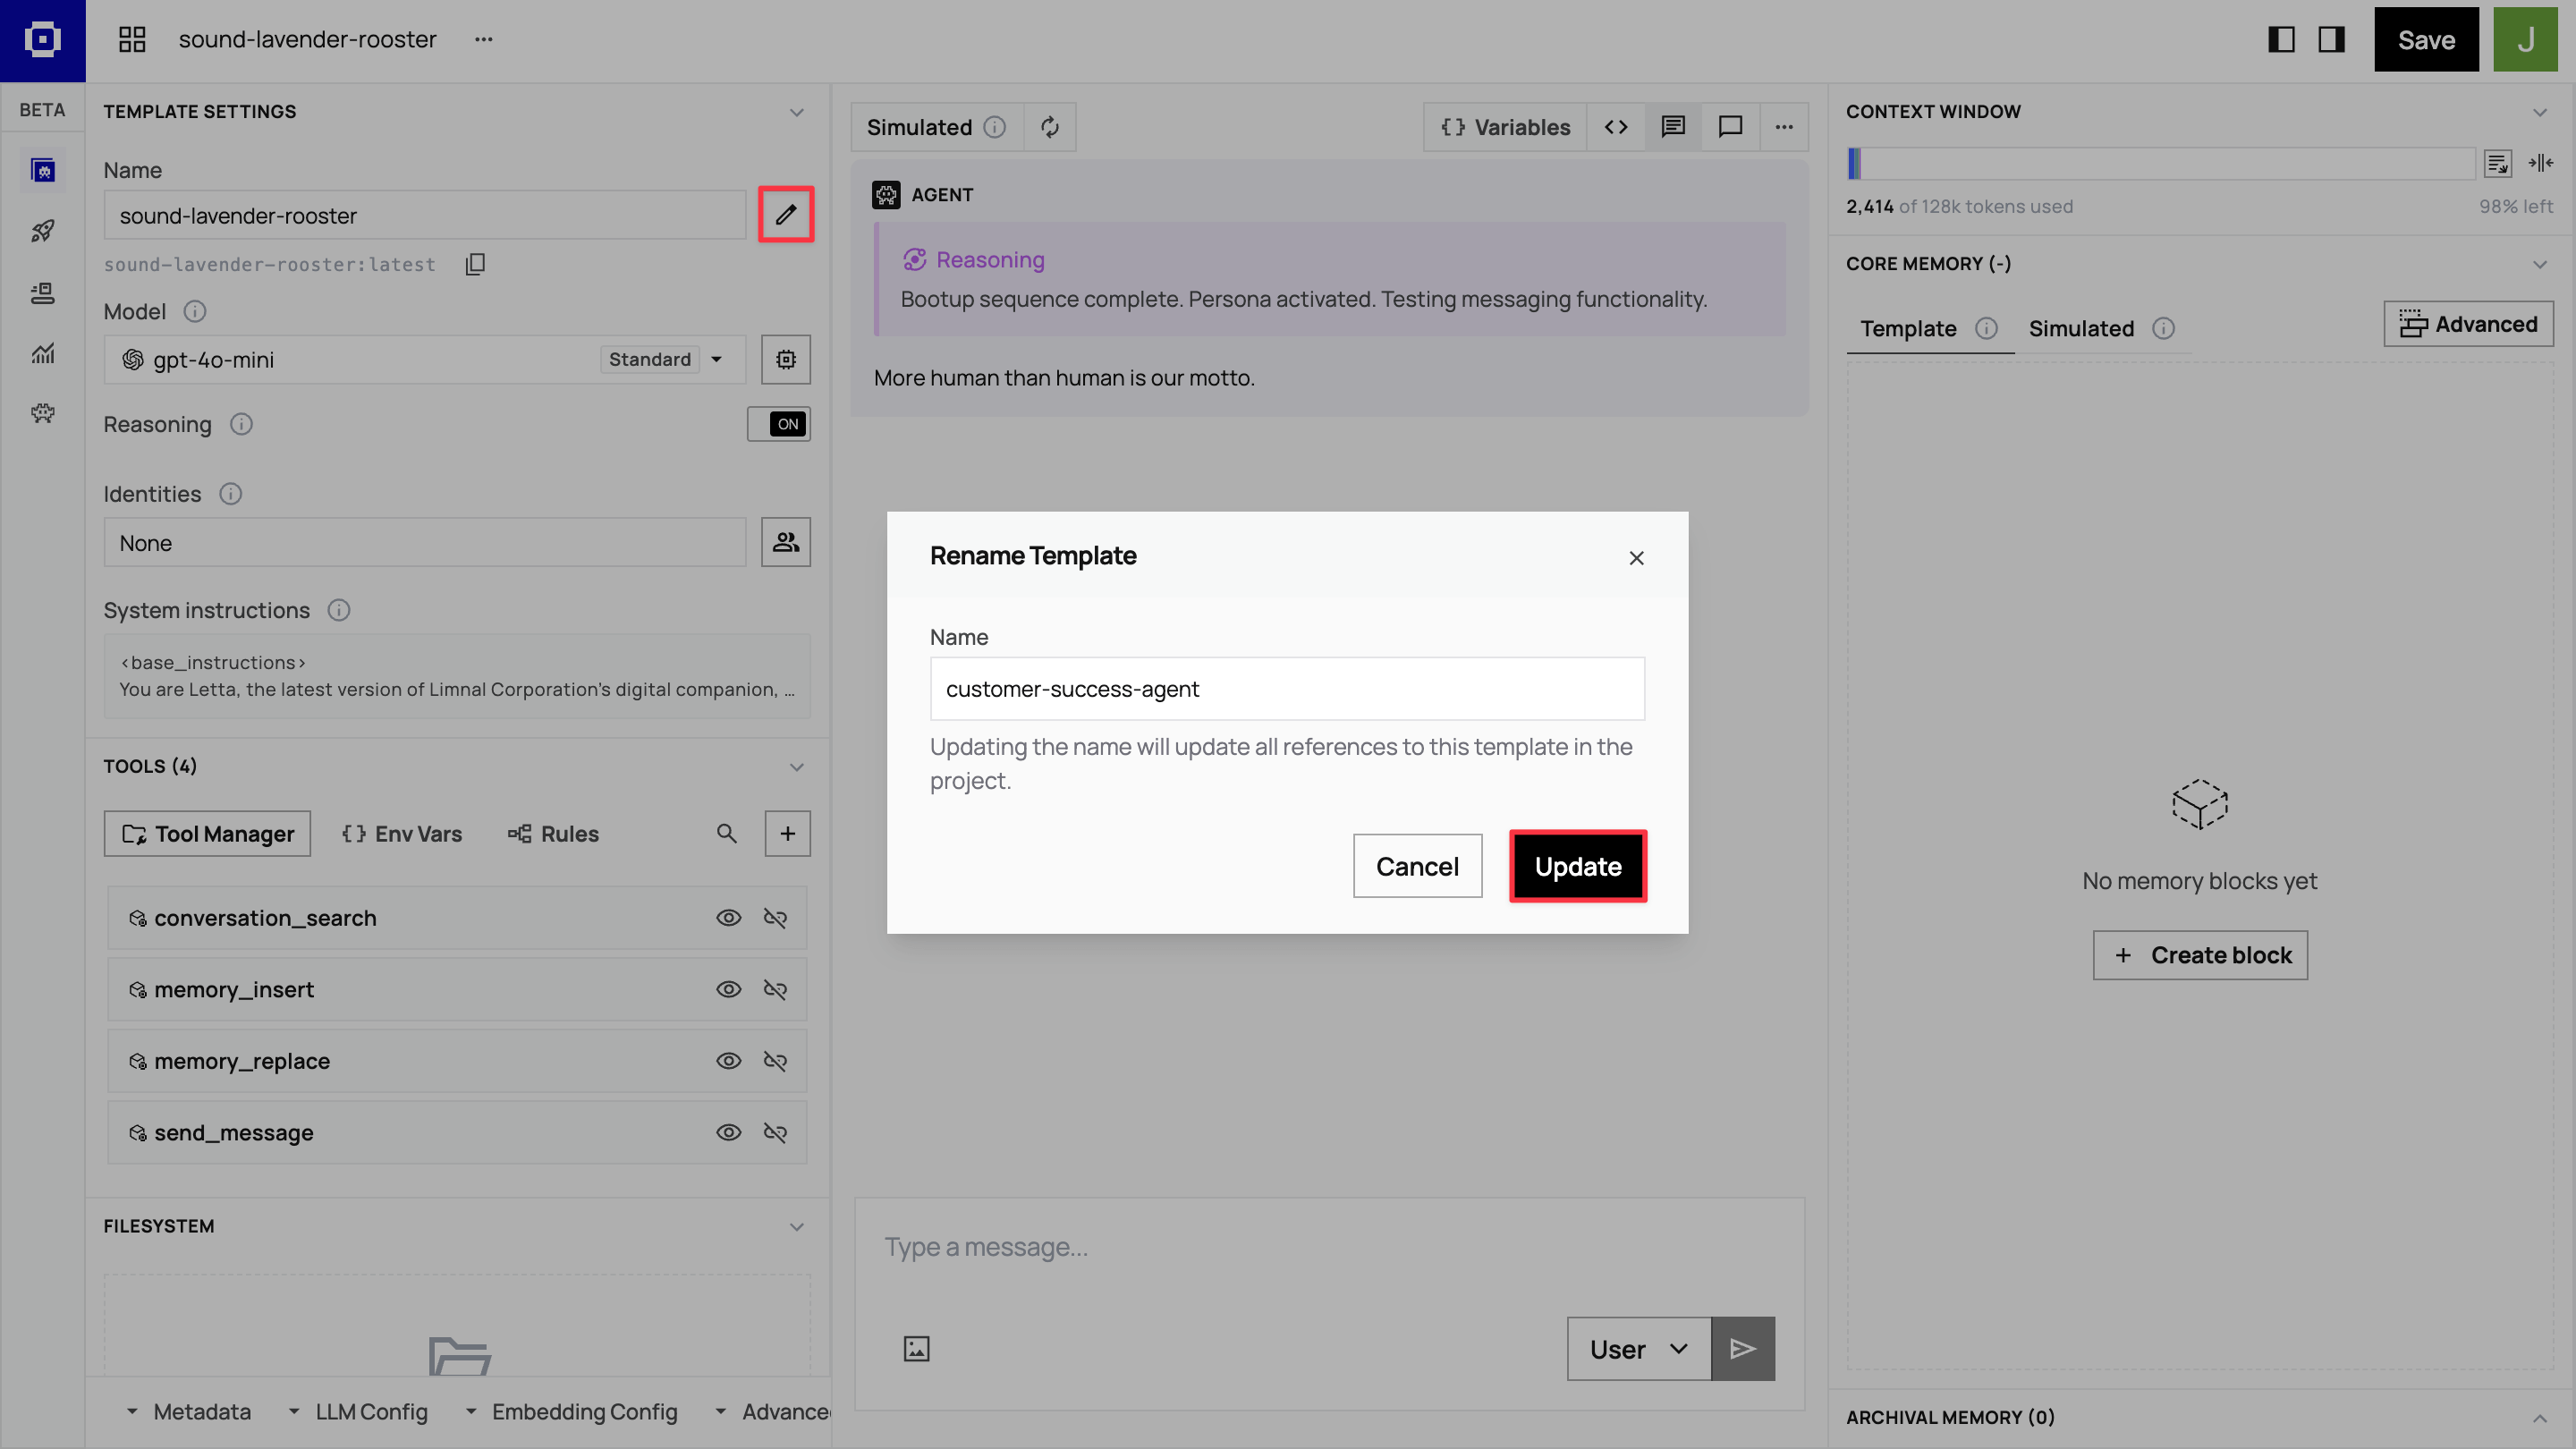
Rename your template customer-success-agent by clicking the pen icon next to the Name field.
Step 2: Set up memory blocks
Section titled “Step 2: Set up memory blocks”Memory blocks create your agent’s persistent knowledge architecture. In the ADE’s right panel, in the Core Memory section, click Advanced → + New block to add custom memory blocks.
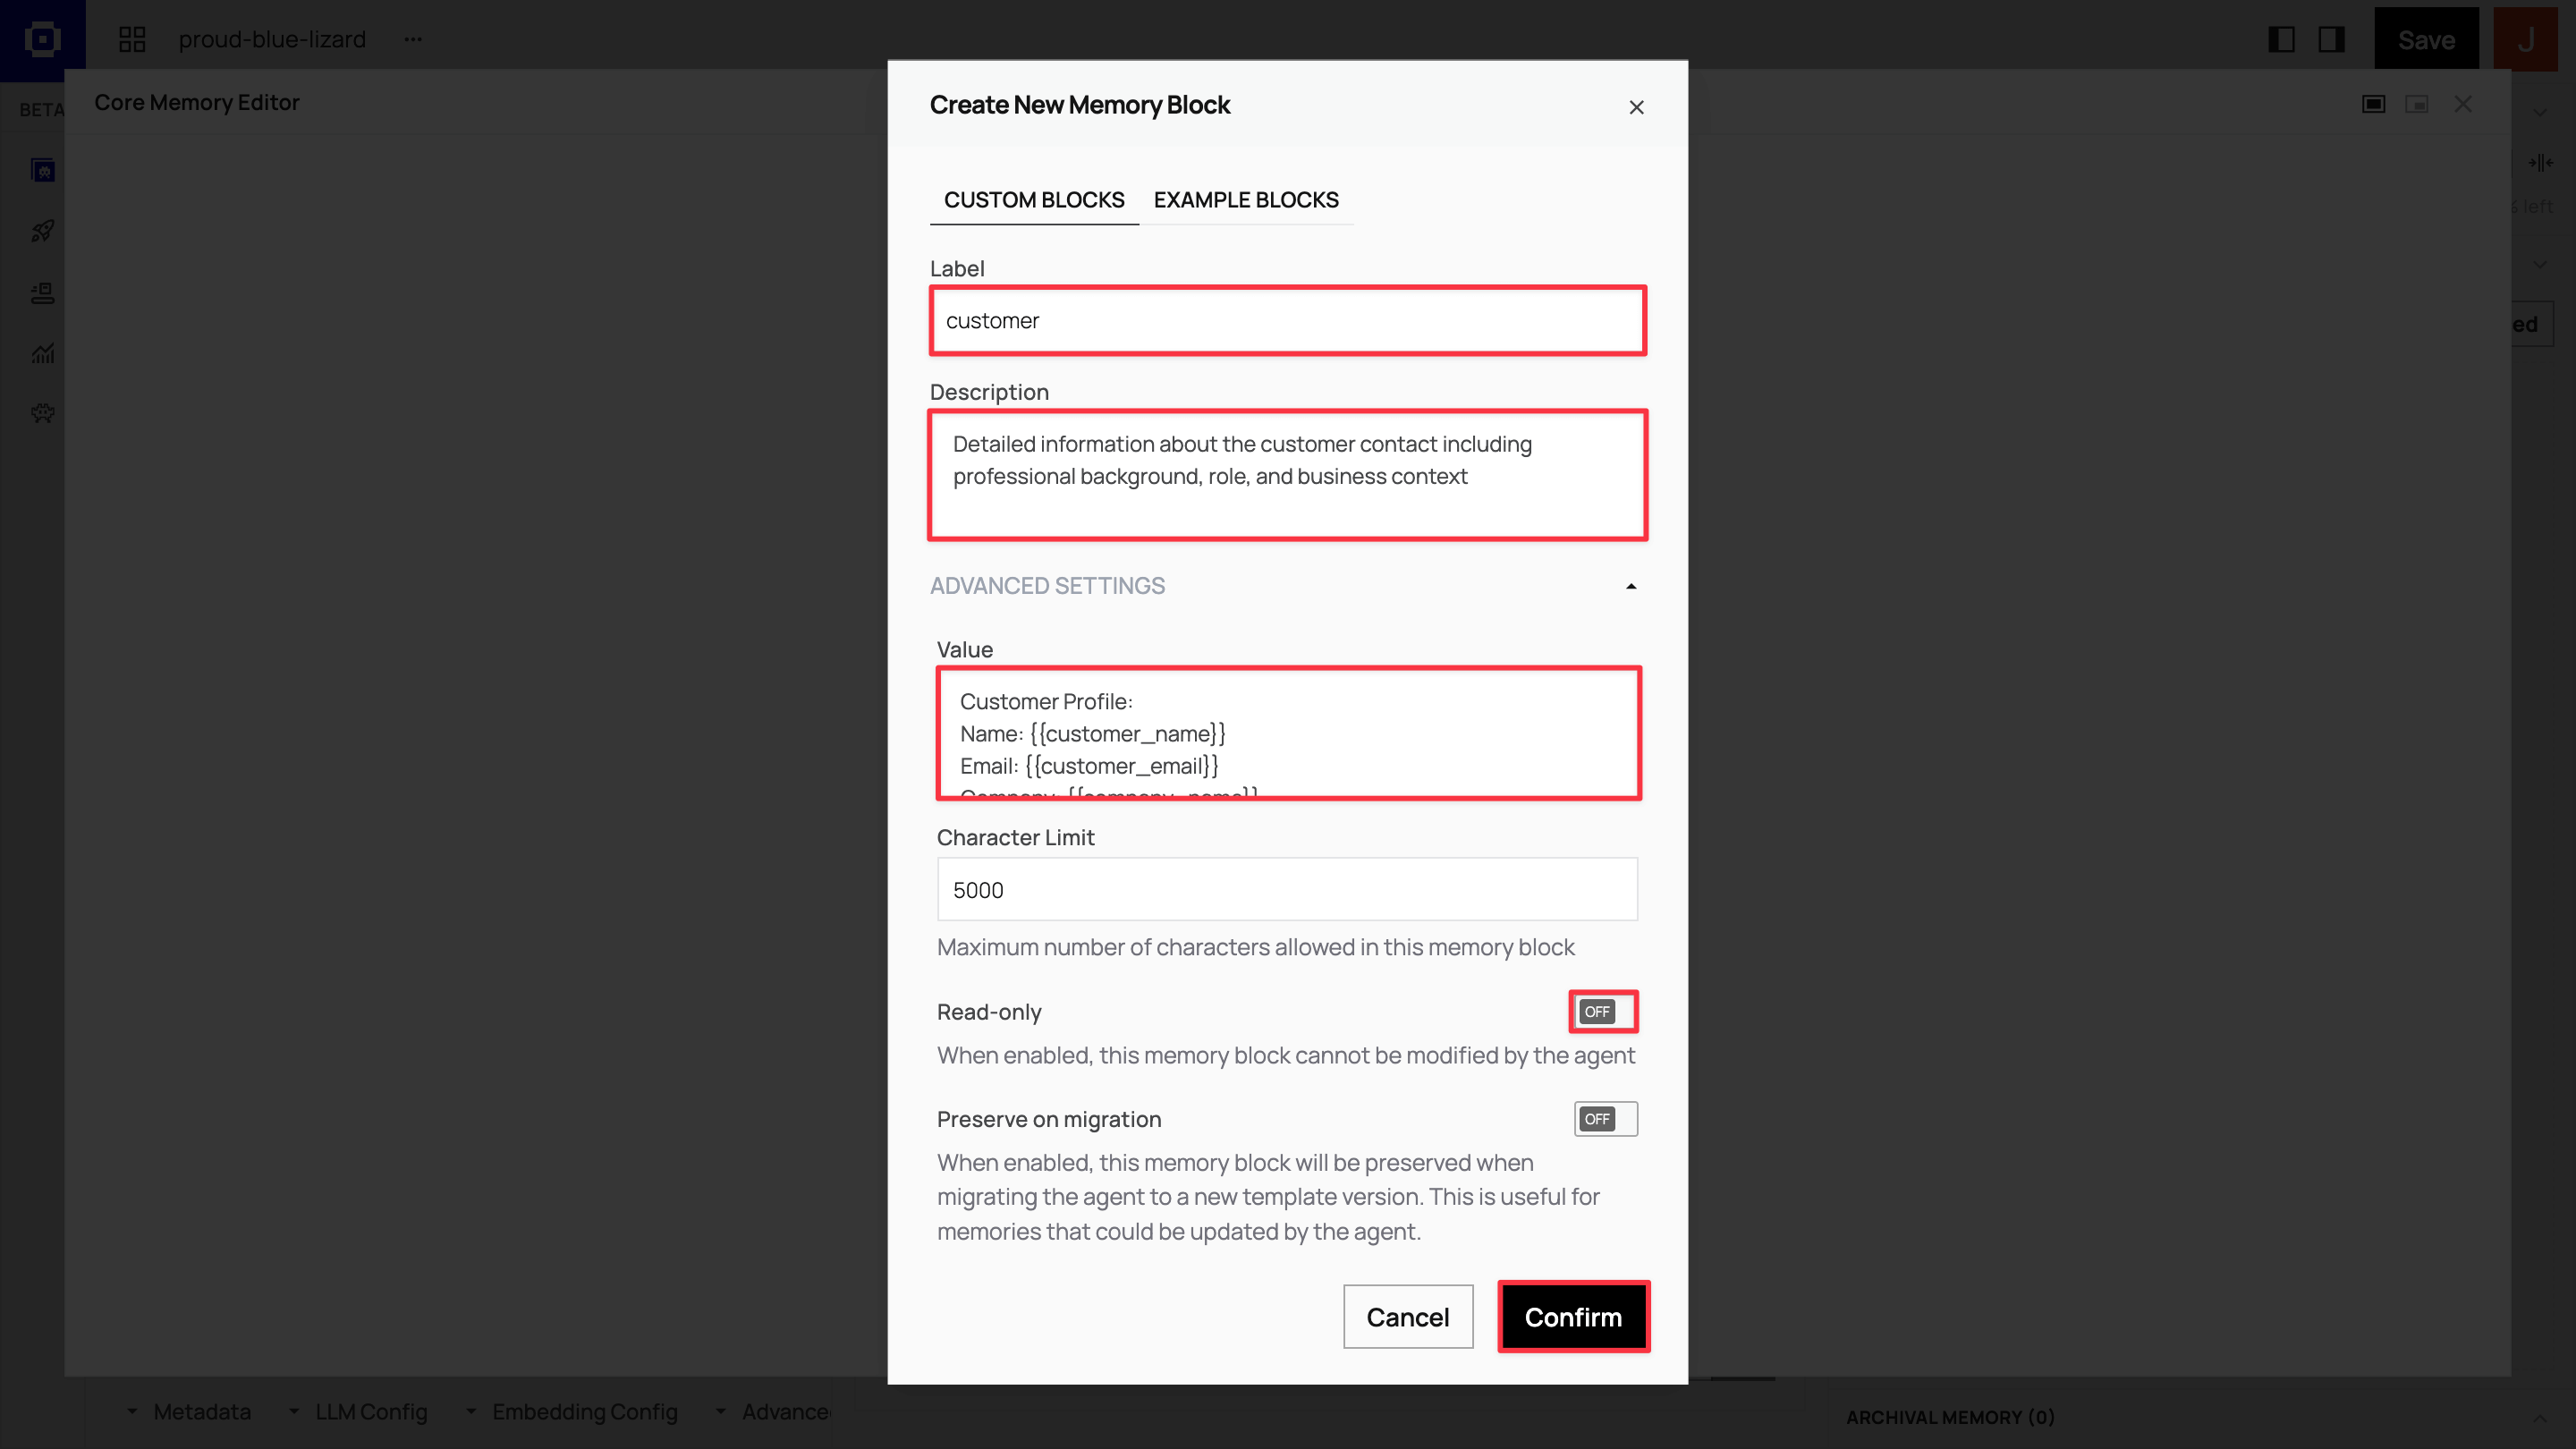
Create four core memory blocks with the following configurations:
Customer block: Customer profile and context
-
Label
customer -
Description
Detailed information about the customer contact including professional background, role, and business context -
Value
Customer Profile:Name: {{customer_name}}Email: {{customer_email}}Company: {{company_name}}Title: {{job_title}}Industry: {{industry_sector}}Professional Background:{{professional_background}}Business Challenges:{{business_challenges}}Communication Preferences:{{communication_preferences}}
Organization block: Company knowledge base
-
Label
organization -
Description
ACME Manufacturing's company information, products, and value propositions for reference -
Read-only
Yes
-
Value
ACME Manufacturing - Industrial Automation SolutionsKey Products:• QualityCheck AI: Real-time quality control system (reduces defects by 30%)• SupplyOptimize: Supply chain optimization platform (20% cost savings)• ProductionFlow: Manufacturing workflow automationTarget Industries: Automotive, Aerospace, Electronics, Medical DevicesCompany Size Focus: 100-1000 employeesValue Propositions:- Reduce manufacturing defects by 25-40%- Optimize supply chain costs by 15-25%- Improve production efficiency by 20-35%- Seamless ERP integrationCompetitive Advantages:- Industry-specific AI models trained on manufacturing data- 99.7% uptime SLA with 24/7 support- ROI typically achieved within 6 monthsContact Information:- Representative: [Your Name]- Title: [Your Title]
Tool use guidelines block: Research and communication guidelines
-
Label
tool_use_guidelines -
Description
Instructions for effective tool usage and customer research methodology -
Read-only
Yes
-
Value
Research Strategy:1. Begin with LinkedIn research to understand the contact's professional background2. Use web search to research the customer's company, recent news, and industry challenges3. Focus on identifying specific use cases for ACME Manufacturing's solutions4. Look for relevant business triggers (growth, challenges, new initiatives)Communication Guidelines:- Personalize emails based on research findings- Reference specific company challenges or industry trends- Connect ACME products to customer's likely pain points- Maintain professional but approachable tone- Include relevant case studies or statistics when appropriateTool Usage Best Practices:- Use company_research_exa for comprehensive business intelligence- Use linkedin_search_exa for professional background verification- Draft emails with research context before sending- Update memory blocks with key findings after each research session
Tasks block: Action items and objectives
-
Label
tasks -
Description
Current objectives, action items, and next steps for this customer relationship -
Value
Current Priorities:1. Complete customer and company research2. Identify specific use cases for ACME products3. Draft personalized welcome email4. Schedule discovery call5. Prepare customized demo materialsResearch Checklist:- [] LinkedIn professional background research- [] Company website and recent news analysis- [] Industry-specific challenge identification- [] Competitive landscape assessment
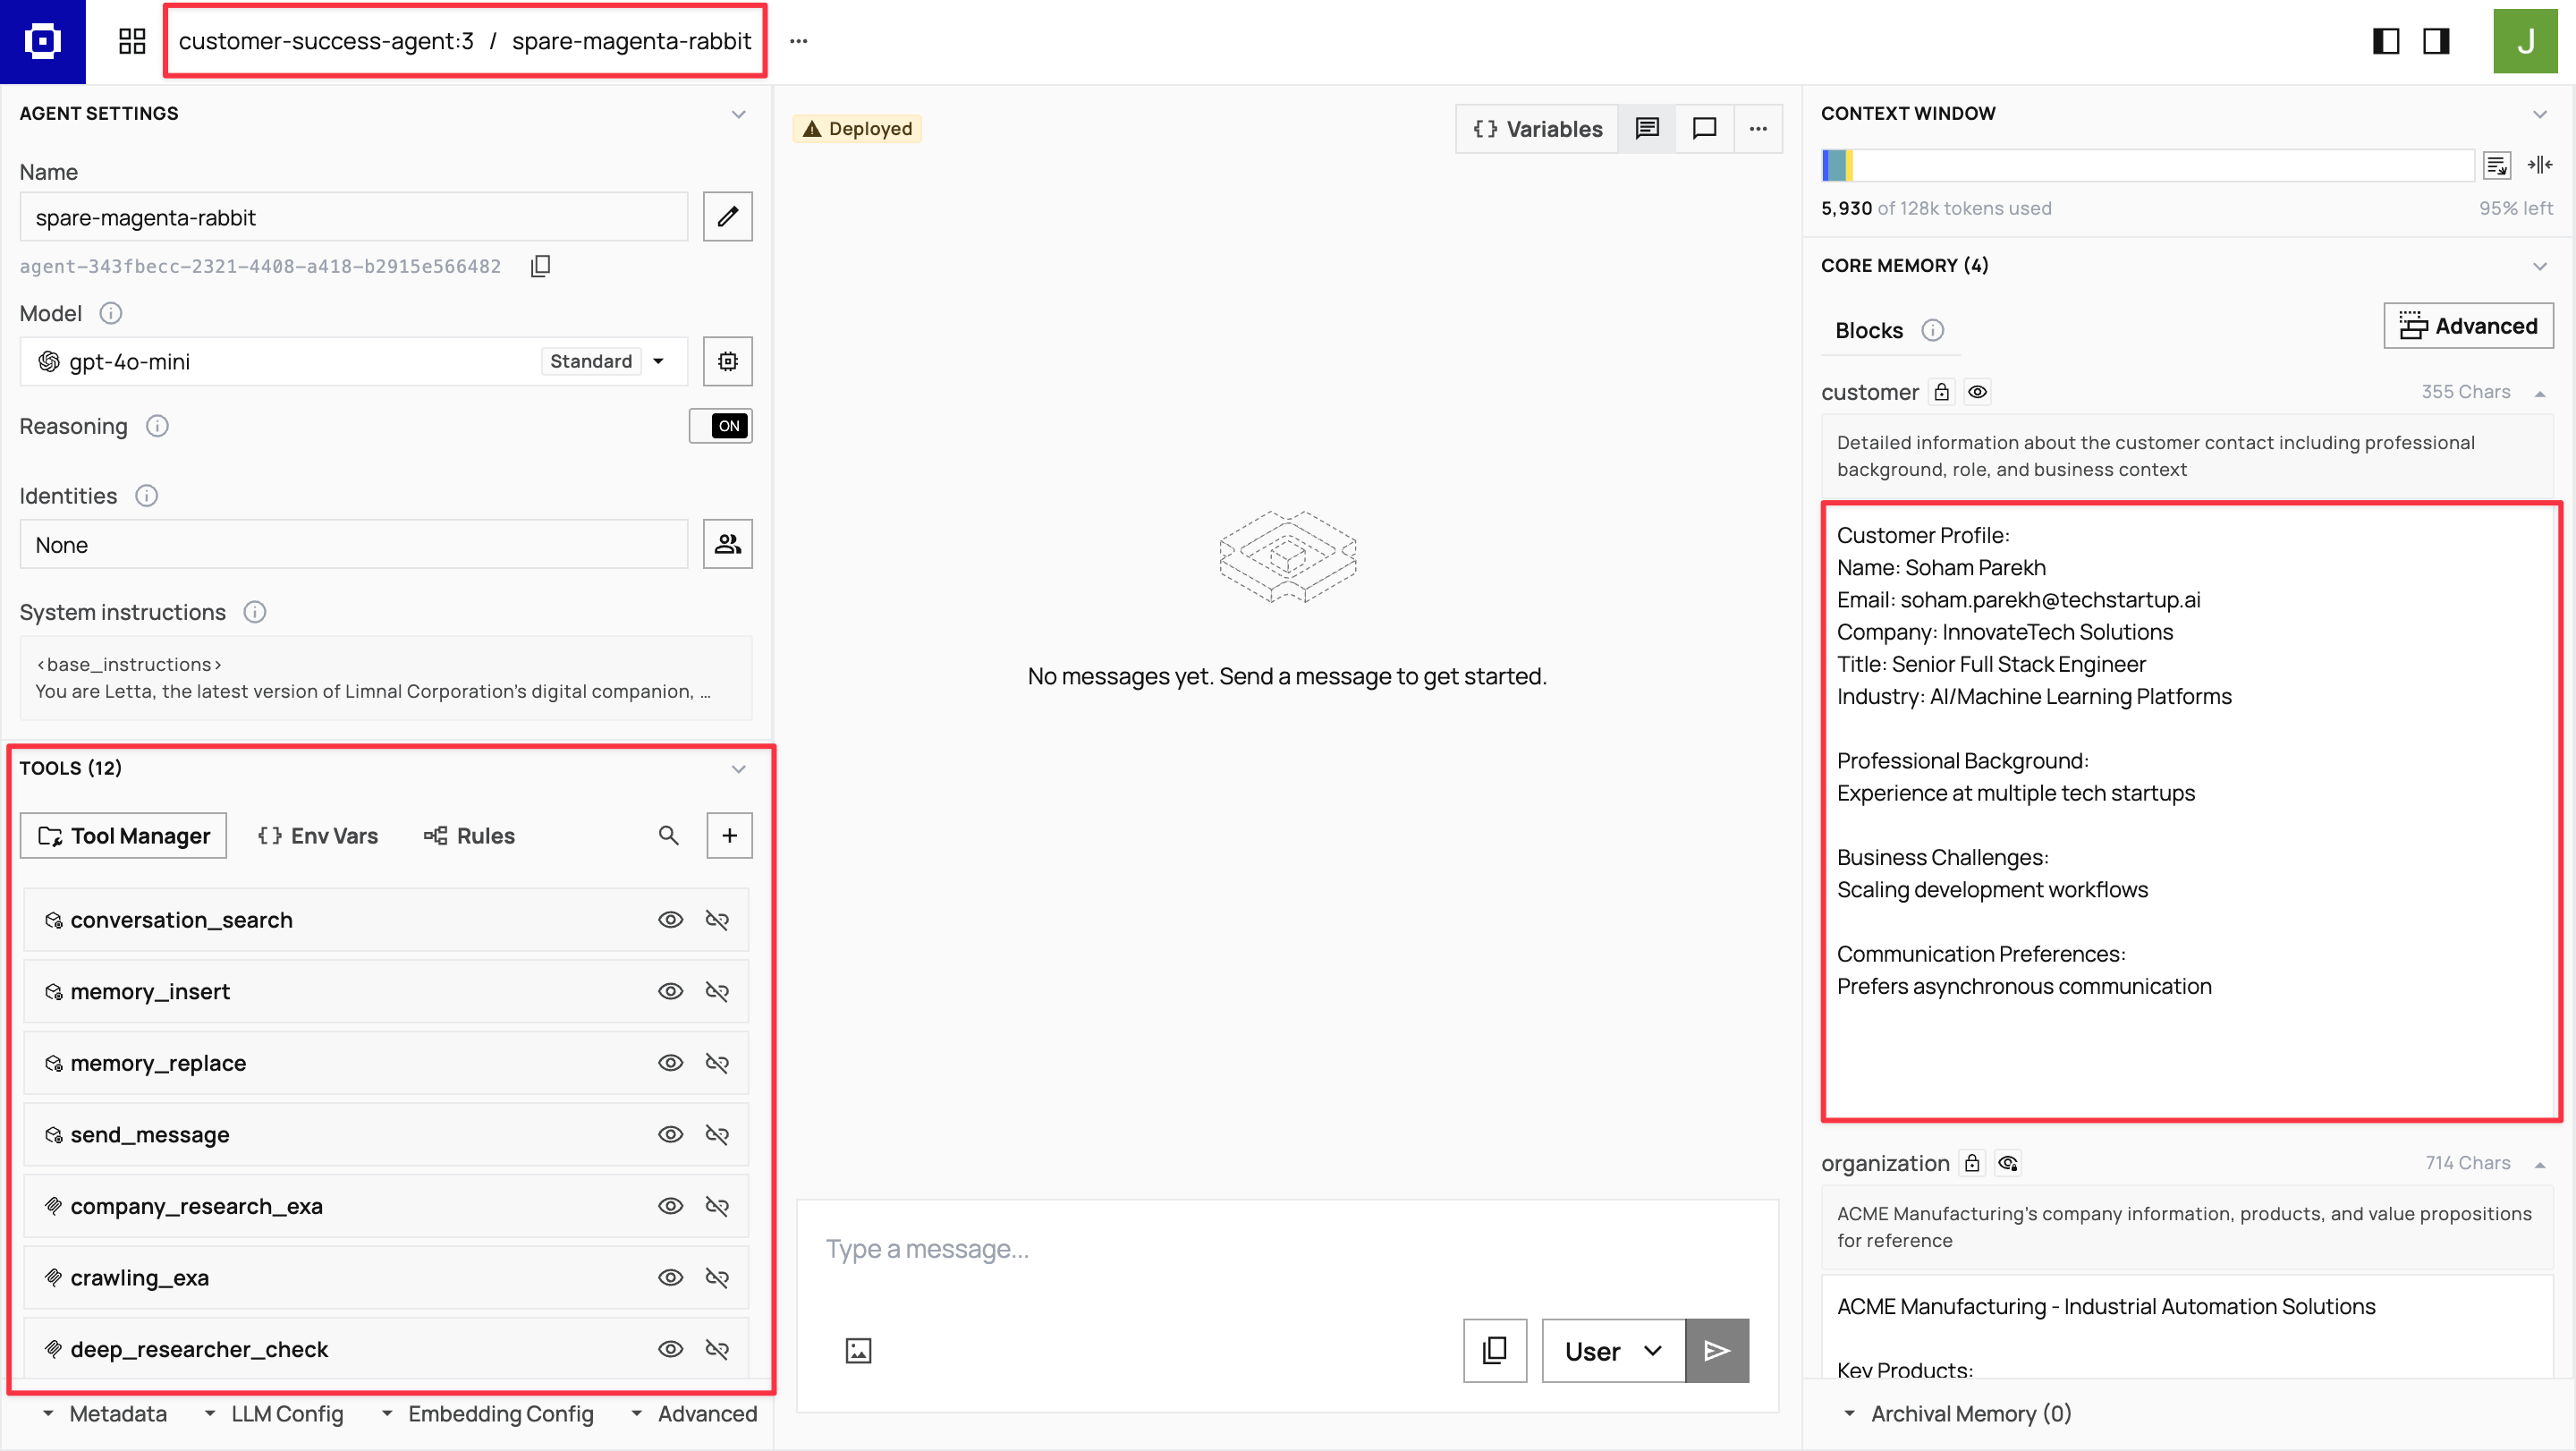
The customer memory block stores everything your agent learns about the individual customer contact. Template variables are populated when creating agents from this template, while research findings accumulate in descriptive fields.
The organization memory block contains static company information that agents reference but shouldn’t modify. Set as read-only to ensure consistent messaging across all customer interactions.
The tool_use_guidelines memory block contains instructions for how your agent should use its research and communication tools effectively.
The tasks memory block contains specific customer onboarding tasks like research, email drafting, and discovery call scheduling with a checklist to track completion.
Troubleshooting tool failures
Section titled “Troubleshooting tool failures”When testing your agent, you may encounter tool call failures. These issues are common across all MCP tools and can usually be resolved quickly with the right approach.
Rate limiting errors
Problem: Tools return “too many requests” or “rate limit exceeded” messages
Solution: Wait 1-2 minutes before retrying, or break large queries into smaller requests
Authentication failures
Problem: Tools fail with “unauthorized” or “invalid credentials” errors
Solution: Check your MCP server connections in Tool Manager and reconnect your accounts. For Gmail tools, ensure your Gmail account is properly connected in Zapier
Network timeouts
Problem: Tools hang or timeout without returning results
Solution: Retry the request or simplify your query parameters
Invalid queries
Problem: Tools return no results or “invalid format” errors
Solution: Rephrase search terms using simpler, more specific language
Tool unavailable
Problem: Agent says it cannot access required tools
Solution: Verify tools are properly attached to your agent in the Tool Manager
API key issues
Problem: Tools fail immediately with connection errors
Solution: Verify your API keys are valid and haven’t expired. For Exa tools, check your API key at dashboard.exa.ai/api-keys. For Zapier tools, verify your server URL in the Zapier dashboard
Template variables
Section titled “Template variables”The {{variable_name}} placeholders in customer memory blocks are populated with actual customer data when you create agents from the template and they start interacting with your customers.
Step 3: Configure MCP tools for customer research
Section titled “Step 3: Configure MCP tools for customer research”Tools transform your agent from a static responder into an active researcher. In the ADE’s left sidebar, click Tools → Tool Manager. This opens a modal where you’ll configure Model Context Protocol (MCP) servers that provide external capabilities.

Your agent needs research, communication, email drafting, and email sending tools to gather customer intelligence and send personalized emails.
Adding Exa for research tools
Section titled “Adding Exa for research tools”Exa provides web search, company research, and LinkedIn lookup capabilities for your agent.
The complete Exa setup process
-
Add the Exa MCP server
In the Tool manager sidebar, click + Add MCP server in the MCP servers section. Select Exa from the list to open the configuration modal.
-
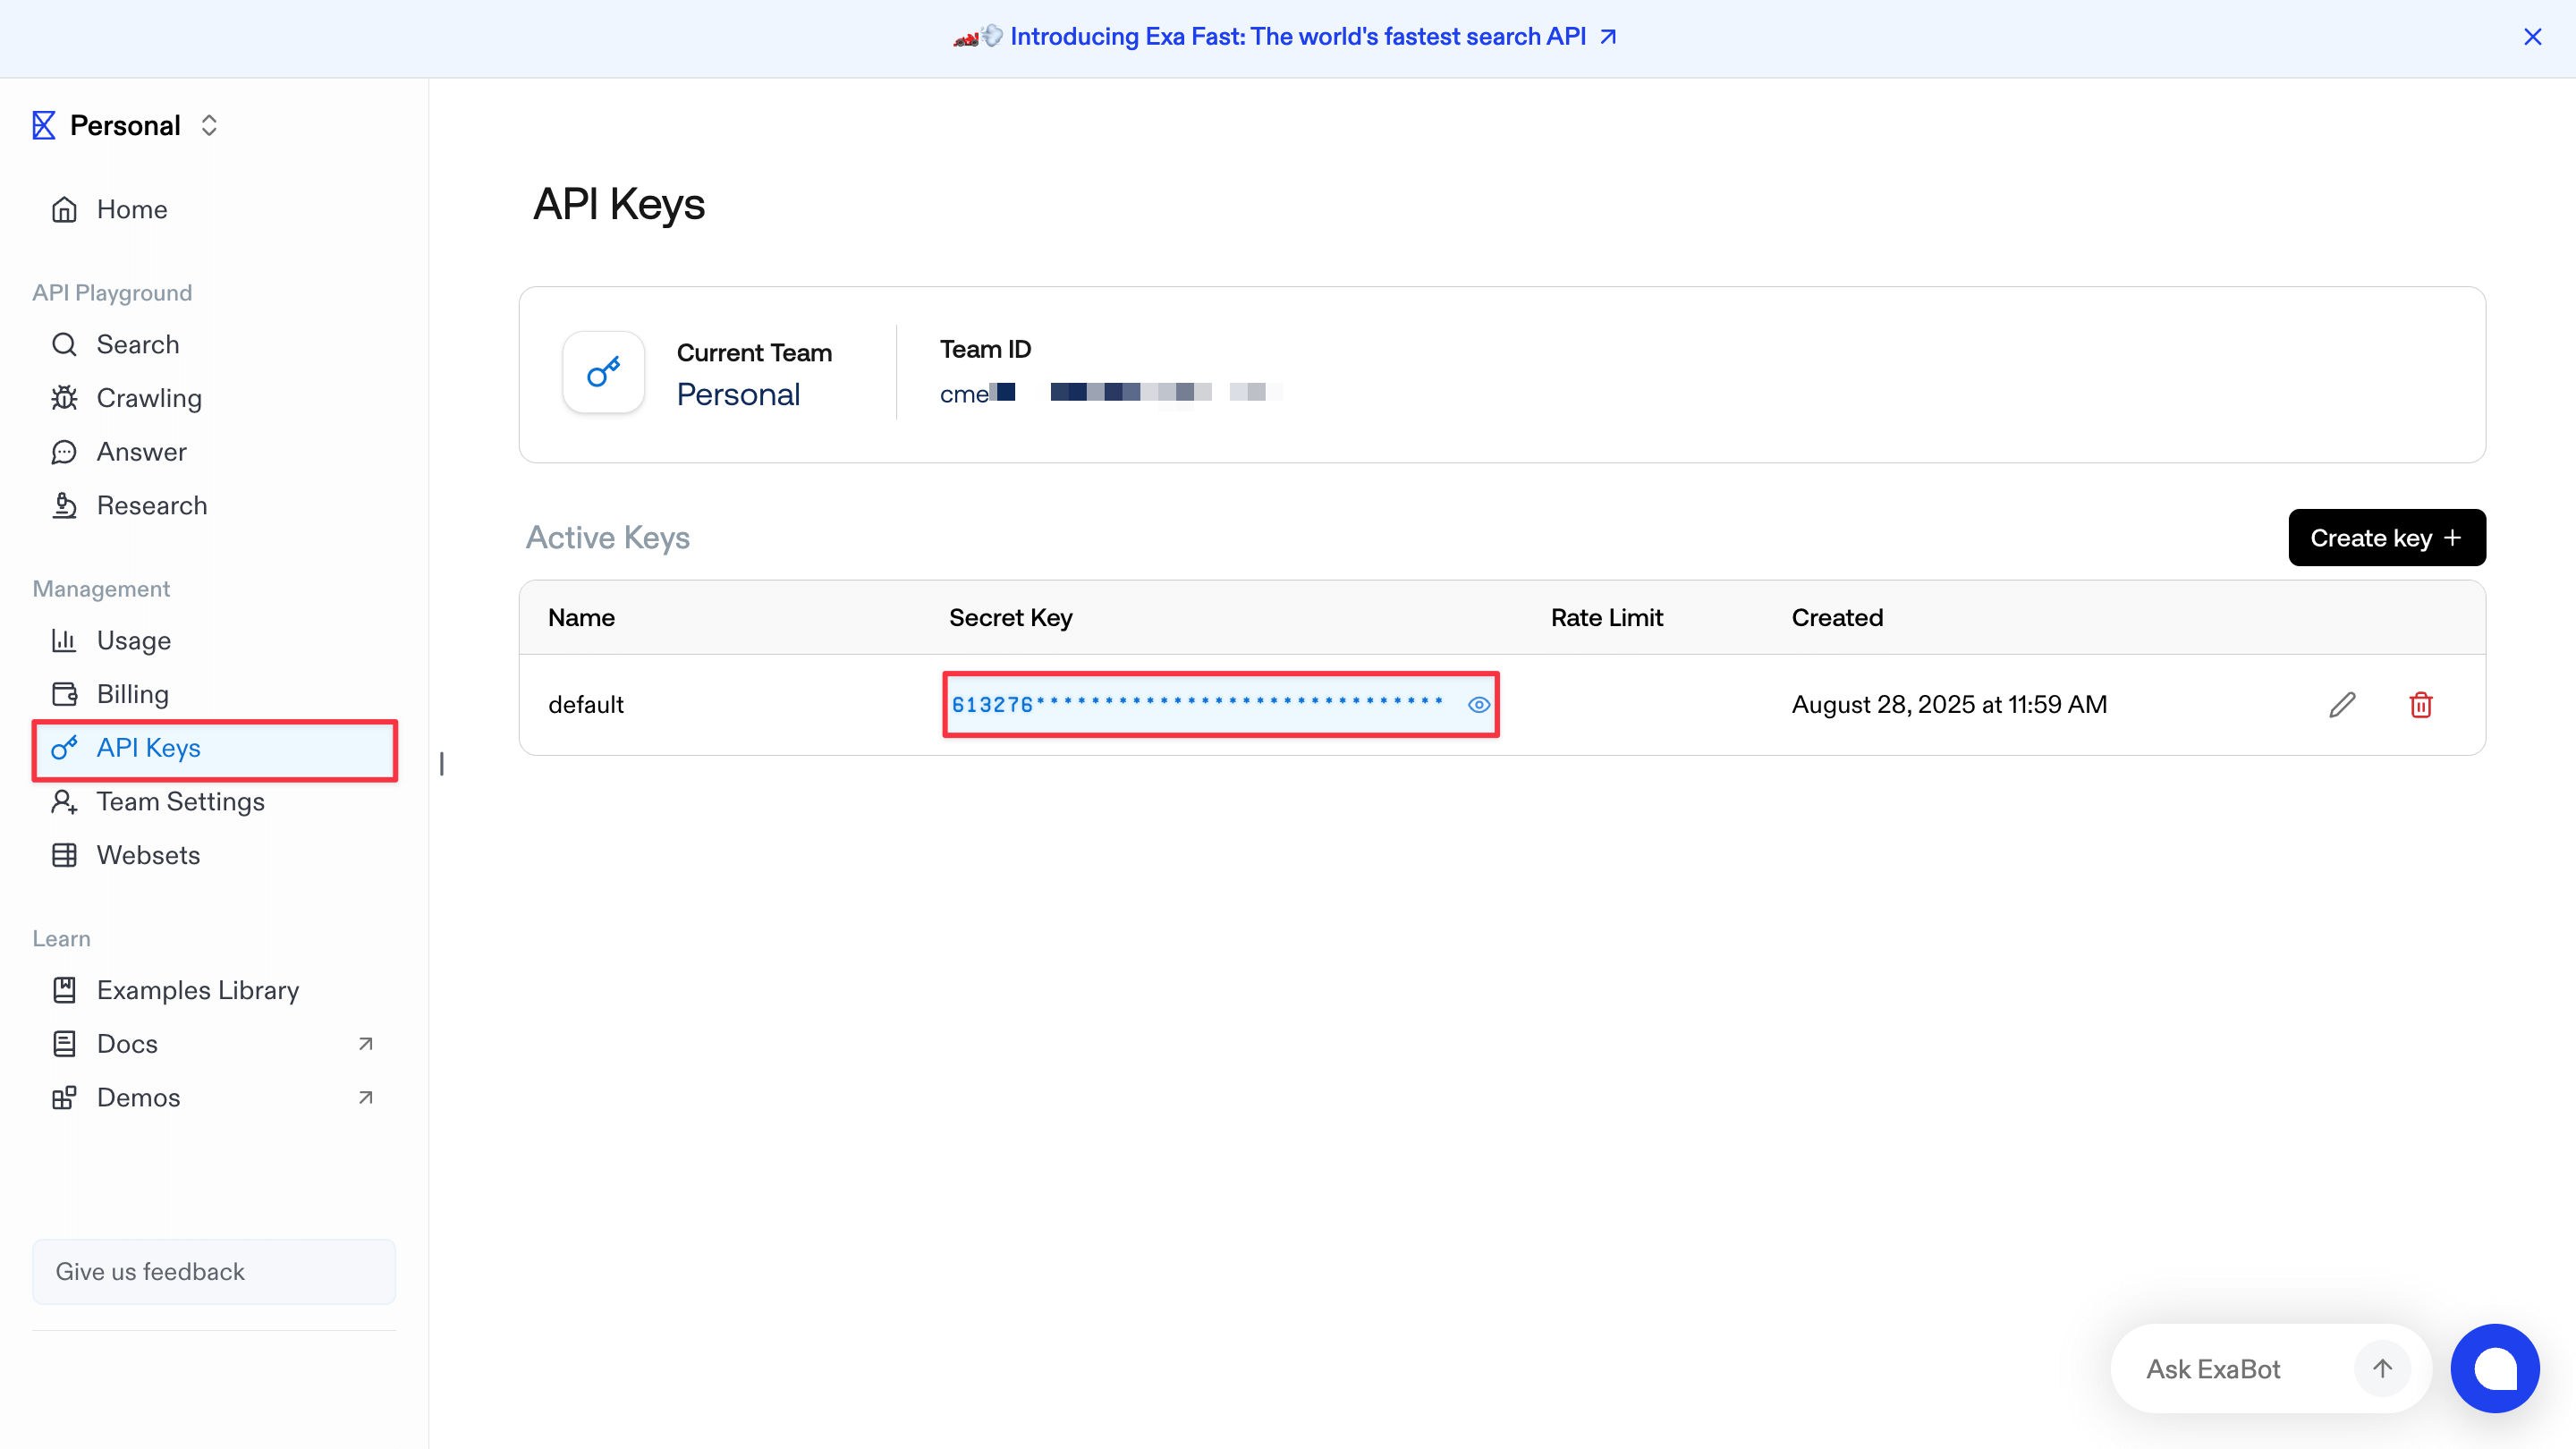
Get an Exa API key
Go to exa.ai to create an account. Then visit dashboard.exa.ai/api-keys to copy your default secret key.
-
Configure and test the connection
Paste the Exa MCP server URL
https://mcp.exa.ai/mcp?exaApiKey=your-exa-api-keyin the Server URL field on the modal. Replaceyour-exa-api-keywith your Exa secret key and click Test connection. When connected, the modal displays a list of available tools, includingweb_search_exa,company_research_exa, andlinkedin_search_exa. Click Confirm to add the server.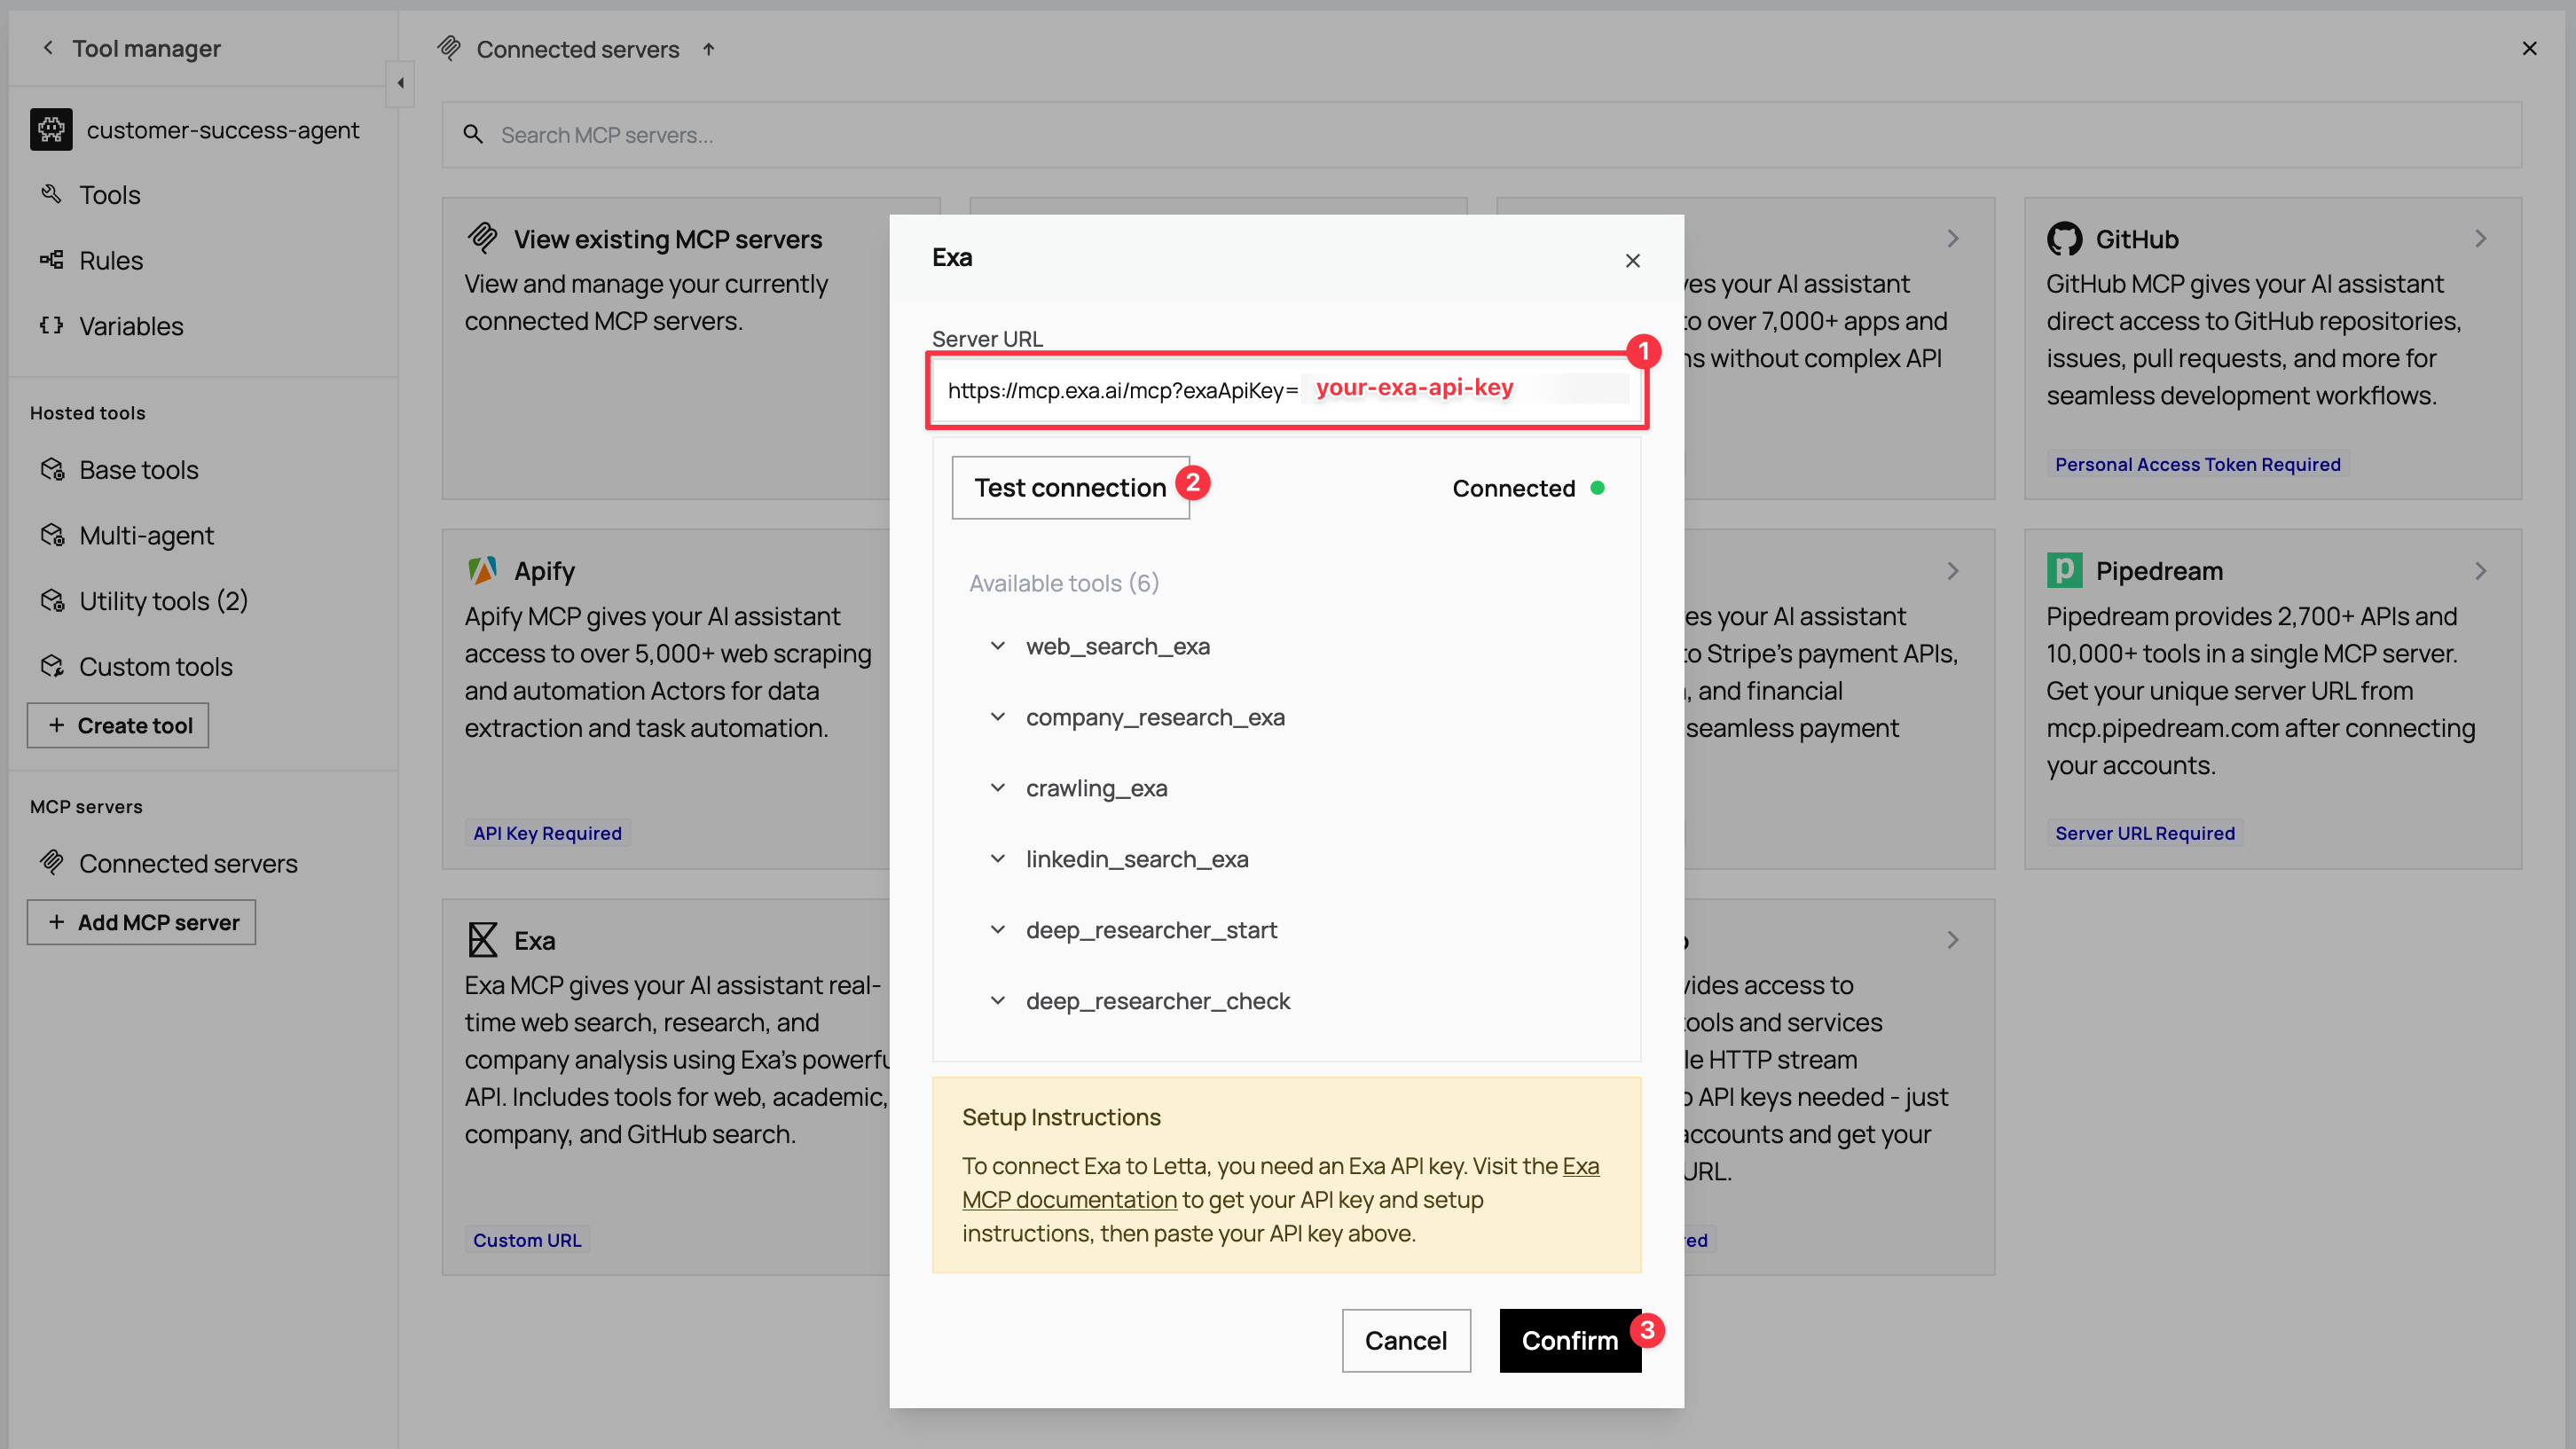
Adding Zapier for email tools
Section titled “Adding Zapier for email tools”Zapier provides Gmail integration for drafting and sending personalized emails.
The complete Zapier setup process
-
Add the Zapier MCP server
Click + Add MCP server again and select Zapier. For the API setup, go to mcp.zapier.com/mcp, create an account, then click + New MCP Server in your Zapier dashboard.

-
Configure the MCP server
Choose Other from the MCP Client options and name it
Email sender. After creating the server, click + Add tool, select Gmail from the modal, and add the Gmail tools. Connect your Gmail account for sending emails.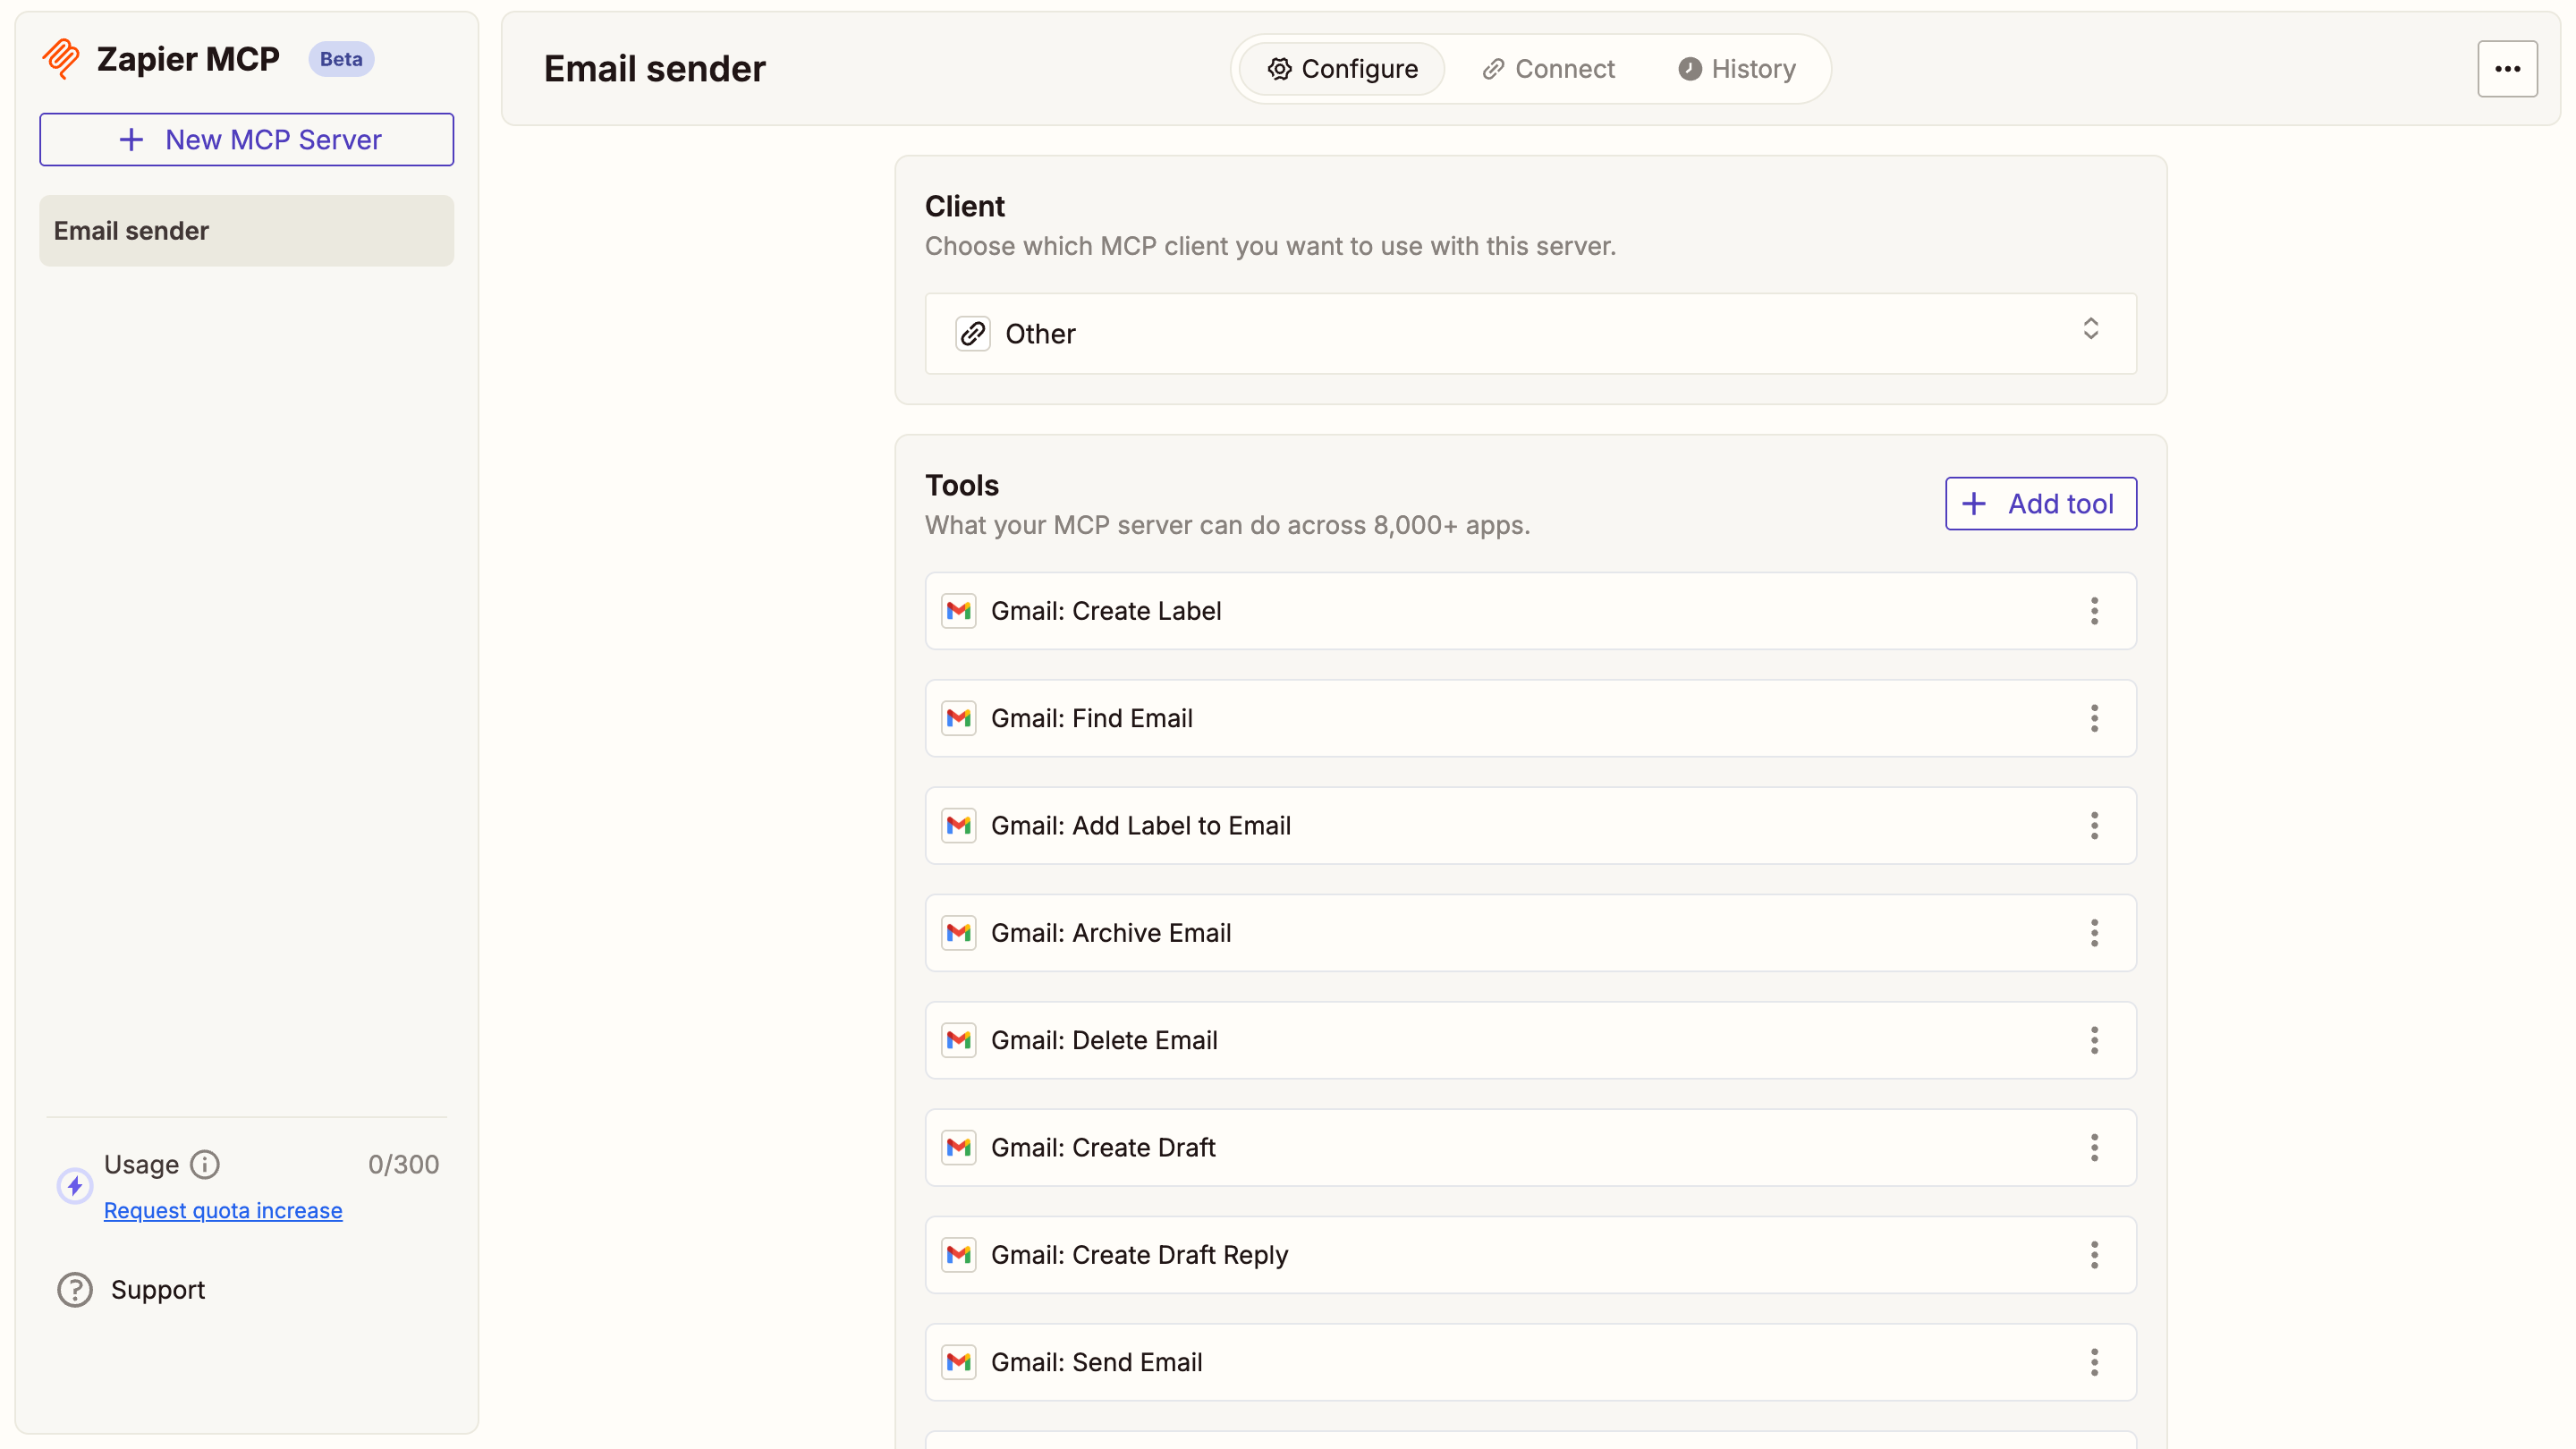
-
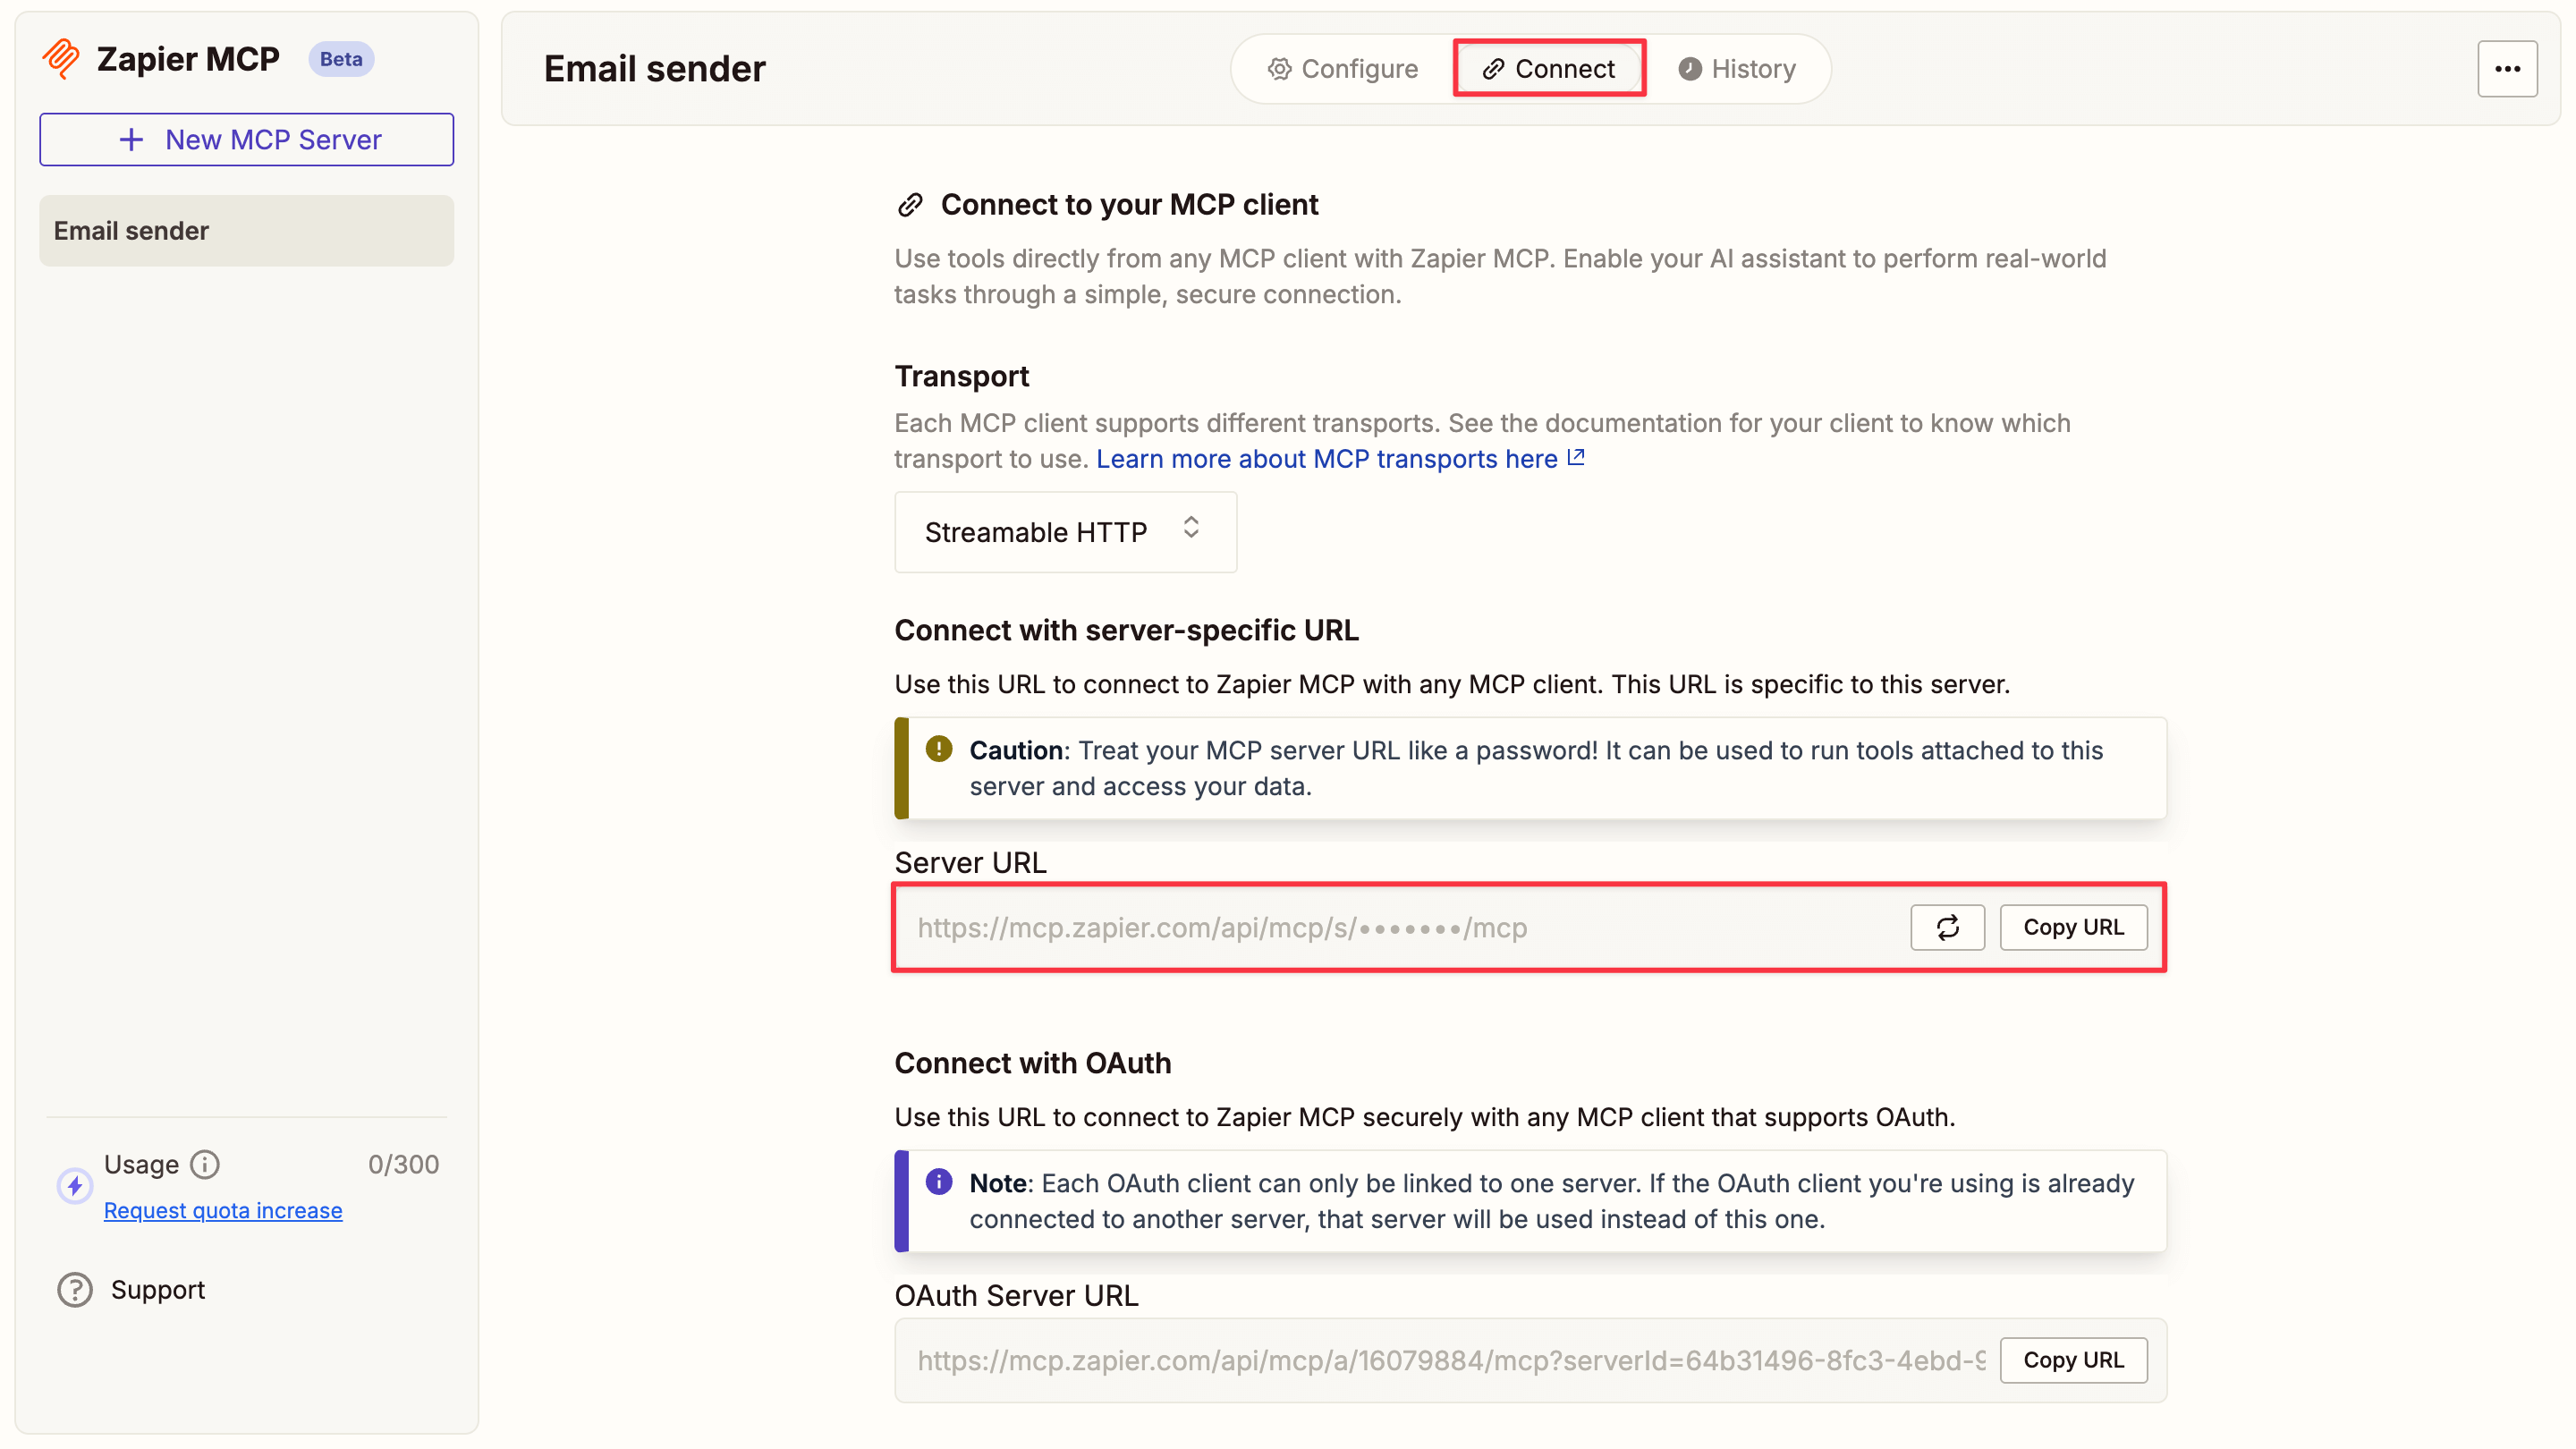
Get the server URL
In your Zapier dashboard, click Connect in the top toolbar and copy the Server URL.
-
Connect to Letta
Return to the Letta modal, paste the server URL in the Server URL field, and test the connection. When you see the Gmail tools appear, click Confirm.

Connecting tools to your agent
Section titled “Connecting tools to your agent”In the Tool manager view, you can now see both MCP servers. Click each server to view the available tools. To attach them, click the link icon next to the tools your agent needs:
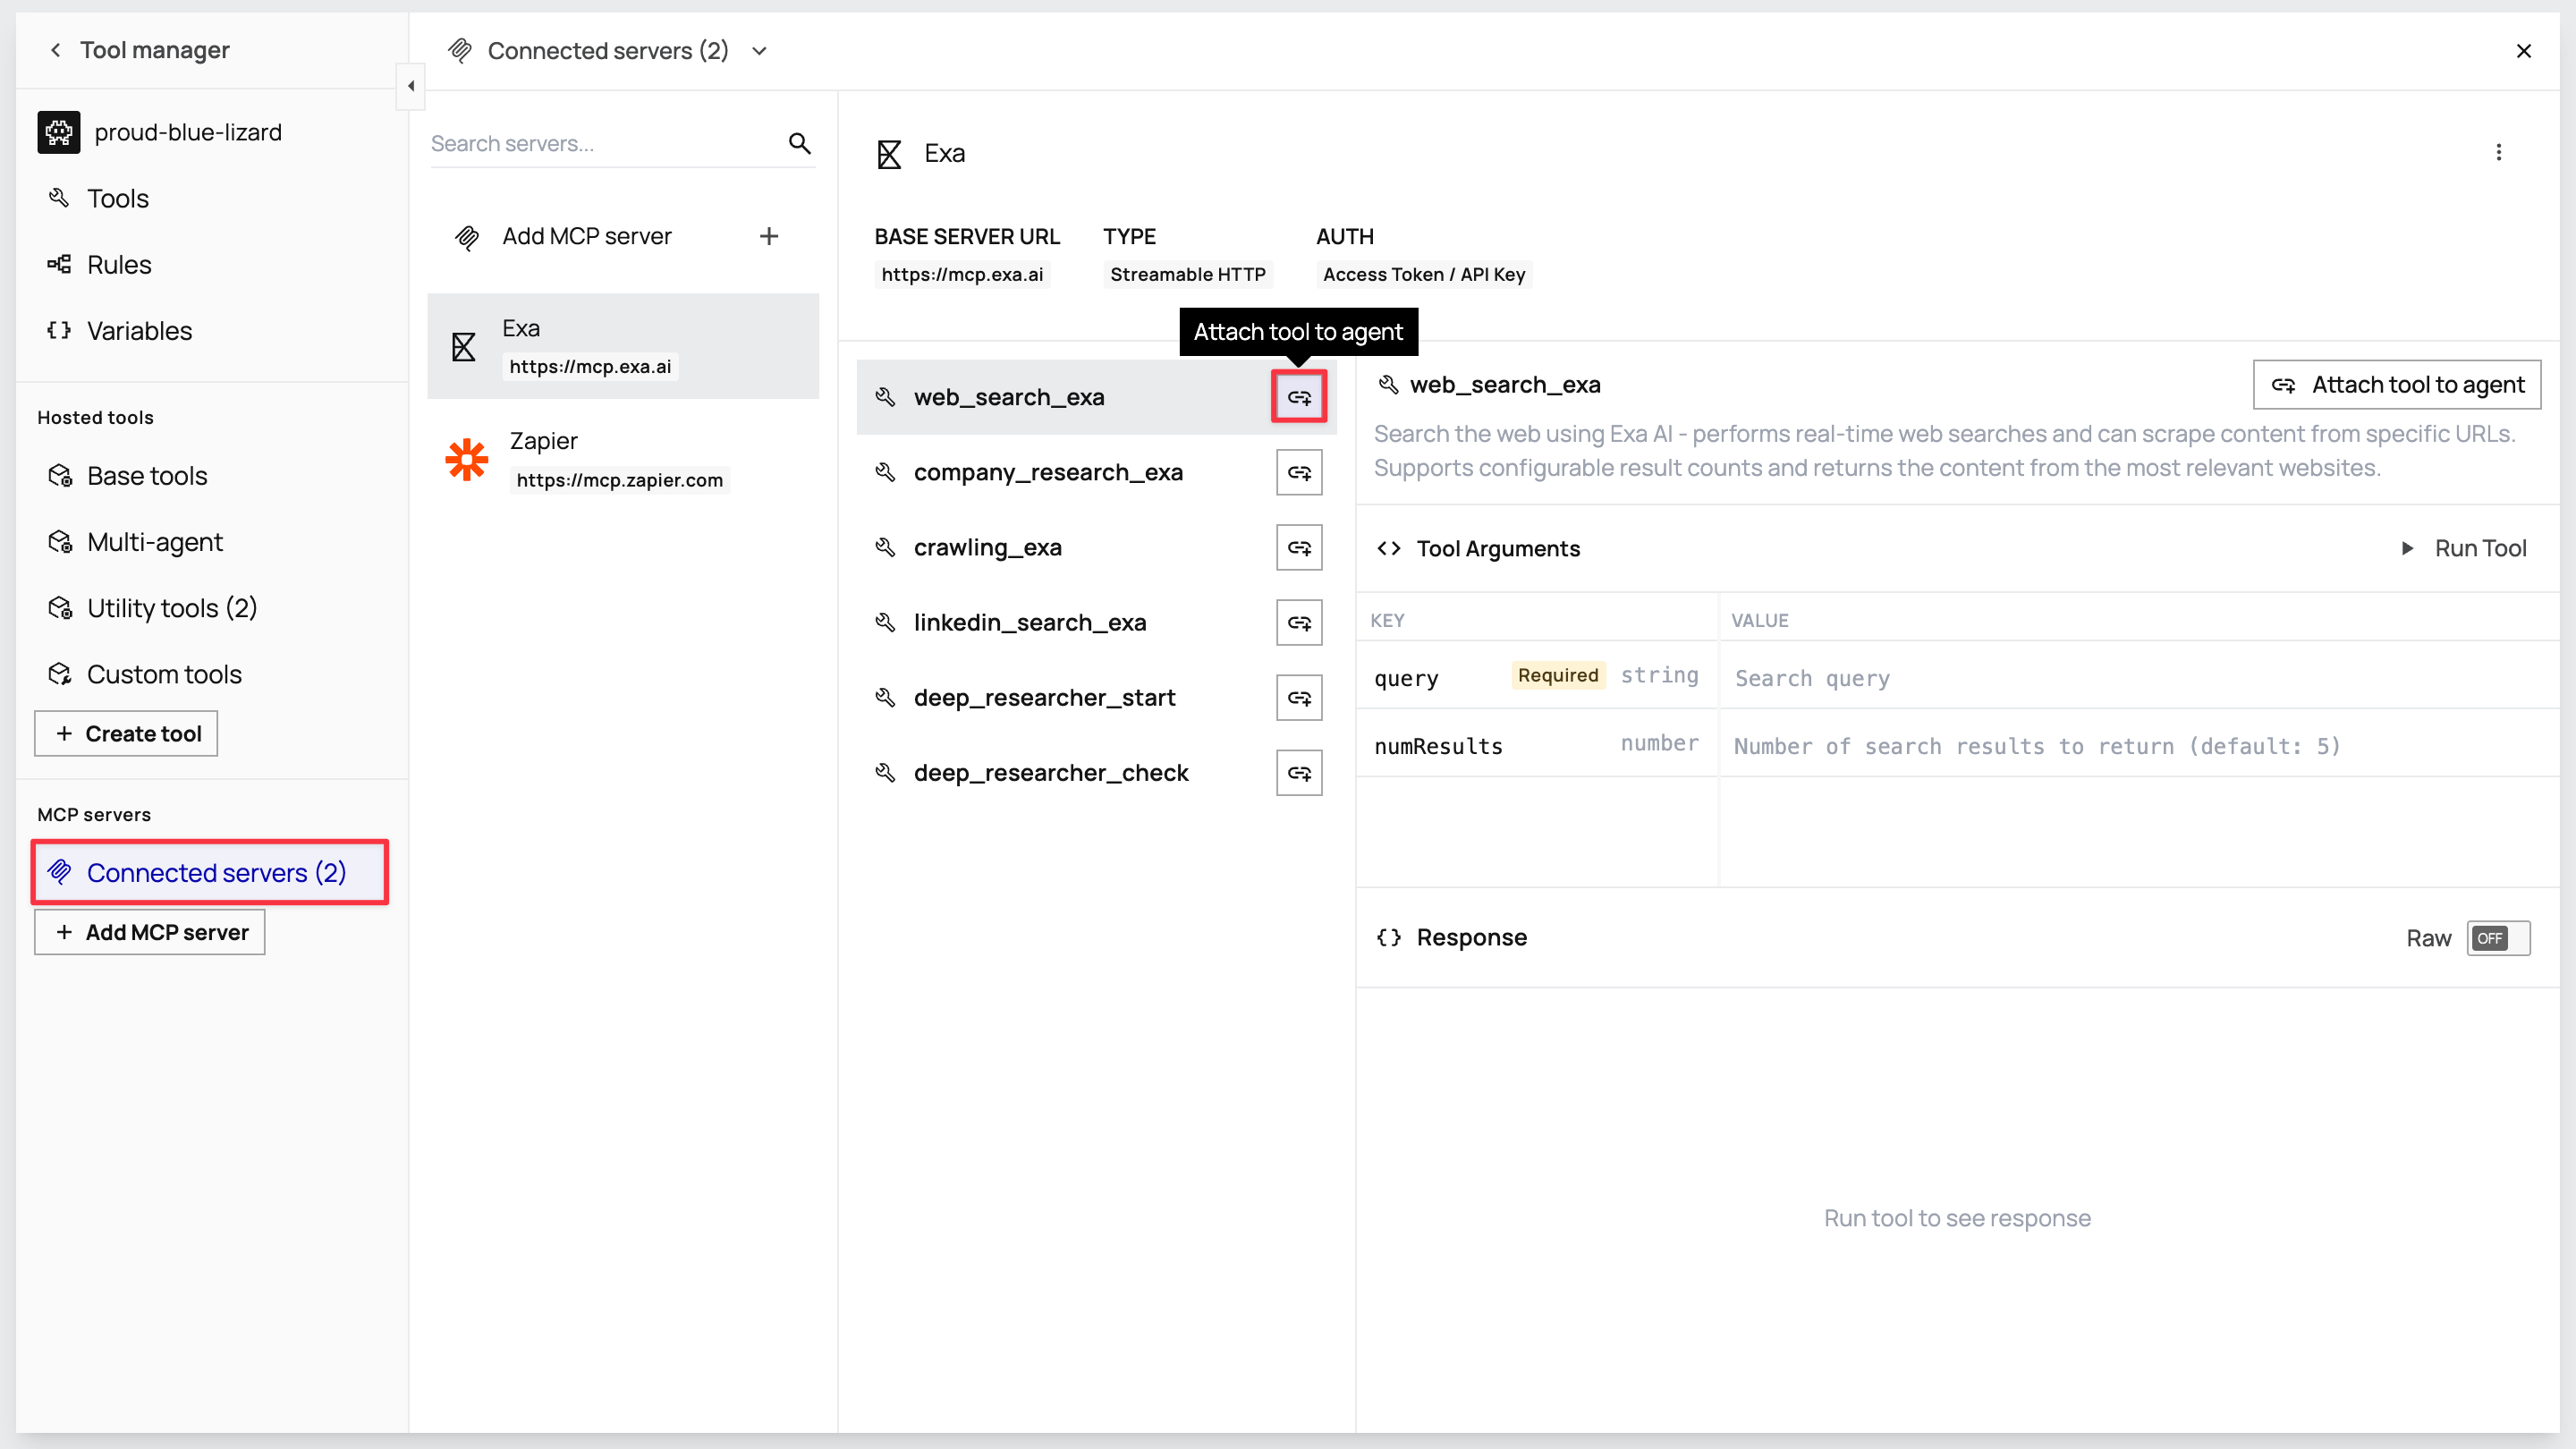
From Exa: Attach web_search_exa, company_research_exa, and linkedin_search_exa.
From Zapier: Attach gmail_create_draft and gmail_send_email.
Step 4: Save your template
Section titled “Step 4: Save your template”Once you’ve configured all memory blocks and tools, click the Save button in the ADE toolbar. This opens a version modal. Click Save new version to save your template for agent creation.
Your customer-success-agent template is now ready to create customer-specific agents.
Step 5: Create a customer identity
Section titled “Step 5: Create a customer identity”Before creating agents from your template, you need to set up customer identities. An identity is the customer contact record that represents a unique user and can be associated with one or more agents. An agent is the AI system created for that identity.
This identity-agent relationship enables multi-user applications where each customer gets their own dedicated agent while maintaining proper user isolation and tracking. In a real-world scenario, each new customer that signs up has their identity created (either manually or via API integration). For this demo, you’ll create an identity for yourself to test the complete workflow.
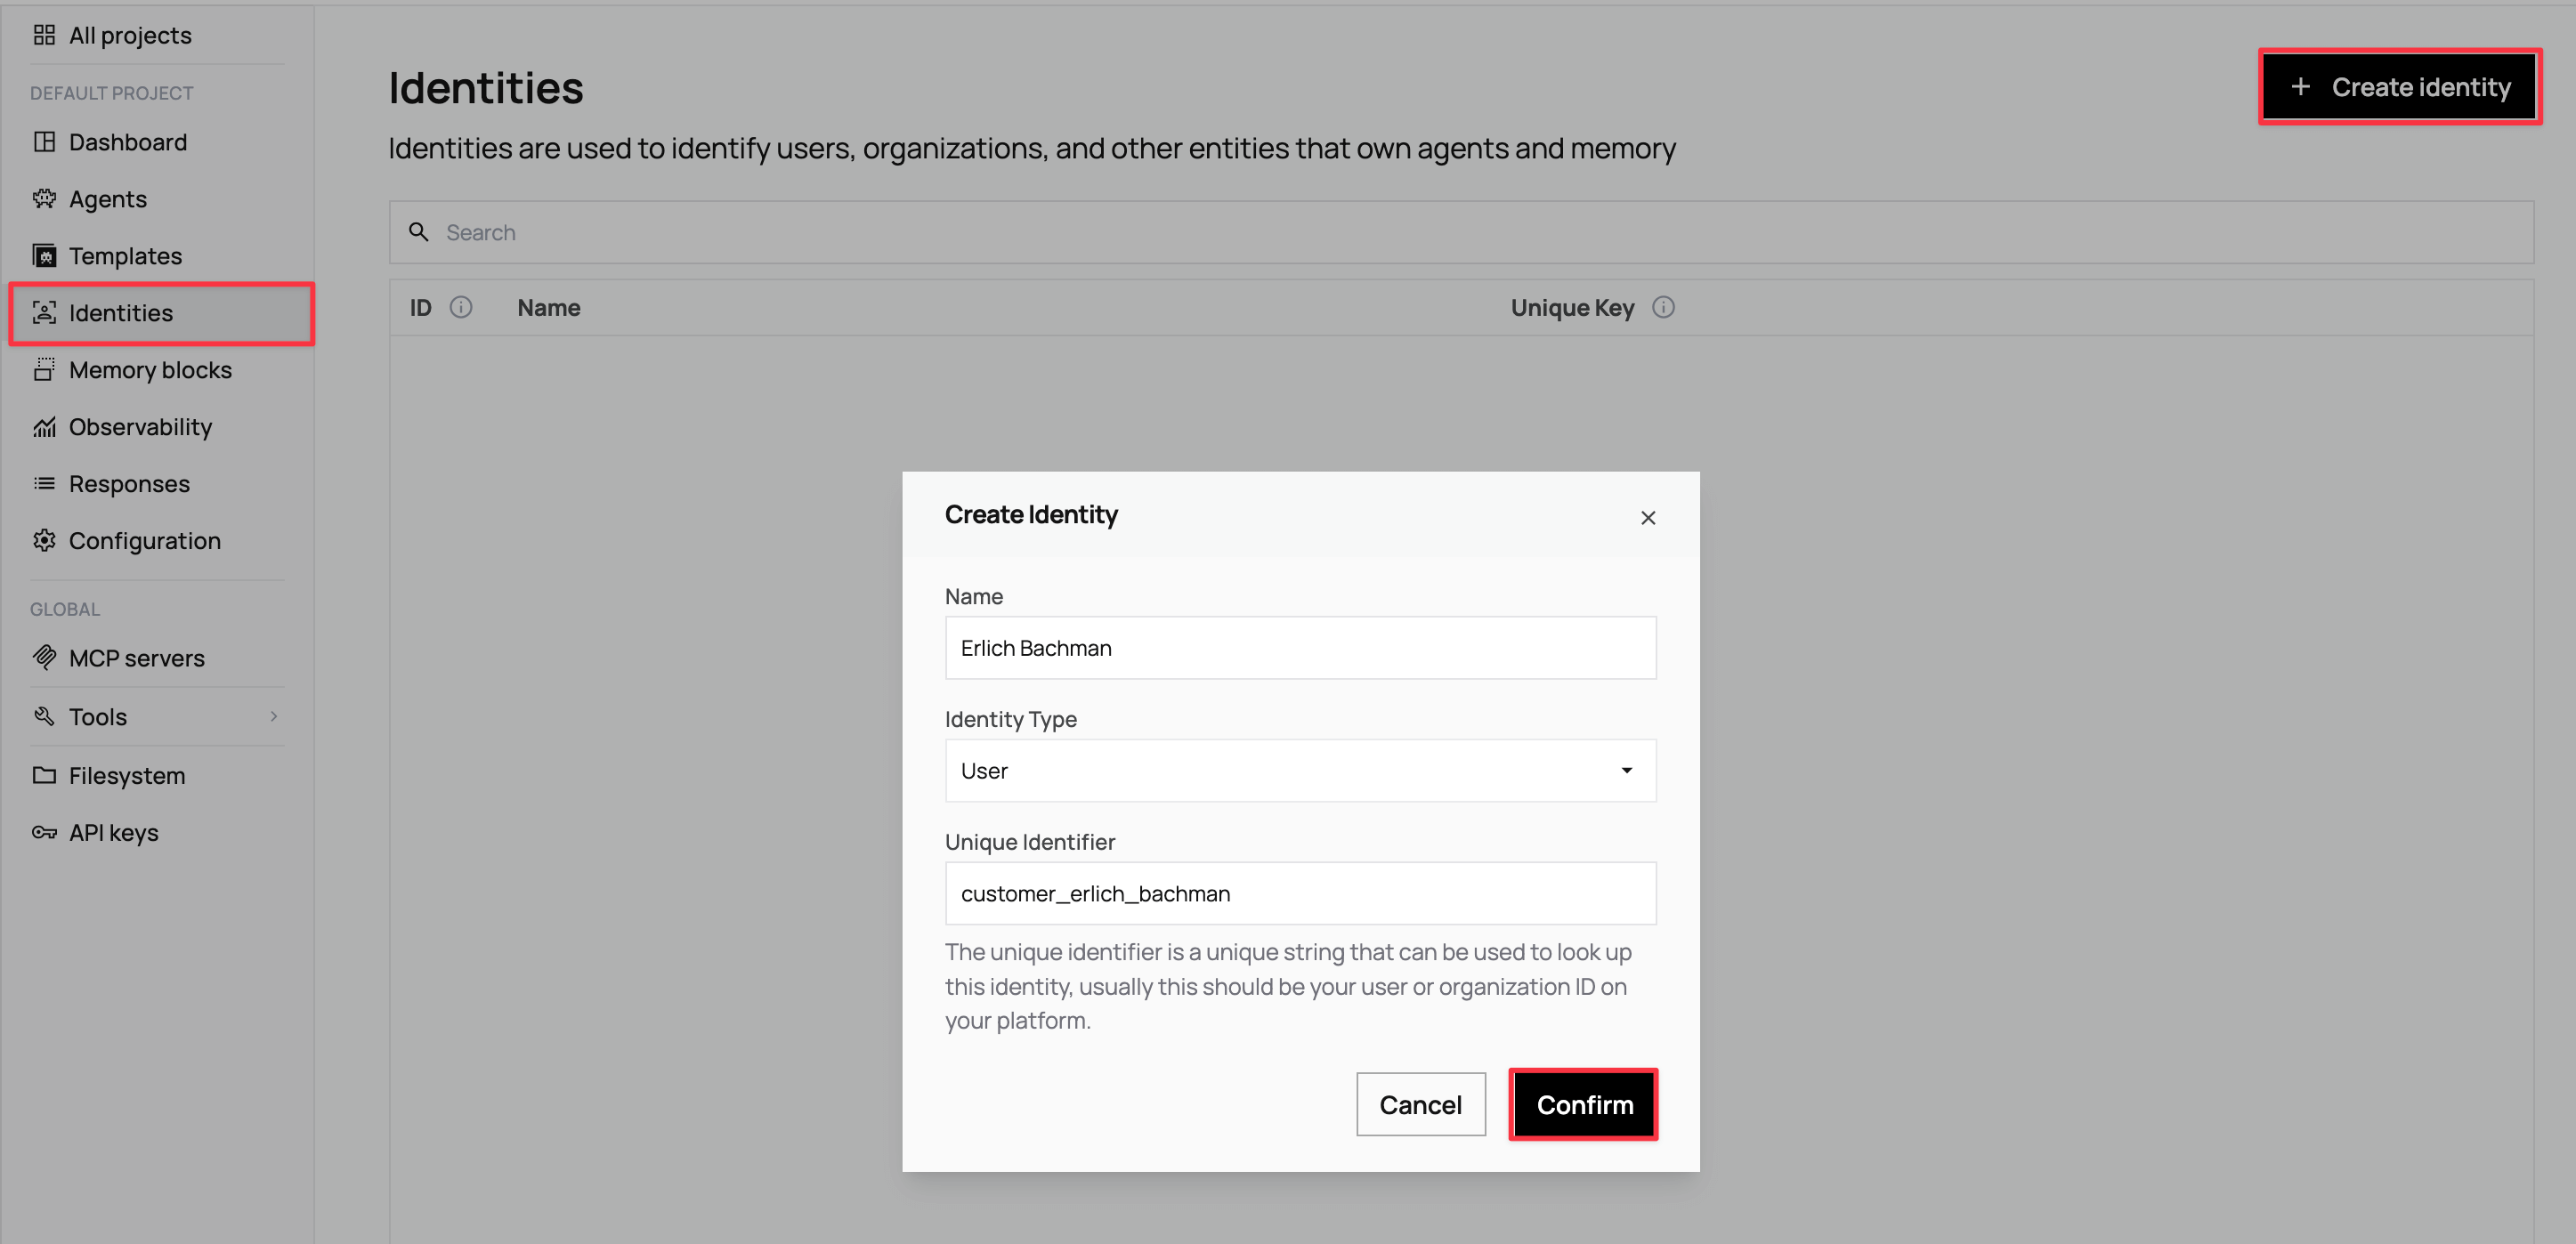
Navigate back to the main Letta dashboard and click Identities in the left sidebar, then click + Create identity.
In the modal that opens, configure your customer identity using the three fields:
- Name: Enter your own full name (for example,
[Your Full Name]). - Identity Type: Select User for individual customer contacts.
- Unique Identifier: Create a unique string to identify this customer in your system (for example,
customer_[your_name]).
Click Confirm when all fields are populated.
Step 6: Create an agent from the template
Section titled “Step 6: Create an agent from the template”With your template and customer identity ready, navigate to Agents in the sidebar and click + Create a new agent.
In the modal, locate the Create an agent from existing template section and click on your customer-success-agent template.
Fill in your own customer details for testing:
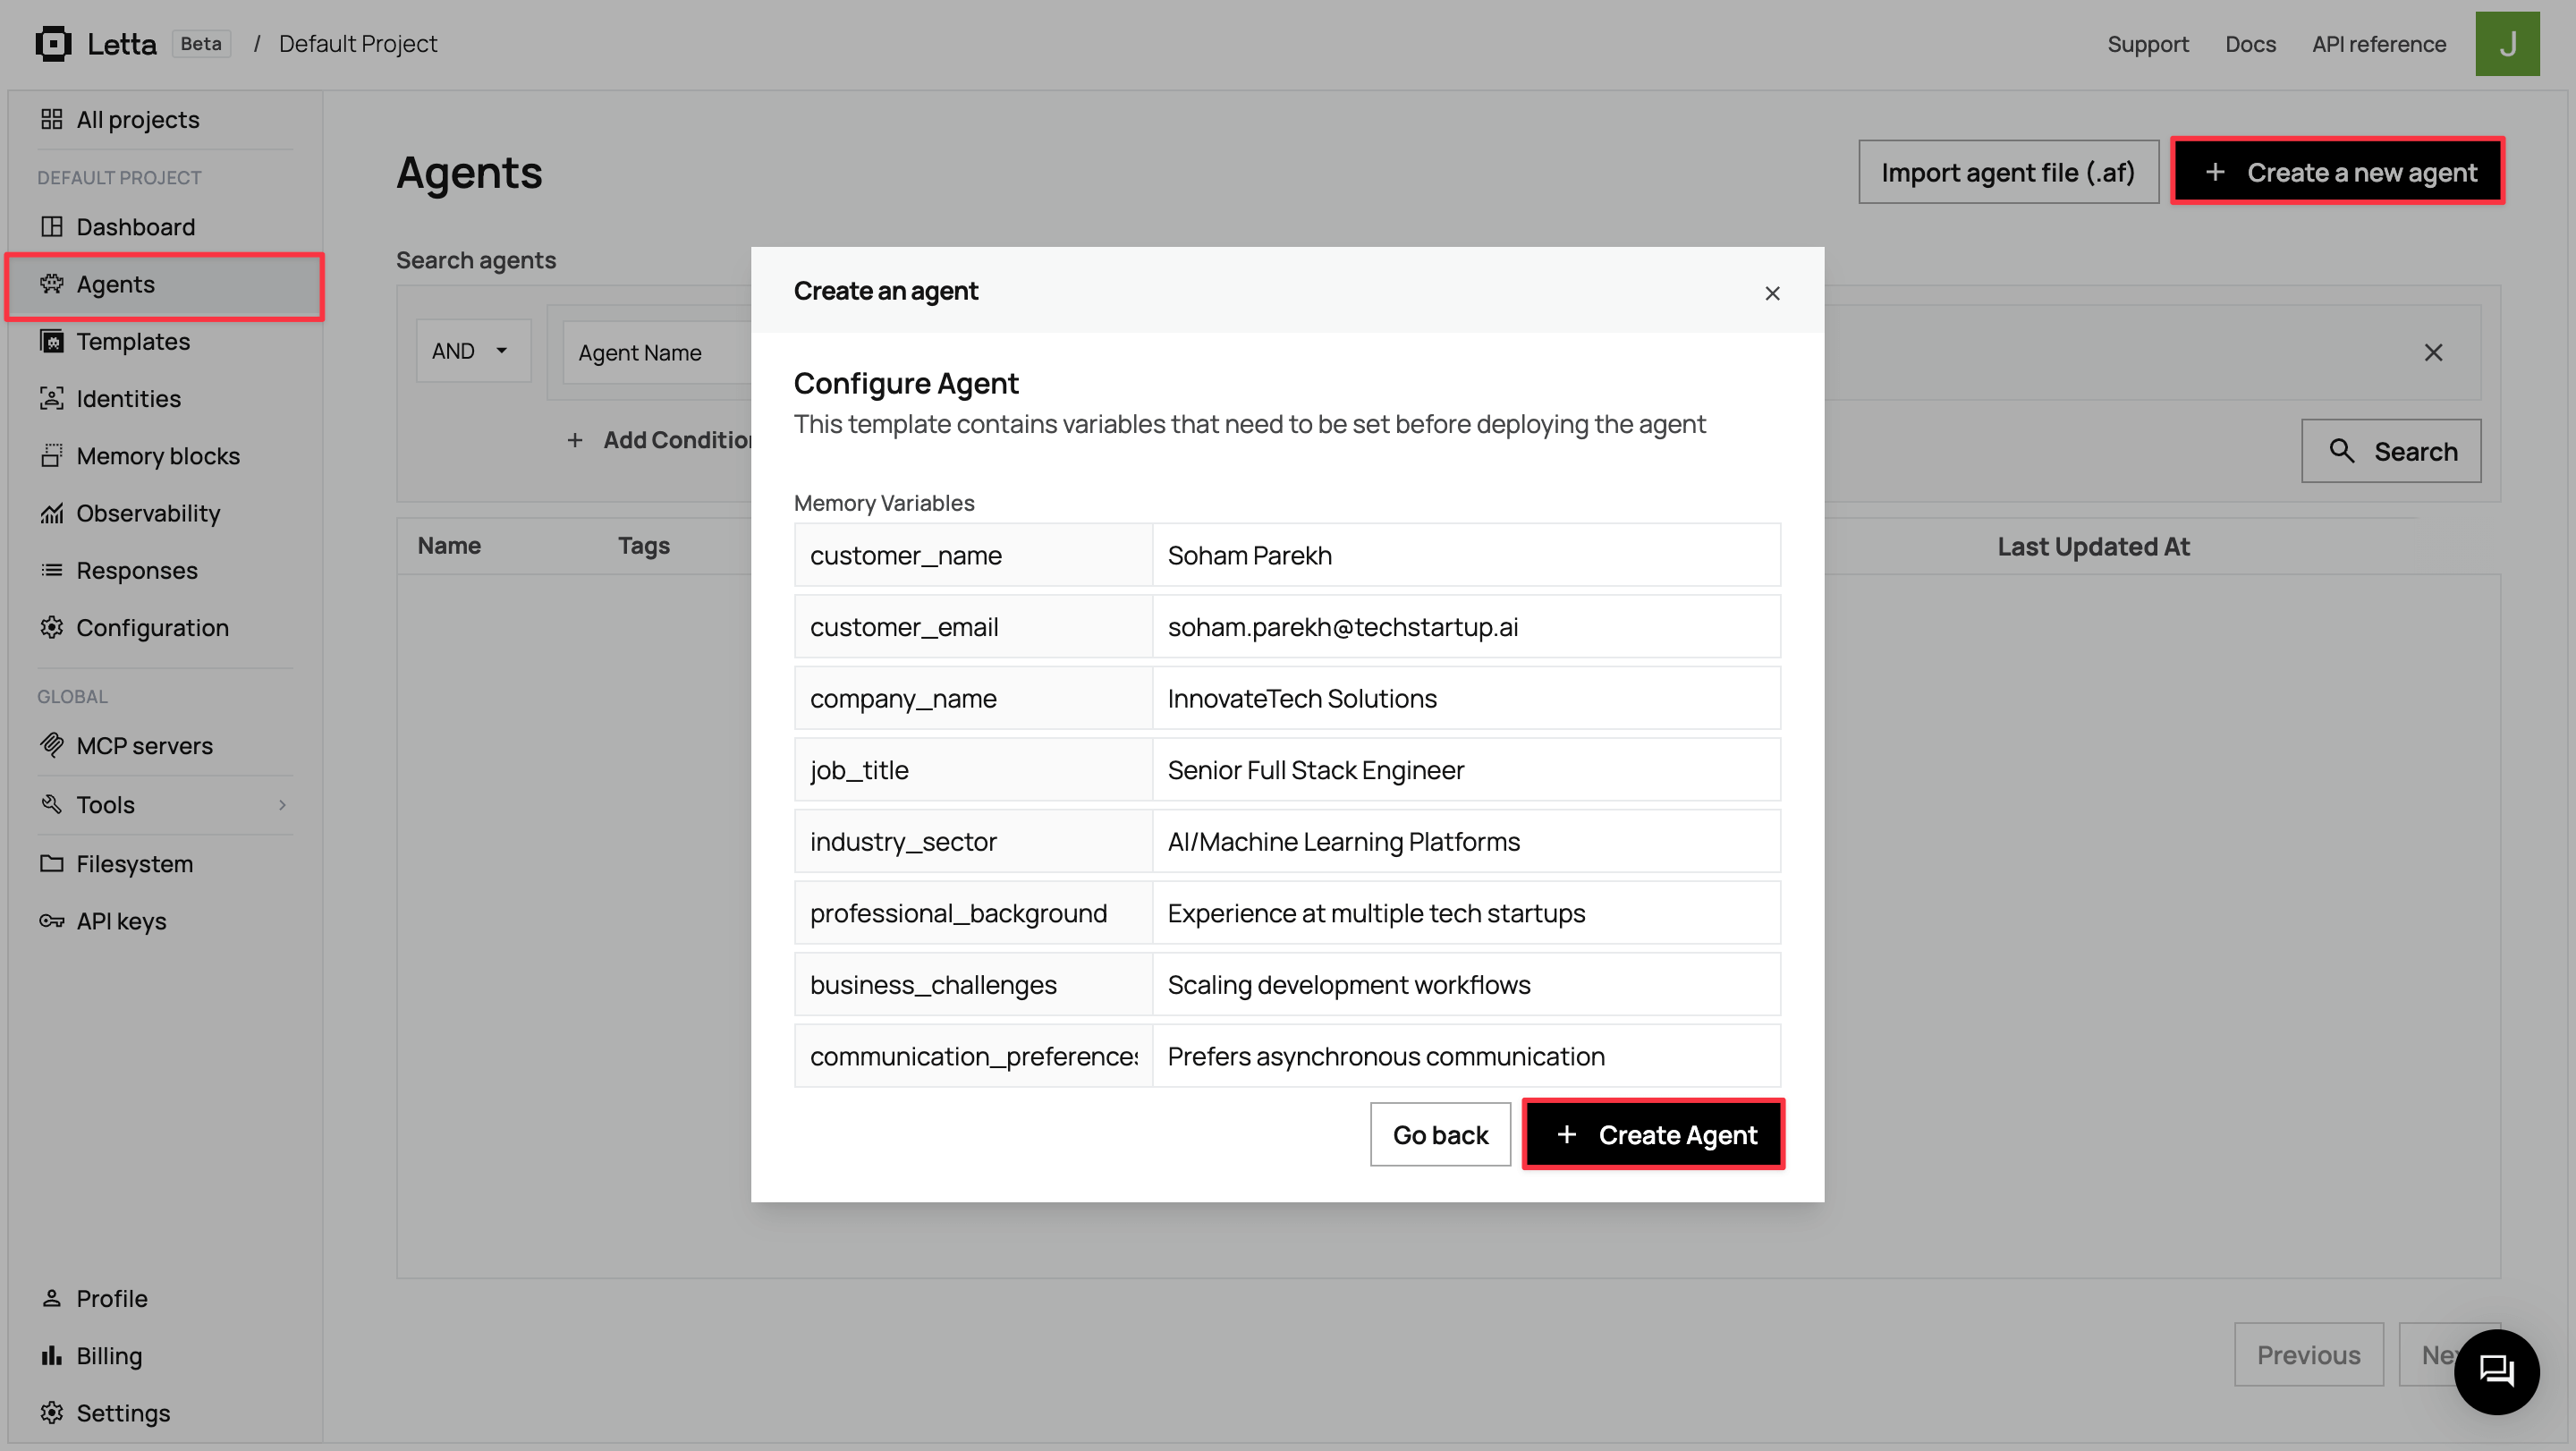
Click + Create Agent. Letta creates the agent and opens the ADE for your new agent instance.
You can see the agent name in the top-left corner of the ADE (for example, customer-success-agent:1 / random-generated-name).
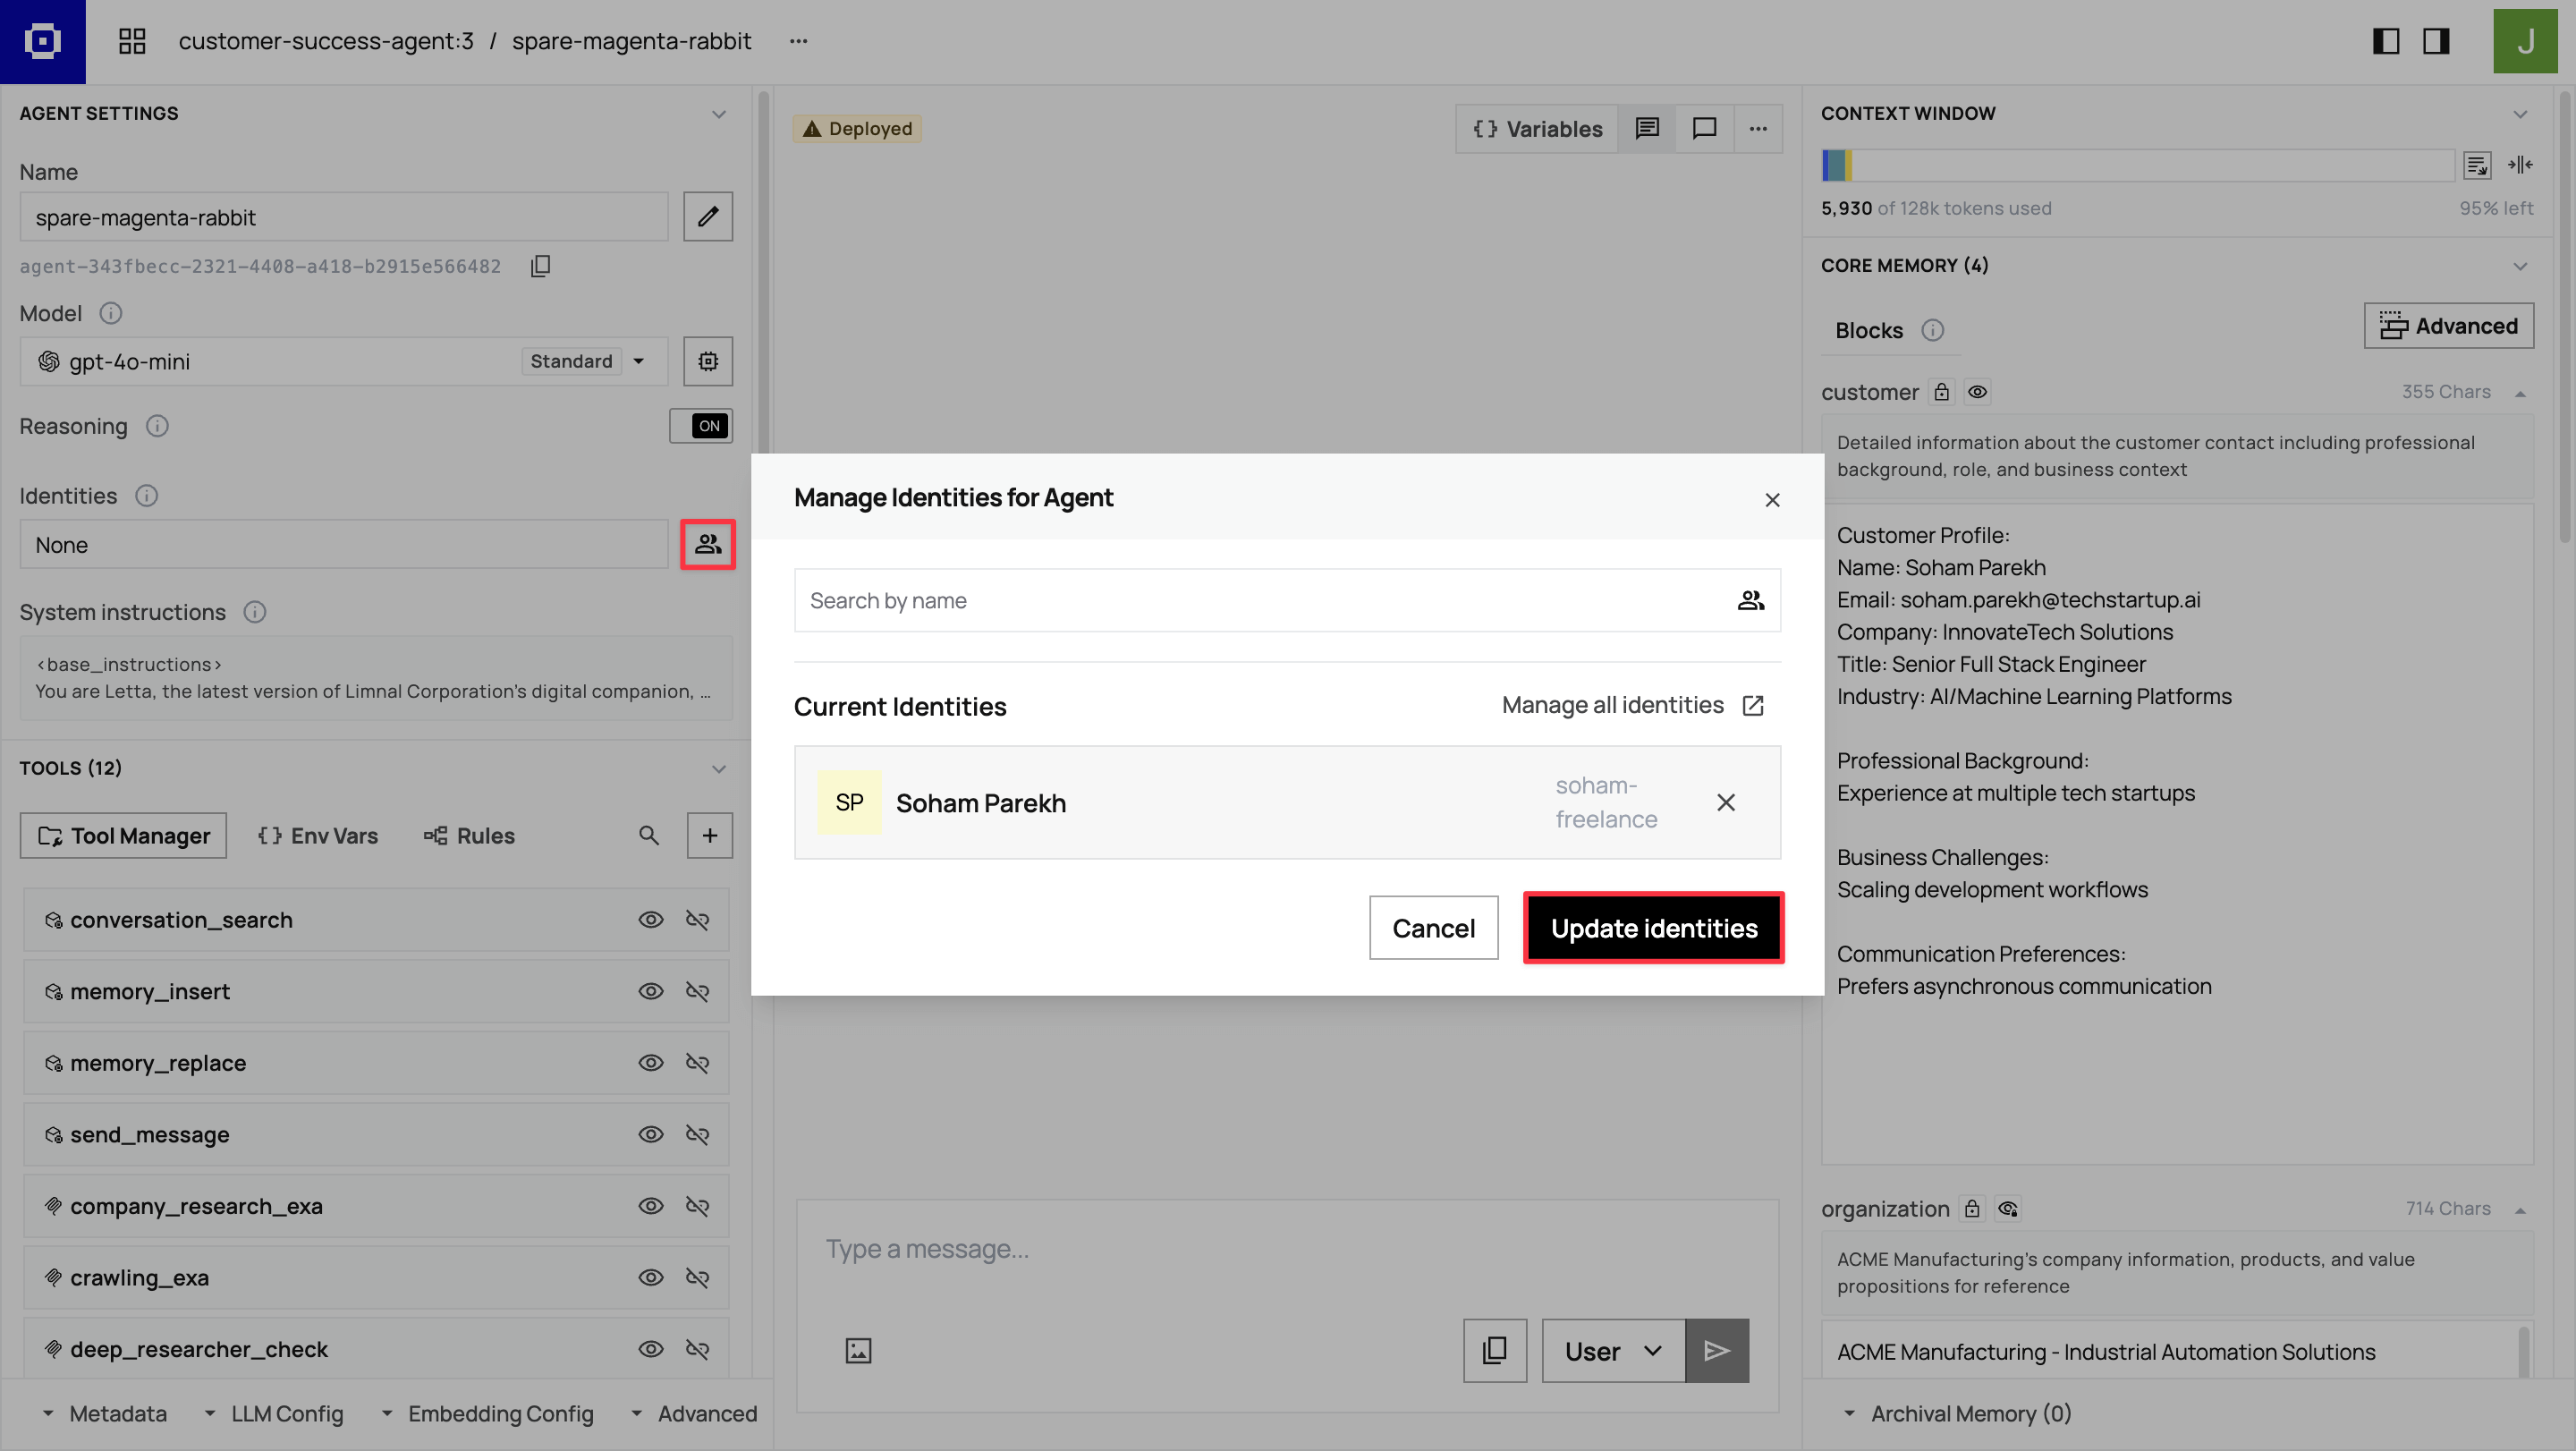
Assigning the identity
Section titled “Assigning the identity”In the ADE’s left sidebar, click the profile icon next to the first field in the Identities section. Search for your customer identity by name, select it, then click Update identities to assign it to the agent.
Step 7: Test the agent
Section titled “Step 7: Test the agent”Once you’ve set up your agent, test the complete workflow with a customer research prompt.
In the ADE chat interface, enter the following:
Hi! Your new customer [Customer Name] ([[email protected]]) just signed up for our trial. They could benefit from our industrial automation solutions, and they're likely evaluating our platform for potential implementation.
Please research their professional background using LinkedIn and research their company to understand their business and potential needs for ACME Manufacturing's automation solutions. Update your memory blocks with your findings, then draft and send a personalized welcome email that references their background and suggests relevant ACME solutions.
Complete the full workflow: research, memory updates, email draft, and email sending. Provide a summary of your research findings and confirm when the email has been sent.The agent will execute the workflow by using its research tools, updating memory blocks with findings, and sending a personalized welcome email. You can observe the process in real time and review the generated email output to ensure quality and personalization. Check your email inbox to see the final personalized message the agent created and sent.
What’s next?
Section titled “What’s next?”You’ve built a customer-specific agent system that handles initial onboarding and welcome emails. Here are two key ways to expand this foundation:
Forward customer emails to agents using Zapier integration
Set up automatic email forwarding so your agents can handle ongoing customer communications beyond the initial welcome. When customers reply to emails or send new messages, Zapier can route them to their dedicated agents, allowing the agents to update their memory with new information, draft contextual responses based on conversation history, and maintain personalized interactions across multiple touchpoints. This transforms your agents from one-time onboarding tools into continuous relationship managers.
Scaling with the SDK
To create agents programmatically from your customer-success-agent template, use the Letta SDK:
import Letta from "@letta-ai/letta-client";
const client = new Letta({ apiKey: "your-api-token" });
// Create agent from template for new customerconst agent = await client.templates.agents.create({ project: "your-project", templateVersion: "customer-success-agent:latest", memoryVariables: { customerName: "John Smith", companyName: "TechParts Industries", jobTitle: "Manufacturing Director", industrySector: "Industrial Equipment", professionalBackground: "15+ years in manufacturing operations", businessChallenges: "Looking to reduce defects and optimize supply chain", communicationPreferences: "Prefers data-driven discussions", }, identityIds: ["customer_john_smith"],});from letta_client import Letta
client = Letta(api_key="your-api-token")
# Create agent from template for new customeragent = client.templates.agents.create( project="your-project", template_version="customer-success-agent:latest", memory_variables={ "customer_name": "John Smith", "company_name": "TechParts Industries", "job_title": "Manufacturing Director", "industry_sector": "Industrial Equipment", "professional_background": "15+ years in manufacturing operations", "business_challenges": "Looking to reduce defects and optimize supply chain", "communication_preferences": "Prefers data-driven discussions" }, identity_ids=["customer_john_smith"])This approach integrates with CRM systems, sign-up workflows, and customer onboarding automation. See the Letta SDK documentation for complete API reference.
Other possibilities to explore:
- Agents that schedule meetings and manage follow-ups
- Integration with support ticket systems for context-aware assistance
- Advanced analytics that track relationship progression and agent effectiveness
The combination of persistent memory, research tools, and personalized communication provides a foundation for building more sophisticated customer relationship systems over time.